
Chemistry of Polymers
A
uthor: Judith Exler (Kollman, Christopher S., Chem 13 News, January 1994)
Date Created: 2008
Subject: Chemistry
Level: High school
Standards: New York State – www.emsc.nysed.gov/ciai/
Standard 1 – Analysis = inquiry and design
Standard 4 – The physical setting
Standard 6 – Interconnectedness; common themes
Standard 7 – Interdisciplinary Problem solving
New York State – Chemistry core curriculum
VII.6 – Types of organic reactions include addition, substitution,
polymerization, esterification, fermentation, saponification and
combustion.
Schedule: Three 45 minute classes
Objectives:
Students will review solubility/polarity and
intermolecular forces while being introduced
to physical properties of polymers.
Students will:
• Test a variety of plastics for solubility,
density, and melting point.
• Students will use the results of their tests
to build a concept map for determining the
identity of an unknown plastic.
• Students will attempt to determine the
identity of an unknown plastic.
• Students will analyze their concept maps
and suggest improvements.
• Students will be able to explain how
polarity affects solubility.
• Students will be able to explain the
relationship between intermolecular
forces, boiling point, and bonding.
• Students will be able to compare the mass
of two different polymers when given the
volume and the density.
Vocabulary:
Solubility
Intermolecular forces
Polymer
Mass
Bonding
Polarity
Boiling point
Density
Volume
Polymerization
Materials:
For Each Pair:
Safety Goggles
One sheet #6 plastic
(day 3)
Activity Sheets
Set of plastic pieces
4 Beakers
70-90% isopropyl
alcohol
Mazola corn oil
Water
Stirring rod
Beaker tongs
Small tongs (to pick
up plastic pieces)
or forceps
Hot plate
For teacher:
Copper wire
Alcohol or Bunsen
burner
Matches
Toaster oven,
aluminum foil,
safety mitts
(day3)
Safety:
Students should wear safety goggles during
Explore activities on the first two days.

Chemistry of Polymers
- 2 –
Science Content for the Teacher:
Student pre-knowledge
During the fall semester, students were introduced to the concepts of density, solubility
(types of bonding), and intermolecular forces (melting/boiling points). In order to access
previous knowledge and put it into long-term memory, repetition is required.
Polymer Basics
Polymers are made up of chains of smaller molecules called monomers. A biological
example is protein which is made up of amino acids. Most plastics are derived from
petroleum products. The physical and chemical properties of a polymer depend on the
monomer that it is made of. Some differences between plastics can be seen, felt or
smelled. (For example, one can burn a plastic and observe its odor, texture, and color of
the flame.) Other differences that can be tested include: melting point, solubility, density,
bounciness, transmission of polarized light, and glass transmission temperature*. These
properties can be modified by techniques such as adding fillers, plasticizers, and pre-
heating. New plastics are made by combining different monomers in order to obtain
desired properties.
Intermolecular forces
The greater the intermolecular forces between molecules, the higher the melting and
boiling temperatures. Polar molecules have greater intermolecular forces than nonpolar
molecules because the slightly negative end of one molecule is attracted to the slightly
positive end of another molecule (dipole-dipole attraction). Hydrogen bonding between
molecules is a very strong intermolecular force. The bigger the molecule, the more of it
there is to exert an intermolecular force so polymers generally have stronger
intermolecular forces than the monomers that they are composed of.
Polyethylene is very nonpolar so it melts at low temperatures compared to many other
plastics.
Kevlar is a polyamide. Amide groups can form hydrogen bonds between adjacent chains:
the positive hydrogen atoms in N-H groups of one chain are strongly attracted to the
oxygen atoms in C=O chains. Kevlar can withstand temperatures up to 400° C (and as
low as -198° C).
*Glass transition temperature- below this temperature, plastics become brittle.

Chemistry of Polymers
- 3 –
Preparation:
Teacher set-up
1. When you are setting up for this lab remember to keep flammables liquids away from
hot plates and flames. Also make sure that students are wearing safety glasses and not
breathing in fumes during this experiment.
2. If you do not want your students to do the copper wire test on their own, have them
bring their plastics up to you for testing. (You can ask individual groups to come up
every 3 to 4 minutes.)
3. Each group needs to have samples of the plastics being tested. Ten pellets of each
plastic are recommended.
4. If your school doesn’t allow the use of acetone, you can find it in some nail polish
removers. Check the bottle to make sure that it is the active ingredient in the nail
polish that you are buying. Using fingernail polish instead of acetone takes more time
so check how long it takes the plastic to soften before doing this lab. Also, throw the
acetone-covered pellets away in a hazardous waste container.(You need to use a fume
hood with acetone).
5. Use 70 to 90 % isopropyl alcohol for the alcohol float/sink test. To prepare 100 mL of
alcohol solution 65 mL of 70 % isopropyl alcohol in a 250 mL beaker with 35 mL of
water.
Mazola corn oil has the correct density for separating plastic #4 and 5.
Classroom Procedure: Day 1
Engage (Time: 5-10 minutes)
Teacher asks the students what are some organic molecules in the body. (Hint: They
contain carbon and hydrogen.) Teacher explains that “poly- means “many” and – “mer”
means “part.” (Teacher may elicit meaning of polymer.) She draws a picture of two
monomers on the board and then shows how they the bonds open up when they join
together during polymerization.
Explore (Time: 25 minutes)
Students collect data on how their polymers react to different tests.
Explain (Time: 10 minutes)
Students review their results and hypothesize some reasons for the differences between
the plastics. The teacher leads them into a discussion of solubility and polarity.
Expand –Homework
Students look at different containers that they use at home. They should list 5 examples
of containers (for example: Beautiful Hair shampoo) and their recycle number.
Classroom Procedure: Day 2
Engage (Time: 5-10 minutes)

Chemistry of Polymers
- 4 –
Teacher asks a question about the properties of Kevlar (for bullet proof vests) versus
polypropylene. Kevlar has a melting point of 400°C and polypropylene has a melting
point of 160 to 170° C. Obviously, Kevlar must have stronger intermolecular forces.
What are some examples of strong intermolecular forces? Teacher tries to elicit hydrogen
bonding, polarity, structure which might cause intertwining of polymer strands (like
spaghetti).
Explore (Time: 10 minutes concept map; 15 minutes testing)
Students use a template (as a scaffold) to create a concept map using density in order to
determine the identity of four different plastics. Then they test the plastics and
hypothesize what the four plastics were.
Explain (Time: 10 minutes)
Groups report on their results and what they could change their testing procedure to
improve it. Teacher elicits how students used (or didn’t use) the density data provided in
order to set up their concept map. Teacher clears up misconceptions about density.
Classroom Procedure:Day 3
Engage (Time: 10 minutes )
Do now: What do you know about polymers and polymerization?
Teacher makes a KWL chart using the answers from the do-now. The teacher then asks
the students if they have any questions about polymers. If the students failed to provide
important concepts (or questions) about polymers, she then asks the students some
questions and, either puts their answers under K or puts the question under W.
Explain (Time: 10 minutes)
a. Teacher goes over the answers to W.
b. Teacher explains the day’s activity. Today we are going to use a piece of polystyrene
container to show the property of memory that some plastics have. Many plastics are
heated and then stretched into a particular shape. Some of these plastics will return t to
their original shape when they are reheated. We are going to use this property to make
necklaces. You will be assigned a monomer. Write the name of the polymer, and draw a
picture of the corresponding monomer on the plastic with a permanent magic marker.
You can add other designs to it. Make a hole in it where you would like to put string.
Explore (Time: 10 minutes)
Students make “shrink dinks.”
Synthesis (Time: 15 minutes)
The teacher throws a potato (or other object) to one student who has to tell the class
something that he knows about polymers. He then throws the potato to another student
who adds another fact. As soon as the student has contributed to the class, the teacher will
take the plastic artwork and put it in a 163° C (325° F) toaster oven for 4 minutes. If there

Chemistry of Polymers
- 5 –
isn’t time for some students’ work to go in the oven during class, the teacher will put it in
after class and return it the next day.
Assessment:
The following rubric can be used to assess students during each part of the activity. The
term “expectations” here refers to the content, process and attitudinal goals for this
activity. Evidence for understanding may be in the form of oral as well as written
communication, both with the teacher as well as observed communication with other
students. Specifics are listed in the table below.
1= exceeds expectations
2= meets expectations consistently
3= meets expectations occasionally
4= not meeting expectations
Engage Explore Explain Expand/Synthesis
1
Shows leadership in
the discussion and
offers creative ideas
reflecting a good
understanding of
chemistry,
All investigations are
completed in a timely
manner. Data and
question sheet are
completely filled out.
Seen to be actively
participating when
teacher walks around
the room.
Group is able to
present correct results
in a clear manner.
Group is able to
answer questions.
Group listens actively
during other group
presentations and asks
questions.
2
Answers do-now
questions correctly in
notebook in a timely
manner. Listens
politely to other
students.
All investigations are
completed in a timely
manner. Seen to be
actively participating
when the teacher
walks around the
room. Data table is
filled out but some
discussion questions
are unanswered.
Group is able to
present correct
answers in a clear
manner. Group is able
to answer questions.
Group needs one or
two reminders to
listen quietly to other
groups. No questions
asked of other groups.
3
Copies answers from
board within 5
minutes after they are
written down. May
need to be asked to
quiet down once or
twice.
Data table and
discussion questions
are completely
answered. No active
participation noted.
Group is able to
present some correct
answers. Group needs
to occasionally be
asked for clarification
or to speak up. Group
needs two or three
reminders to listen
quietly to other
groups.
4
Talks to friends
during brainstorm
about non-chemistry
topics. Doesn’t take
any notes.
Student is not noted
by the teacher to be an
active participant.
Data table and
discussion questions
are incomplete.
Group uses some
evidence that is
flawed or just doesn’t
present answers.
Several reminders are
needed for the group
to be quiet during
other presentations.

Chemistry of Polymers
- 6 –
Extension Activities:
1- Students can do a lab investigating the density of all 6 recyclable plastics (HOP
on plastics activities)
2- Students can see what happens if you burn different plastics. (Brian Niece’s
website)
3- Students can make polymers such as slime, glueup, nylon 66.
Supplemental Information:
The following books and websites are recommended:
Polymer Chemistry: Introduction to an Indispensable Science
By: David Teegarden, NSTA Press, 2004
www.polymerambassadors.org/index.html
www.pslc.ws/macrog.htm
www.americanchemistry.com-
click on “learning center” and then “hands on plastic”
www.assumption.edu/users/bniece/Olympiad/Olympiad.html
www.matse1.mse.uiuc.edu/~tw/home.html
www.polymers.eezway.com-they sell samples of polymers
Safety:
Safety goggles should be worn at all times during the “explore” portion of the activity on
the first two days.
Acknowledgments:
I wish to thank:
Principal Steve Satin and Assistant Principal Amal Abadi, Norman Thomas High School,
NYC.
CCMR Staff: John Sinnott, Kit Umbach, Ron Kemp, Anthony Condo, Maura Weathers,
Yuanming Zhang, Mick Thomas, John Grazul, Nev Singhota, Kevin Dilley, Jane Earle
Wilson Laboratory: Lora K. Hine, Ken Finkelstein
Cornell Nanoscale Science: Melanie-Claire Mallison
Jay Dubner: Summer Research Program for Teachers
Cornell University
National Science Foundation

Chemistry of Polymers
- 7 –
Activity Sheet One
Student Name_____________ Period_________
Procedure:
1. Notice the test areas in the room. Some tests are to be done only at those locations,
while others will be performed at your lab desk.
2. Acetone Test- Put the pellets in the fingernail polish container. Wait at least 5
minutes before removing them and testing for solubility. If one of the plastics has
softened slightly, then it is plastic #5 (polystyrene). (Acetone is a nonpolar solvent.)
(Note: KEEP THIS TEST AREA AWAY FROM FLAMES. Acetone is highly
flammable and must be kept away from flames and covered when not in use. Have
tongs or forceps available.
3. Water test
a. Solubility-Put plastic pellets in water and stir. Since water is a polar
molecule, any plastic that dissolves in water is also a polar molecule (plastic
#7-other-biodegradable packing peanuts).
b. Density- Does the plastic sink or float in water? (Density of water = 1 gm/mL)
4. Alcohol test- Does the plastic sink or float in alcohol? Use tongs or forceps to remove
plastic pellets. Discard plastics in beaker or other container which has been provided
for each group. (Density of alcohol solution is 0.93 g/mL).
5. Oil test-Put the plastics in the oil. Do they sink or float? Use tongs or forceps to
remove and discard plastics. (Density of corn oil is 0.917 g/mL)
6. Heat test-Heat pellets in boiling water for 30 seconds. Remove with tongs and test for
softening. (Note: although PET has a melting point of between 250 to 260°C, it will
start to soften at 100° C). The greater the intermolecular forces holding the molecules
together, the higher the melting/boiling point will be.
7. Copper wire test-Using forceps, the teacher will hold the 5 cm length of copper wire
in the hot part of the flame of a Bunsen burner or alcohol burner until it is red hot.
She will remove from the flame and carefully touch a plastic pellet with the hot wire.
It may stick to the wire at this point so she will need to take another pair of forceps to
pull the pellet off the wire. Place the wire with some plastic glob on it (not the pellet)
back in the flame, observing the color of the flame that comes from the glob. You will
notice a green or orange flame color. Quench the sample in a beaker of water to stop
the burning and cool the wire. If there is more time, students may do this test at their
lab desks.

Chemistry of Polymers
- 8 –
Data table
Test 1-PETE 2-HDPE 3-PVC 4-LDPE 5-PP 6-PS 7-other
Water
solubility
Acetone
solubility
Sink/float
water
Sink/float
alcohol
Sink/float
oil
Copper
wire test
Heat test
Questions:
1. Which three plastics had the highest density?
2. Which plastic exhibited the lowest density?
3. The density of LDPE (low density polyethylene) was between what two numbers?
4. Explain in terms of intermolecular forces, why PVC (polyvinyl chloride) has a lower
melting point than PP (polypropylene)?
5. Explain in terms of molecular polarity, why the biodegradable peanuts are more
soluble in water than the polystyrene peanuts.
The following are the codes and abbreviations for recyclable plastics:
1. PET - polyethylene terephthalate 5. PP - polypropylene
2. HDPE - high density polyethylene 6. PS - polystyrene
3. PVC - polyvinyl chloride 7. other
4. LDPE - low density polyethylene
Chemistry of Polymers
- 9 –
Activity Sheet Two
Today you will design and test a flow chart to distinguish between four different plastics,
you will perform the experiment, and then we will discuss it as a class.
The density of water is 1.00 g/mL, the density of corn oil is 0.93 g/mL, and the density of
the alcohol solution is 0.917 g/mL. The four plastics that you will be testing are PET,
HDPE, LDPE, and PP. (Note: PS or PVC may be used instead of PET according to
availability. (10 minutes to design concept map)
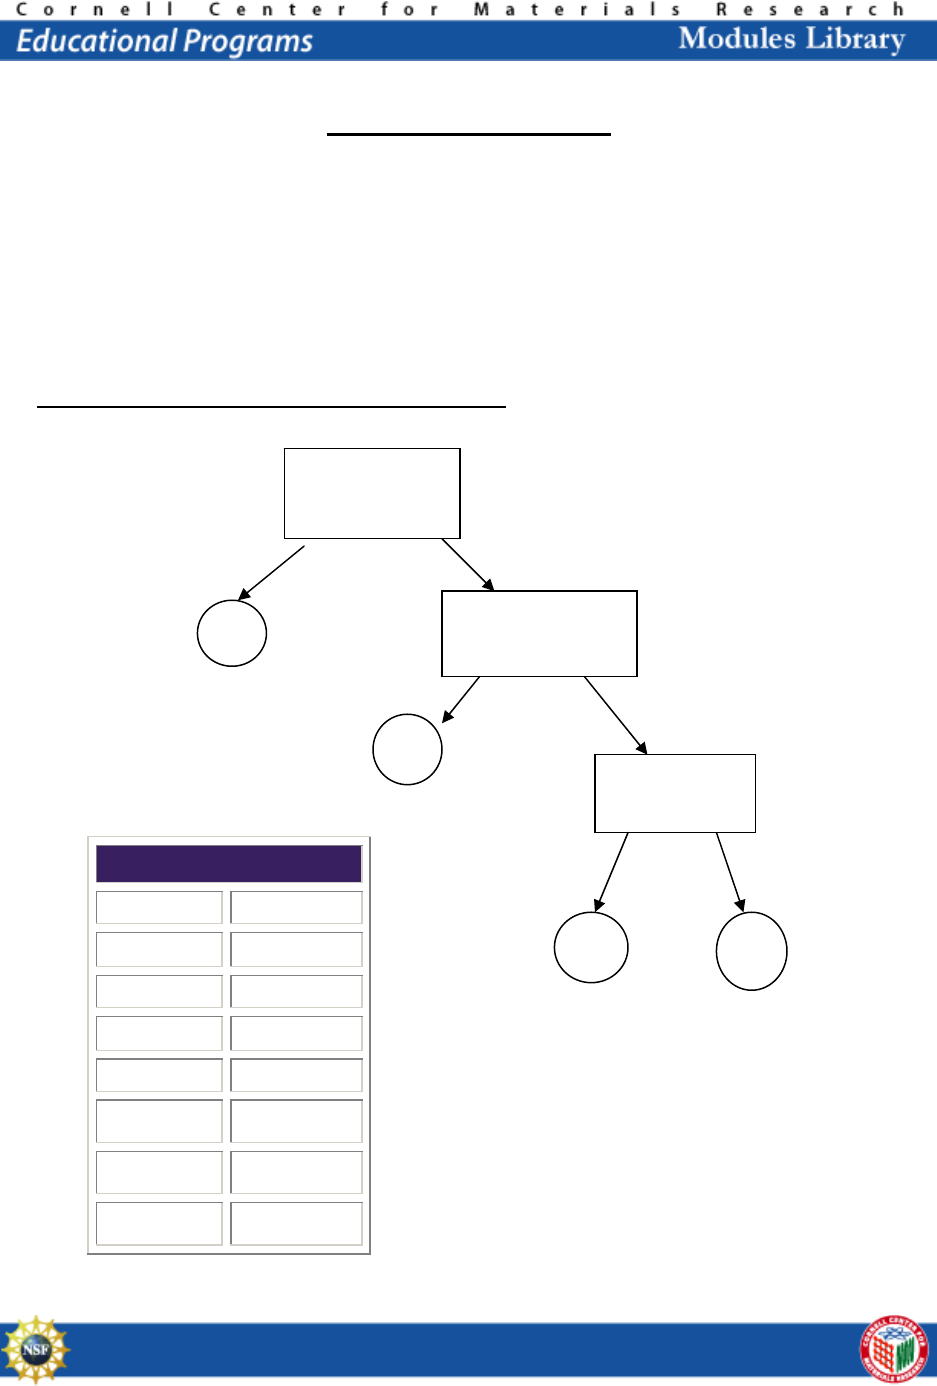
Concept Map for Determining Type of Plastic
Density Table
Substance Density
Water 1.00
(1) PET 1.38-1.39
(2) HDPE 0.95-0.97
(3) PVC 1.16-1.35
(4) LDPE 0.92-0.94
(5) PP 0.90-0.91
(6) PS 1.05-1.07

Chemistry of Polymers
- 10 –
You have 10 minutes to test the plastics and determine which was which.
Questions (Each group is required to orally answer at least one question depending on
time constraints)
1. Which plastic was A, B, C, and D?
2. Why would a 150 pound fat person float more easily on water than a 150 pound
muscular person? Explain your answer.
3. How easy was it for you to identify the plastics using your concept map?
4. What changes would you suggest in order to improve your concept map?
5. Could you improve your concept map by adding any other tests or observations?
Explain.

Chemistry of Polymers
- 11 –
Common Plastic Resins Used in Packaging
Polyethylene Terephthalate (PET or PETE):
High Density Polyethylene (HDPE):
Vinyl (Polyvinyl Chloride or PVC):
Low density polyethylene (LDPE):
Polypropylene (PP):
Polystyrene (PS):
Resin Identification Code
The Society of the Plastics Industry, Inc. (SPI) introduced its resin identification coding
system in 1988 at the urging of recyclers around the country.
