
WORK ANYWHERE WITH ADOBE DOCUMENT CLOUD | Set up a workow in Adobe Sign
1
WORK ANYWHERE WITH ADOBE DOCUMENT CLOUD
Set up a workow in Adobe Sign
Oen you have forms with multiple signatures and need routing logic, or even
calculations. Let’s see how to use Adobe Sign’s Workow Designer tool to help
streamline the process.
Requirements:
1. An Adobe Sign account
Please note: If you do not have an account already, please contact your Adobe team or IT administrator.
2.A PDF form to post
This example will show the process using HomeCare
Requisition Form, which you can find attached to this
document for your own use.
is guide covers:
PART 1
Create a document template with form fields, ready to send. Star
t >
PART 2
Set up a new workflow to route the agreement in pre-determined steps, then
put that workflow to use. Start >
PART 3
Track the progress of the workflow. Start >
Note: If your Adobe Sign account doesn’t show you the option to create a workflow, check
with your account administrator to verify that the feature has been enabled in Global
Settings.

WORK ANYWHERE WITH ADOBE DOCUMENT CLOUD | Set up a workow in Adobe Sign
2
PART
Create a library template
To set up a workow in Adobe Sign, you’ll need an existing library template to work
from. In this rst step, we’ll set up a template that you can access from your library at
any time, whether using it in a workow or just sending it out for signature.
1. In your web browser, navigate to https://documentcloud.adobe.com.
2. Sign in using your username and password credentials.
3. From the top menu bar, hover over Sign, then select Request Signatures. is will take you
to Adobe Sign.
4. From the Home screen, click on Create a reusable template.

WORK ANYWHERE WITH ADOBE DOCUMENT CLOUD | Set up a workow in Adobe Sign
3
5. Set the Template Name to the desired name for the form.
Ex. HomeCare Requisition.
6. Drag and drop the form you want to use for your web form (in this example, HomeCare
Requisition Form.pdf ) from your File Explorer (Windows) or Finder (Mac) into the Files section.
7. In the options under Who can use this template, select Any user in my organization or Any
user in my group to make this form available for others to access.
8. Click on Preview & Add Form Fields to prepare the form le.

WORK ANYWHERE WITH ADOBE DOCUMENT CLOUD | Set up a workow in Adobe Sign
4
9. e drag and drop authoring environment allows you to add llable form elds to your le.
Simply drag elds from the right rail onto your document in the desired spaces.
Or, let Adobe Sign suggest form elds for you: Adobe Sensei’s AI technology can detect form
eld candidates based on analyzing the content, aributes, and relative placement of aributes
on the form. In the authoring environment, look in the upper le to nd the blue alert that says
“Form elds were detected in this document. On each page, click this buon to place them.”
10. When the form setup is complete, click Save in the lower right.

WORK ANYWHERE WITH ADOBE DOCUMENT CLOUD | Set up a workow in Adobe Sign
5
PART
Create & use your workow
Now that you have created your reusable library template, you need to create a
workow to dene the routing of the document.
1. In the main Adobe Sign navigation bar, click on Account.
2. This will open your account preferences. From the left sidebar, click on Workflows.
3. This screen is where you will define your new workflow or access existing workflows.
Click on the icon to create a new workflow.
4. In the Workflow Name field, give your new workflow a unique name.
Ex. HomeCare Requisition
5. The Instructions for Sender let you specify what instructions you would like to be displayed to
the signer when they are completing the sending step. Enter any information you need to be
displayed when someone is using this workflow.
Similar to determining who can access your template (Step 1), you can define who can access
this workflow based on your agency’s groups. For more info about working with groups,
click here.
6. Now you will congure the agreement that will be used in this workow. In the le sidebar,
click on Agreement Info.

WORK ANYWHERE WITH ADOBE DOCUMENT CLOUD | Set up a workow in Adobe Sign
6
7. Next to Agreement Name, click on the pencil icon to edit the name of the agreement that will
be sent out during this workflow.
Ex. Requisition name
8. In the Message field, you can specify the default message that will be sent in the emails to each
of the recipients.
9. If someone in your agency needs to be copied on the agreement, add their email address in the
CC field. You can use the Minimum and Maximum boxes to set the number of CC emails
required, or check the box marked Editable to allow the sender to edit the email address(es) in
the CC field each time the workflow is used.
10. When you have nished conguring the agreement, you will be ready to dene the routing
order for this workow. In other words, who needs to take what action, and when? In the le
sidebar, click Recipients.
11. Any workow starts with one required participant: the signer. We’ll start by conguring this
individual’s information, then add additional signers and steps. In the workow diagram, select
the Signer icon.

WORK ANYWHERE WITH ADOBE DOCUMENT CLOUD | Set up a workow in Adobe Sign
7
12. Click the pencil icon next to Signer to change the name of this participant to something specic
to this agreement and workflow.
Ex. Certifying official
13. If the rst signer is the person initiating the workow, select the box labeled is is the sender.
Congure any other options for this individual: determine this recipient’s role, select whether
this participant is required, and choose any extra identity verication needed. If you have an
email address that you would like to have pre-dened for a given signer, enter it in the Email
eld. e email address you specify will be populated automatically in the workow.
14. When you’re done making changes, click OK.
15. Now you can add the next participant to the workow — the person who will receive the
document aer the rst signer has completed his or her step. Click on the Plus sign
under
your rst signer to add another recipient.
16. You can now go through the same process as you did for the rst signer: click the Signer you
want to edit, then change the details as needed. It’s recommended that you change the name
of the second recipient (ex. Requisitioner).
17. Click on the Plus sign to add another recipient aer the second recipient.
18. Click Signer to edit the third signer.
19. Click the pencil icon to change the name of the third recipient.
Ex. Approving official.
2
0. In the left sidebar, click on Documents.
WORK ANYWHERE WITH ADOBE DOCUMENT CLOUD | Set up a workow in Adobe Sign
8
21. In the Document Title eld, enter your form name.
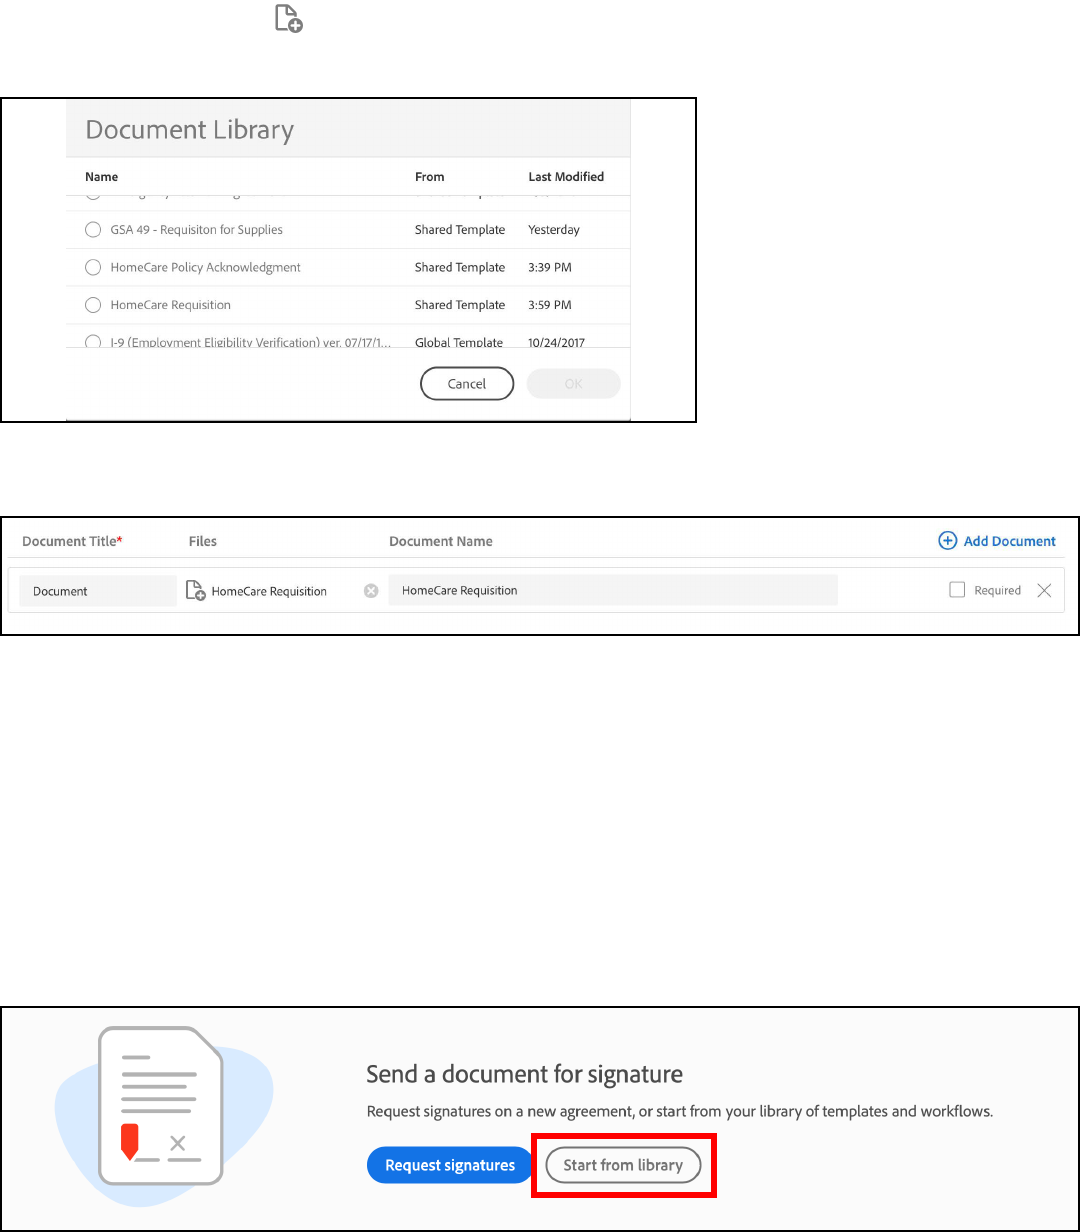
22. Click on the Add File buon.
23. From the list, select the template you created in a previous step.
24. Check the box marked Required.
25. In the top right corner, click the blue buon marked Activate.
26. Click OK.
Now you’re ready to use your workow to request signatures. Here are the steps for
beginning a new request using the workow you just created.
1. If you are not already logged in, log into your Adobe Sign account.
2. In the Home screen, click on Start from library.

WORK ANYWHERE WITH ADOBE DOCUMENT CLOUD | Set up a workow in Adobe Sign
9
3. In the lehand menu, select Workows.
4. Select your Workow from the list.
5. Click Start.
6. Specify the email addresses where needed for each recipient.
7. Set agreement name and message if those have not already been entered.
8. Click Send.
WORK ANYWHERE WITH ADOBE DOCUMENT CLOUD | Set up a workow in Adobe Sign
10
PART
Track the request
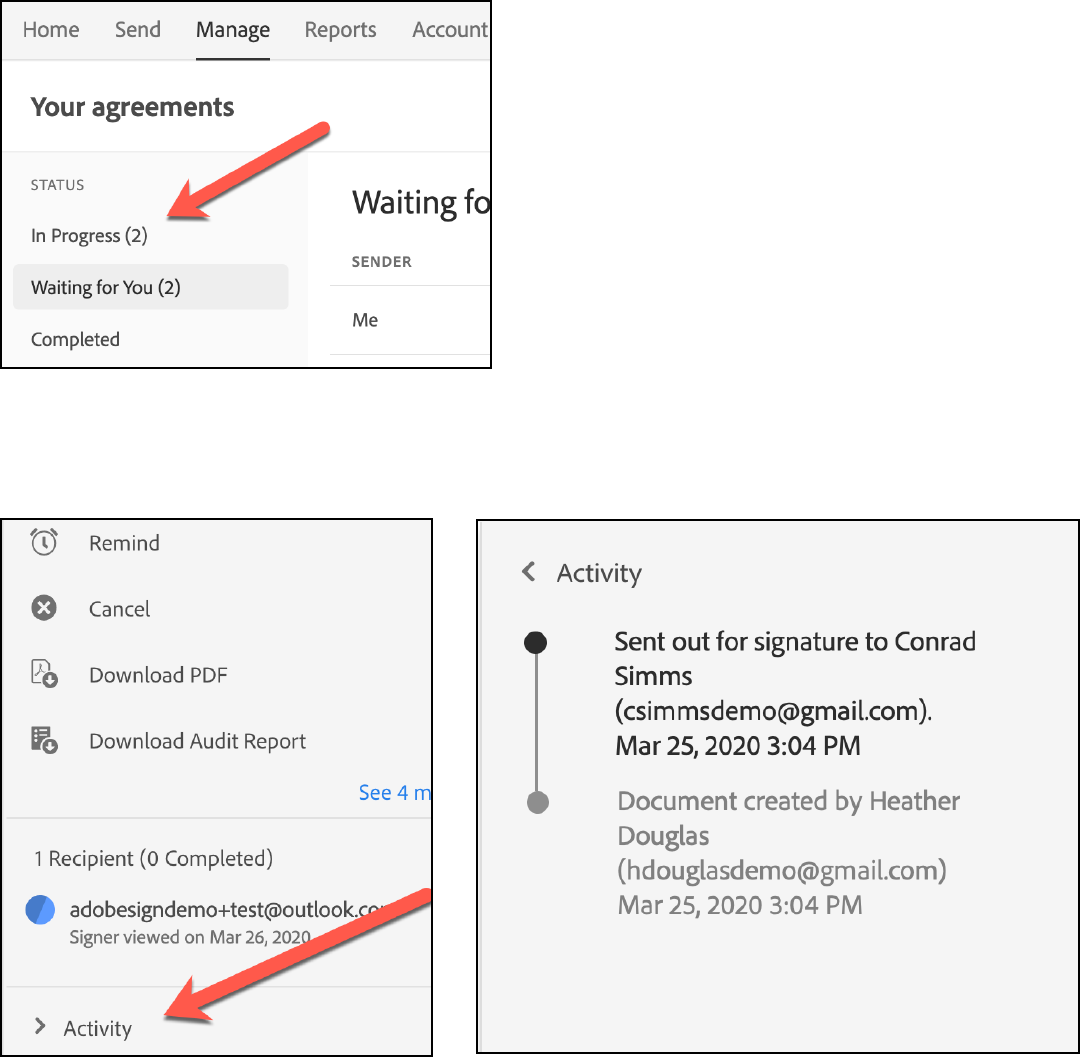
While the agreement is out for signature, you can track its current status.
1. Log into Adobe Sign.
2. Click on Manage in the navigation bar.
3. In the sidebar, select In Progress.
4. Select your agreement workow from the list.
5. In the right sidebar, click Activity to view the document’s history and current status.
