

1
Thank you for purchasing our product. Crystal Vision Technology is committed to providing
our customers with a high quality, reliable security solution.
This manual refers to the following models:
CVT9604E / CVT9608E / CVT804A / CVT808A
For the latest online manual, downloads and product updates, and to learn about our
complete line of accessory products, please visit our website at: www.cvtus.com
WARNING
RISK OF ELECTIC SHOCK DO NOT OPEN
WARNING: To reduce the risk of electric shock do not remove cover, no user serviceable
parts inside.
Refer servicing to qualified service personnel.
The lightning flash with arrowhead symbol, within an equilateral triangle, is intended to alert
the user to the presence of uninsulated ‘dangerous voltage’ within the product’s enclosure
that may be of sufficient magnitude to constitute a risk of electric shock.
The exclamation point within an equilateral triangle is intended to alert the user to the
presence of important operating and maintenance (servicing) instructions in the literature
accompanying the appliance.
WARNING: To prevent fire or shock hazard, do not expose the NVR system & power
adapters to rain or moisture.
CAUTION: To prevent electric shock, match wide blade of the plug to the wide slot and fully
insert.
Important Safeguards
In addition to the careful attention devoted to quality standards in the manufacturing process
of your product, safety is a major factor in the design of every instrument. However,
safety is your responsibility too. This sheet lists important information that will help to ensure

2
your enjoyment and proper use of the product and accessory equipment. Please read
them carefully before operating and using your product.
General Precautions
1. All warnings and instructions in this manual should be followed.
2. Remove the plug from the outlet before cleaning. Do not use liquid aerosol detergents. Use
a water-dampened cloth for cleaning.
3. Do not use this product in humid or wet places.
4. Keep enough space around the product for ventilation. Slots and openings in the storage
cabinet should not be blocked.
5. It is highly recommended to connect the product to a surge protector to protect from
damage caused by electrical surges. It is also recommended to connect the product to an
uninterruptible power supply (UPS), which has an internal battery that will keep the product
running in the event of a power outage.
Installation
1. Read and Follow Instructions: All the safety and operating instructions should be read
before the product is operated. Follow all operating instructions.
2. Retain Instructions: The safety and operating instructions should be retained for future
reference.
3. Heed Warnings: Comply with all warnings on the product and in the operating
instructions.
4. Polarization: Do not defeat the safety purpose of the polarized or grounding-type plug. A
polarized plug has two blades with one wider than the other. A grounding type plug has
two blades and a third grounding prong. The wide blade or the third prong are provided
for your safety. If the provided plug does not fit into your outlet, consult an electrician for
replacement of the obsolete outlet.
5. Power Sources: This product should be operated only from the type of power source
indicated on the marking label. If you are not sure of the type of power supplied to your
location, consult your video dealer or local power company. For products intended to
operate from battery power, or other sources, refer to the operating instructions.
6. Overloading: Do not overload wall outlets or extension cords as this can result in the risk
of fire or electric shock. Overloaded AC outlets, extension cords, frayed power cords,
damaged or cracked wire insulation, and broken plugs are dangerous. They may result in
a shock or fire hazard. Periodically examine the cord, and if its appearance indicates
damage or deteriorated insulation, have it replaced by your service technician.
7. Power-Cord Protection: Power supply cords should be routed so that they are not likely
to be walked on or pinched by items placed upon or against them. Pay particular
attention to cords at plugs, convenience receptacles, and the point where they exit from

3
the product.
8. Surge Protectors: It is highly recommended that the product be connected to a surge
protector. Doing so will protect the product from damage caused by power surges. Surge
protectors should bear the UL listing mark or CSA certification mark.
9. Uninterruptible Power Supplies (UPS): Because this product is designed for
continuous, 24/7 operation, it is recommended that you connect the product to an
uninterruptible power supply. An uninterruptible power supply has an internal battery that
will keep the product running in the event of a power outage. Uninterruptible power
supplies should bear the UL listing mark or CSA certification mark.
10. Ventilation: Slots and openings in the case are provided for ventilation to ensure reliable
operation of the product and to protect it from overheating. These openings must not be
blocked or covered. The openings should never be blocked by placing the product on a
bed, sofa, rug, or other similar surface. This product should never be placed near or over
a radiator or heat register. This product should not be placed in a built-in installation such
as a bookcase or rack unless proper ventilation is provided and the product
manufacturer’s instructions have been followed.
11. Attachments: Do not use attachments unless recommended by the product
manufacturer as they may cause a hazard.
12. Water and Moisture: Do not use this product near water — for example, near a bath tub,
wash bowl, kitchen sink or laundry tub, in a wet basement, near a swimming pool and the
like.
13. Heat: The product should be situated away from heat sources such as radiators, heat
registers, stoves, or other products (including amplifiers) that produce heat.
14. Accessories: Do not place this product on an unstable cart, stand, tripod, or table. The
product may fall, causing serious damage to the product. Use this product only with a cart,
stand, tripod, bracket, or table recommended by the manufacturer or sold with the
product. Any mounting of the product should follow the manufacturer’s instructions and
use a mounting accessory recommended by the manufacturer.
15. Camera Extension Cables: Check the rating of your extension cable(s) to verify
compliance with your local authority regulations prior to installation.
16. Mounting: The cameras provided with this system should be mounted only as instructed
in this guide or the instructions that came with your cameras, using the provided
mounting brackets.
17. Camera Installation: Cameras are not intended for submersion in water. Not all cameras
can be installed outdoors. Check your camera environmental rating to confirm if they can
be installed outdoors. When installing cameras outdoors, installation in a sheltered area
is required.
Service
1. Servicing: Do not attempt to service this product yourself, as opening or removing covers
may expose you to dangerous voltage or other hazards. Refer all servicing to qualified

4
service personnel.
2. Conditions Requiring Service: Unplug this product from the wall outlet and refer
servicing to qualified service personnel under the following conditions:
When the power supply cord or plug is damaged.
If liquid has been spilled or objects have fallen into the product.
If the product has been exposed to rain or water.
If the product has been dropped or the cabinet has been damaged
If the product does not operate normally by following the operating instructions. Adjust
only those controls that are covered by the operating instructions. Improper adjustment
of other controls may result in damage and will often require extensive work by a
qualified technician to restore the product to its normal operation.
When the product exhibits a distinct change in performance. This indicates a need for
service.
3. Replacement Parts: When replacement parts are required, have the service technician
verify that the replacements used have the same safety characteristics as the original parts.
Use of replacements specified by the product manufacturer can prevent fire, electric shock,
or other hazards.
4. Safety Check: Upon completion of any service or repairs to this product, ask the service
technician to perform safety checks recommended by the manufacturer to determine that
the product is in safe operating condition.
Use
1. Cleaning: Unplug the product from the wall outlet before cleaning. Do not use liquid
cleaners or aerosol cleaners. Use a damp cloth for cleaning.
2. Product and Cart Combination: When product is installed on a cart, product and cart
combination should be moved with care. Quick stops, excessive force, and uneven
surfaces may cause the product and cart combination to overturn.
3. Object and Liquid Entry: Never push objects of any kind into this product through
openings as they may touch dangerous voltage points or ‘short-out’ parts that could result
in a fire or electric shock. Never spill liquid of any kind on the product.
4. Lightning: For added protection of this product during a lightning storm, or when it is left
unattended and unused for long periods of time, unplug it from the wall outlet and
disconnect the antenna or cable system. This will prevent damage to the product due to
lightning and power line surges.

5
Preface
Thank you for purchasing Crystal Vision products. This user manual is to introduce the
operations of Crystal Vision wireless HD systems in more details. If there is any other
question which is not covered in this user manual, please contact Crystal Vision support at:
support@cvtus.com
Statement
Though we apply all efforts to make the manual complete and accurate, there could still be
some discrepancies due to products’ timely update.
The products and manual are subject to change without previous notification.
The content in this manual is only for users’ reference. We don’t promise it’s exactly the same
with the products you purchase. Detailed information is in accordance with the final products.
The accessories and parts mentioned in this manual are only for product using guide purpose
and not necessarily to be included in your purchased item.
Special Statement
Please comply with local laws and regulations when you use the surveillance devices.
About default settings
The default username for NVR is admin (administrator ID)
The default password for account admin is ‘blank’, means no password.
The default setting of NVR is to overwrite oldest recorded videos when hard drive is full.
The device will start Setup Wizard by default when NVR is powered on.

6
Table of contents
Preface ................................................................................................................................. 5
1. Product Overview
1.1 Product Introduction .................................................................................................... 9
1.2 Product Specifications ................................................................................................. 9
1.3 Product Key Features ................................................................................................ 13
2. Operation Instructions
2.1 NVR Front / Rear Panel ............................................................................................ 13
2.2 Monitor Display .......................................................................................................... 14
2.3 Mouse Operation ....................................................................................................... 14
2.4 Frequently Used Button ............................................................................................. 14
3. Installation & Connection
3.1 Installation Precautions ............................................................................................. 15
3.2 Preparations before Installation ................................................................................. 15
3.3 Camera Mounting Spots ............................................................................................ 16
3.4 Antenna mounting Tips ............................................................................................. 16
4. System Operation
4.1 Starting up ................................................................................................................. 16
4.2 Setup Guide ............................................................................................................... 17
5. System Main Menu
5.1 Split screen ................................................................................................................ 19
5.2 Video Manage ........................................................................................................... 19
5.2.1 Refresh ........................................................................................................... 19
5.2.2 Match Code .................................................................................................... 19
5.2.3 Wifi Add ........................................................................................................... 21
5.2.4 Auto Add ......................................................................................................... 22
5.2.5 Modify ............................................................................................................. 23
5.2.6 Advanced ........................................................................................................ 23
5.2.7 Delete / Delete All ........................................................................................... 23
5.2.8 Manual Edit ..................................................................................................... 24

7
5.2.9 Channel ........................................................................................................... 24
5.2.10 Wi-Fi Setup ................................................................................................... 24
5.2.11 Repeater ....................................................................................................... 24
5.3 System Setup
5.3.1 General
5.3.1.1 General ................................................................................................ 26
5.3.1.2 Time .................................................................................................... 27
5.3.1.3 Hard Drive ........................................................................................... 27
5.3.1.4 Screen ................................................................................................. 28
5.3.1.5 Error .................................................................................................... 29
5.3.2 Record
5.3.2.1 Record.................................................................................................. 29
5.3.3 Network
5.3.3.1 Network ................................................................................................ 30
5.3.3.2 DDNS ................................................................................................... 31
5.3.3.3 E-mail ................................................................................................... 32
5.3.3.4 Wi-Fi Setup .......................................................................................... 33
5.3.4 Channel
5.3.4.1 Channel info ........................................................................................ 34
5.3.4.2 PTZ ..................................................................................................... 34
5.3.4.3 Channel OSD ....................................................................................... 35
5.3.4.4 Motion Detection .................................................................................. 35
5.3.4.5 Bitrate ................................................................................................... 36
5.3.5 System
5.3.5.1 System info .......................................................................................... 37
5.3.5.2 System Log .......................................................................................... 37
5.3.5.3 User...................................................................................................... 38
5.3.5.4 System Upgrade .................................................................................. 39
5.3.5.5 Camera Upgrade.................................................................................. 40
5.3.5.6 Default Setting...................................................................................... 41
5.3.5.7 System Maintenance............................................................................ 42
5.4 Video Playback .......................................................................................................... 43
5.5 Video Backup ............................................................................................................. 44
5.6 Color Adjust ............................................................................................................... 45
5.7 PTZ Control................................................................................................................ 45

8
5.8 Manual Recording ..................................................................................................... 46
5.9 Setup Wizard ............................................................................................................. 46
5.10 Fast Network ........................................................................................................... 46
5.11 Exit System .............................................................................................................. 47
5.11.1 Log Out ......................................................................................................... 47
5.11.2 System Reboot ............................................................................................. 47
5.11.3 Close Screen Display .................................................................................... 48
5.11.4 System Shutdown ......................................................................................... 48
6. Remote View
6.1 Smartphone Setup (Android / iOS) ............................................................................ 49
6.2 CMS Software for Windows & MAC .......................................................................... 51

9
1. Product Overview
1.1 Product Introduction
The Crystal Vision wireless HD NVR system is our new generation of NVR. It supports
wireless Wi-Fi network video input, real time live view, video playback, and video backup. The
NVR system can be widely used for surveillance of home, business, office, villa, etc.
1.2 Product Specification
NVR: CVT9604E / CVT9608E
Operation System
Embedded Linux OS
NVR Channel
4 Channel / 8 Channel
Video Output
HDMI Output
1024x768, 1366x768, 1440x900,
1920x1080p
Video Resolution
720P (H.264)
Frame Per Second
25 fps Live View / 15 fps Recording
Synch-Playback
4 Channel
Video Control
Video / Capture mode Manual / Time / Motion
Playback mode Real time / Manual / Motion
Backup USB Backup
Hard Drive
Interface 1x SATA
Max Capacity 4 TB Hard Drive
External Interface
Network Interface RJ45 10M/100M (LAN)
USB interface USB 2.0 1x Front, 1x Back
Network Control
Protocol
UPnP (Plug & Play), SMTP
(Email Notification), PPPoE (dial-
up), DHCP (Automatically Obtain
an IP Address), ETC…
Power
DC 12V 3A
Consumption (without HDD)
<5 W
Working Temperature
-10c ~ 55c
Working Humidity
10% ~ 90%
Size
280 x 270 x 65 mm
Weight (without HDD)
3.2lb

10
Camera: CVT3010W
Mega Pixel
1.3MP
Operation System
Embedded Linux
Image Sensor
1/4’ Progressive Scan Senor
S/N Ratio
> 39.1dB
Resolution
1280 x 720 (16:9) High Definition
Minimum Illumination
Color: 0.1 Lux, B/W: 0.1 Lux
OSD
Date, Time, Title
White Balance
Auto
Day & Night
Auto / Color / BW
3D-DNR
Auto
Mirror / Flip
On / Off
Remote Stream
Dual Stream Mode
HD: 1280 x 720
SD: 640 x 480
Anti-thunder Level
Standard IEC61000-4-5
Power
DC12V 1A
Consumption
<6W
Interface
Connect / Rest Button, DC Power Input Port
Working Temperature / Humidity
-10c ~ 50c / 30% ~ 80% RH
Storage Temperature / Humidity
-20c ~ 60c / 20% ~ 90% RH
Size
180 x 65 x 65 mm
Weight
500g

11
NVR: CVT804A / CVT808A
Operation System
Embedded Linux OS
NVR Channel
4 Channel / 8 Channel
Video Output
HDMI Output
1024x768, 1366x768, 1440x900,
Video Resolution
720P / 1080P (H.264, H.265, H.265+)
Frame Per Second
25 fps Live View / 15 fps Recording
Synch-Playback
4 Channel
Video Control
Video / Capture mode Manual / Time / Motion
Playback mode Real time / Manual / Motion
Backup USB Backup
Hard Drive
Interface 1x SATA
Max Capacity 4 TB Hard Drive
External Interface
Network Interface RJ45 10M/100M (LAN)
USB interface USB 2.0 1x Front, 1x Back
Network Control
Protocol
UPnP (Plug & Play), SMTP
(Email Notification), PPPoE (dial-
up), DHCP (Automatically Obtain
Power
DC 12V 3A
Consumption (without HDD)
<5 W
Working Temperature
-10c ~ 55c
Working Humidity
10% ~ 90%
Size
280 x 270 x 65 mm
Weight (without HDD)
3.2lb

12
Camera: CVT20WB
Mega Pixel
2.0 MP
Operation System
Embedded Linux
Image Sensor
1/3’ Progressive Scan Senor
S/N Ratio
> 39.1dB
Resolution
1920 x 1080 (16:9) High Definition
Minimum Illumination
Color: 0.1 Lux, B/W: 0.1 Lux
OSD
Date, Time, Title
White Balance
Auto
Day & Night
Auto / Color / BW
3D-DNR
Auto
Mirror / Flip
On / Off
Remote Stream
Dual Stream Mode
HD: 1920 x 1080
SD: 640 x 480
Anti-thunder Level
Standard IEC61000-4-5
Power
DC12V 1A
Consumption
<6W
Interface
Connect / Rest Button, DC Power Input Port
Working Temperature / Humidity
-10c ~ 50c / 30% ~ 80% RH
Storage Temperature / Humidity
-20c ~ 60c / 20% ~ 90% RH
Size
180 x 65 x 65 mm
Weight
500g

13
1.3 Product Key Features
HD wireless network video recorder
Built-in high-performance high-stability Wi-Fi router module; NVRs support
802.11b/g/n protocol
Add Wi-Fi IP network camera to NVR by auto add
Video live view/ record/ playback/ backup
Easy usability (wireless auto pair, setup wizard, frequently used function menu, plug and
play)
Support IP Cameras with ONVIF & N1 protocol
Network services supported: P2P, DHCP, DDNS, PPPoE, E-Mail, etc.
Multiple alarm trigger (video loss/ motion detection) and alarm output (buzzer/E-Mail/ etc.)
Support access and control from Android/ Apple phones (or tablets)
Support access and control from PC via PC client software.
Support IP camera settings (codec, image adjustment, OSD display etc.)
Support motion detection with IPC
Support user authority management
2. Operation Instructions
2.1 NVR Front / Rear Panel
1. 10.1’ Built-in Screen 5. HDMI Output Port
2. Monitor On / Off Button 6. LAN Port
3. USB Ports 7. Power Input
4. Power / Hard Drive Indication LED 8. System Wi-Fi Antenna

14
2.2 Monitor Display
1. Camera Title
2. Camera Time Stamp
3. Wi-Fi / Recording
Mode
4. System Time
5. Cloud ID / System
Internet Connection
Status
2.3. Mouse Operation
The NVR is designed for mouse navigation. To use a USB Mouse (included), connect the
mouse to a USB port on the NVR.
2.4 Frequently used Button
Camera wireless signal indication
Motion record
Time record
Manual record
Apply Save and continue
OK Save and exit
Cancel Cancel / Close the operation
Copy to Copy the settings of current channel to other channels
Left Click A. Click to select a menu option
Right Click
A. Enter Main Menu
B. Exit / Cancel
A. Change drop down menu content
Middle scroll
B. Switch between channels under single view mode

15
3. Installation & Connection
3.1 Installation Precautions
Please refer to below tips while install and use the device:
1. To extend the life of the NVR system (main unit), please keep the NVR system away from
water, high temperature, and dust. Use it in a well-ventilated place.
2. Please use SATA hard drive, USB devices and mouse purchased from authentic channels.
3. Before use, please ensure the NVR has correct ground connection. Power source should
not exceed the indicated normal working voltage range in the specs sheet.
3.2 Preparations before Installation
Decide the location of NVR. It is suggested to place the NVR at the center of monitoring
area. Avoid any avoidable obstacle between the cameras and the NVR.
Open area with no walls, cameras can be mounted about approx. 350ft away from the NVR.
When there is one wall in between, reduce the distance to approx. 175ft
When there are 2 walls in between, reduce the distance to approx. 85ft
When there are more than 2 walls between camera and NVR, we suggest using
extendable antennas to bring camera’s antenna inside walls while leaving camera out; or
use network cable to hard wire the camera to NVR. (optional)
The Wi-Fi range mentioned above may vary depends on the environments; range data only
for reference.
Test the system before installation.
Screw on antennas for NVR and plug it to power with included 12V 3A power adapter.
Screw on antennas for cameras and plug cameras to power with included 12V 1A power
adapters.
If you see videos from all cameras on monitor within minute or two, you can now mount the
cameras to location you want.
If the camera does not connect within minute or two, please follow step 5.2.2 to add the
camera to system or contact Crystal Vision Support at: support@cvtus.com.
3.3 Camera Mounting Spots
1. Mount the cameras anywhere within the Wi-Fi range, plug them to power with included
power adapters (smaller 12v 1amp power adapter).
2. The cameras should start to stream videos to NVR within 1 ~ 2 minute.
3. If it does not display video on the NVR’s screen, the distance to the camera might be too
far and the camera should be moved closer to the NVR system.

16
3.5 Antenna Mounting Tips
The NVR’s antennas radiate signals to all around. The signal pick-up is best while antennas
are on same height and parallel. If the cameras cannot be at the same height with NVR,
please keep their antennas parallel (up or down).
4. System Operation Introduction
4.1 Starting up
Note:
Please check the output voltage of the power adapter to make sure it is correct.
Unstable power source may cause unstable working status or even damage to the NVR
system. If you have unstable power source in your area, please use voltage-stabilized
power source.
Starting up the system:
1. Plug NVR to power, the power indicator on NVR front panel should light up and you’ll hear
a beep.
2. If monitor is getting video output from NVR, you should see the starting page as shown in
Image below. If you cannot see anything on the display please contact us at:

17
Login
After system initialized, the system will ask you to login to the system. Users must login to do
further operations.
Operation Steps:
1. Type in username. Default Username is
admin.
2. Type in password. Default Password is
empty, means no password, leave it
blank.
3. Click ‘OK’, you shall be logged in to the
system.
Tip: The password can be combination of numbers, letters or * #. The password length must
be characters long.
4.2 Setup Guide
When you have login to the system for the first time, you will automatically enter Setup Guide.
The setup guide will guide you through the basic settings. You may also click ‘Cancel’ > ‘Yes’
to skip the settings.
Operation Steps:
If you don’t want to go through the settings
again on every startup, please uncheck the
‘Enable Boot Wizard’.
General: Allows you to set your NVR’s time
zone, date and time, language, and keypad
type. Click ‘Next’ to continue after finish your
settings.

18
Network :
Allows users to connect the NVR to Internet
for remote access.
Users can either check DHCP to allow NVR
obtain IP address from router automatically,
or manually set the NVR’s IP Address,
Gateway, Subnet Mask, etc.
Check DHCP, your NVR will obtain IP
address from router automatically.
Uncheck DHCP, you can also manually
assign an IP address for your NVR by
clicking ‘Manual Config’.
Hard Drive :
It displays list of current hard drives,
including the hard drive model, capacity,
used, status and format status. As default the
hard drive should be formatted. If the hard
drive hasn’t been formatted yet please select
the hard drive (check box on the right) and
click ‘Format’. This will take few minute to
format the hard drive.
When the hard drive is successfully
formatted, the status will show ‘formatted’
You can now click ‘Done’ to finish your setting
Note:
You will lose all the recording on the hard drive once you format the hard drive, so please
backup the recordings before you format the hard drive.
If you do not see any hard drive listed under the ‘Hard Drive ’ please contact us at:

19
5. System Main Menu
5.1 Split Screen
Select between ‘1x view’ (view a channel in full screen) / ‘4x
view’ / ‘6x view’ / ‘8x view’ ‘9x view’ (6 /8 / 9 split screen is only
available in 8 channel system).
Tip: You can also double left click on the mouse to simply
change between the single and multi channel view. From
single channel view you can also use the mouse scroll to
change between the channels.
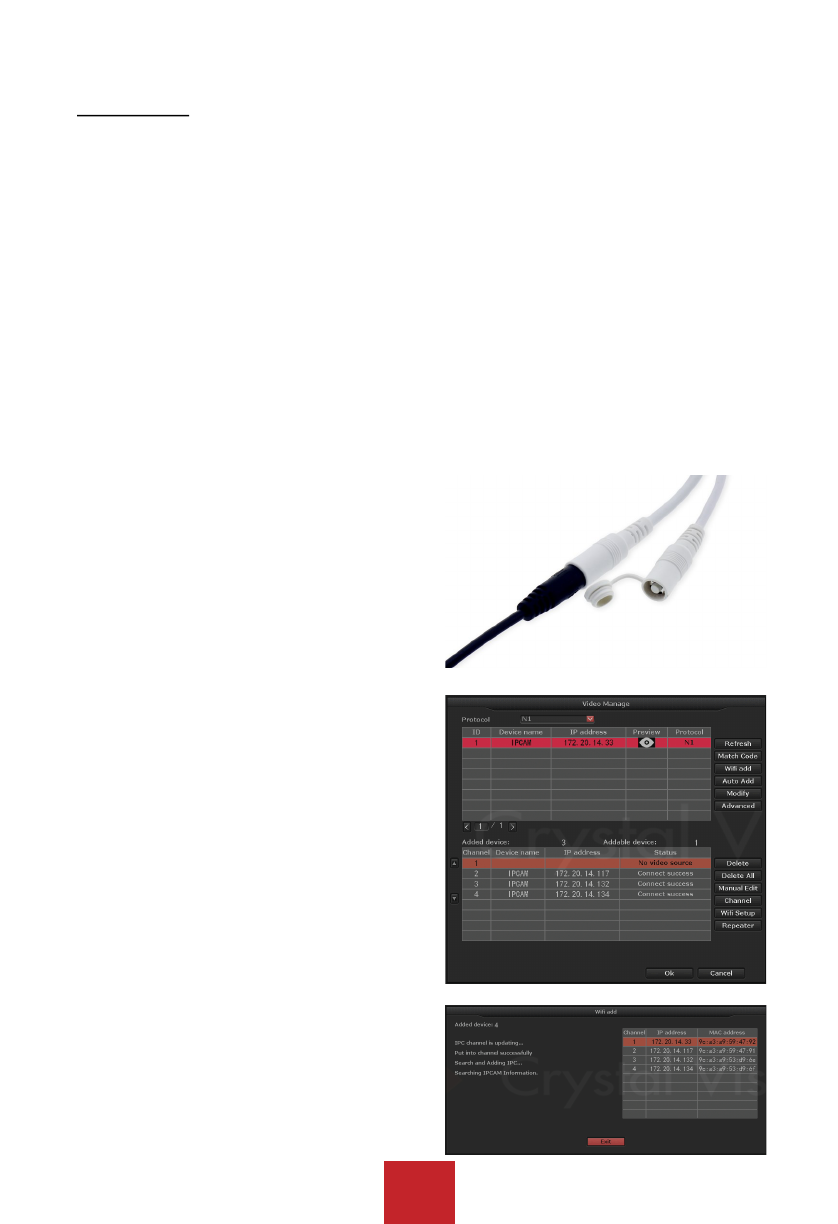
5.2 Video Manage
Interface that manage camera connections. You can add new
cameras to the NVR, and delete camera from the current NVR
system and re-pair to resolve any connection issue.
5.2.1 Refresh
Check for any available cameras within the network.
5.2.2 Match Code
Pairing the camera to the NVR and configure the cameras to work wirelessly.
The main function of ‘Match Code’ is to pair the IP cameras to NVR, and transfer the NVR’s
Wi-Fi information (SSID & Password) to the IP cameras. Once the information has been
transfer to the IP camera, it will be added to the NVR’s network with an IP address starting
with 172. When it is done the camera will be added to the system and will automatically
connect to the NVR system.
When to use Match Code:
Adding new camera to your Crystal Vision NVR system or re-pair camera to NVR when
the camera lost connection to the system.
Note:
IP cameras in pre-packed kits have already been paired to NVR. So cameras will auto
connect to NVR once the cameras are powered on using the provided power adapters.

20
How to pair (sync) camera using match code:
1. Connect the camera to your NVR via
Ethernet cable, and power on both of
the NVR system & the camera. The
Ethernet port at the end of camera will
blink, as shown in image below.
2. Right click your mouse to bring up the
main menu, then click ‘Video Manage’.
From the video manage click ‘Refresh’
on upper right and wait about 20~30
second, and you’ll see the camera
displays in upper chart.
3. Once you see the camera listed on the
top chart, click on the ‘Match Code’ to
start pairing the camera to the system.
4. When the system is done adding the
camera, click on the ‘Exit’ to stop the
pairing process.
5. Once you are done the camera you
have added should be listed at the
bottom chart indicating the camera has
been sync to the system.
6. When you are done click ‘OK’ to save &
exit the video manage, and unplug the
Ethernet cable from the camera.
Note:
Connection Success: Camera is paired
to NVR system successfully. You should
be able to see the camera feedback on
the monitor.
NO Video Source: Available camera slot
where you can add new or re-pair
existing camera.
IPC Disconnect: Camera is paired to the
NVR system, but not yet connected (Ex.
Camera is out of range or not yet
powered on).
Camera needs to be in the NVR’s Wi-Fi
range.
21
5.2.3 WiFi Add
Pairing the camera to the NVR and configure the cameras to work wirelessly.
The main function of ‘WiFi Add’ is to pair the IP cameras to NVR, and transfer the NVR’s Wi-
Fi information (SSID & Password) to the IP cameras. Once the information has been transfer
to the IP camera, it will be added to the NVR’s network with an IP address starting with 172.
When it is done the camera will be added to the system and will automatically connect to the
NVR system.
When to use Match Code:
Adding new camera to your Crystal Vision NVR system or re-pair camera to NVR when
the camera lost connection to the system.
Note:
IP cameras in pre-packed kits have already been paired to NVR. So cameras will auto
connect to NVR once the cameras are powered on using the provided power adapters.
How to pair (sync) camera using WiFi add:
1. Power on the system and the camera using
the provided power adapter.
2. From the system, please go to ‘Video
manage’ and click ‘WiFi Add’.
3. Once you see the WiFi add screen display,
press & hold the ‘Sync’ button for 5 second to
enter the wireless sync mode.
4. Please allow 30~60 second for the system to
search and add the camera into the system.
5. When the system is done adding the camera,
click on the ‘Exit’ to stop the pairing process.
6. Once you are done the camera you have
added should be listed at the bottom chart
indicating the camera has been sync to the
system.
7. Click ‘OK’ to save & exit the system and you
are done.
Tip: If you have an issue syncing the camera to
the system, please press & hold the ‘Sync’ button
for 10 second to reset and try again. The reset
process may take up to 1~2 min.

22
5.2.4 Auto Add
Function: Adding all of the cameras back
into the system in case the camera has
been deleted from the system, or after the
NVR firmware update.
Auto Add is different from the Match
Code. This function help you add the
camera to the system by reconfiguring the
IP address, however, it does not change
the connection type such as wire or
wireless.
When to use Auto Add:
When the camera is out of the Wi-Fi
range and want to connect the camera via hard wire connection.
After NVR system firmware upgrade.
Operation Steps
Configure the camera to work as wired connection:
1. Right click to bring up the main menu, and click ‘Video Manage’.
2. From the bottom chart select and delete the channel you will like to use it as wire
connection
3. Connect the NVR system to the router, and connect the camera to the same router
(network) as the NVR system using the Ethernet cable and click ‘Refresh’.
4. Once you see the camera at the top chart with the internal IP address (ex.
192.168.xxx.xxx) click ‘Auto Add’ > ‘Yes’ > ‘Yes’ to reconfigure the IP address and add it
to the system.
Re-adding all the cameras after NVR firmware upgrade:
1. Right click to bring up the main menu, and click ‘Video Manage’
2. From the ‘Video manage’ you will be able to see all of the cameras listed at the top chart.
If you do not see all the cameras listed please click ‘Refresh’.
3. With all the cameras showing click ‘Auto add’ > ‘Yes’ > ‘No’ to add the camera back into
the system without reconfiguring the IP address.

23
5.2.4 Modify
Function: Modify Camera information (Camera IP
Address, Username & Password, etc..)
Operation Steps:
1. Right click to bring up the main menu, and click
‘Video Manage’
2. Select the camera from top chart you will like to
edit and click ‘Modify’
3. You can edit the camera information within this
option. When you are done click ‘OK’ to save &
exit.
5.2.5 Advanced
Function: Supports multiple network segment search, allows for repeated & intelligent add.
Multiple Network Segment: Allow system to search wireless IP cameras in different
segment as NVR system.
Repeated add: Allow system to add same camera to multiple channels.
Intelligent add: Allow system to assign a new valid IP address to the camera to resolve IP
address errors. (Such as IP conflicts, IP address is not in the same segment)
5.2.6 Delete / Delete All
Function: Delete camera from the current channel of the NVR system.
Delete: Allows you to delete one channel at a time
Delete All: Allows you to delete all the channel at once.
Operation Steps:
1. Right click to bring up the main menu and click ‘Video Manage’
2. Select the channel you will like to remove and click ‘delete’. Deleted camera will be move
to the top chart, and you will not be able to see the video feed from this camera. The
channel you have deleted will be empty with status display ‘No Video Source’.
Tip: You can delete camera and re-add them to rearrange the order of the cameras.

24
5.2.7 Manual Edit
Function: Edit Channel information
such as: enable / disable channel,
Protocols, IP address, port number,
username & password, stream type,
and image orientation.
5.2.8 Channel
Function: Edit each of the channel setup. refer to 5.3.4.1 Channel info.
5.2.9 Wi-Fi setup
Function: Edit system Wi-Fi configuration for camera connection. (SSID, Password, Wi-Fi
channel, Region) refer to 5.3.3.6 Wi-Fi Setup
5.2.10 Repeater
Function: Setup Air Bridge feature to boost the Wi-Fi signal of Crystal Vision NVR system.
** Air bridge only works on the firmware version listed below **
System
Version: v. 2.6.3.7_21322230 or above
Camera:
Version: v. 1.3.35.391802 or above
Channel
Current setup channel.
Username
Username of the IP camera (default: admin).
Password
Password of the IP camera (default: (blank) no password).
Preview Mode
Real time
Optimize for real time (live) view.
Balance
Balance setting between the real time & recording mode (default).
Fluency
Optimized for recoding.
Image Rollover
Rotate the image 180º (flip image upside down).
Reboot IPC
Restart the camera remotely from the NVR system.

25
The Air Bridge technology uses the cameras / IPC router as repeaters. This feature allow you
to boost the Wi-Fi signal using the camera / IPC router located near by the camera with weak
signal to boost & extend the range of Wi-Fi. This will increase the Wi-Fi range up to %150.
Air Bridge setup guide
Operation Steps:
1. Right click to bring up the main menu
and go to ‘Video Manage’
2. From the video manage please make
sure you have all the camera / router
connected and ready.
3. Click on the ‘Repeater’
4. Click ‘+’ right of the camera channel or
IPC router you will like to use it as
repeater, and select the channel you will
like to link to increase the signal.
For example, CH 2 & 3 have weak signal
which is located near the IPC router, and
the CH4 is located near the CH 1.
Therefore, CH 2 & 3 will be link to the
router, and the CH 4 will get link to the
CH 1.
5. Once you have click ‘Apply’ to save the
setting you can now click on the
‘Refresh’ and check the setting to make
sure it is configure correctly.
** Please allow 20~30 second after you
have apply the setting before you click on
the refresh. When you are done you can
see the increase of the signal rate for those
camera has been link using the air bridge
connection.
6. When you are done setting up the linear
connection you can exit the setup by
clicking ‘OK’ for repeater option, and
‘OK’ for video manage.

26
Tip:
If you have multiple air bridge to setup, please try to setup one at a time to avoid system
error.
NVR system & cameras need to be stay connected to constant power.
If you are having an issue liking the camera with weak signal, please move the camera
closer to the system to link the camera first. Once the camera has been link you can move
the camera back to the previous location.
5.3 System setup
Function: System configuration such as: Time, Screen resolution, Recording, Network,
Notification, User, etc….
5.3.1 General
5.3.1.1 General
Auto Logout: Enable / Disable auto logout
Key buzzer: Enable / Disable keyboard sound.
Language: Change the system language
Keypad Type: Change the keyboard type.
Remote ID: Remote controller channel setting.
Boot Wizard: Enable / Disable startup setup guide.
Show Cloud ID: Enable / Disable display of Cloud ID on screen
Show Time: Enable / Disable display of system time on screen (Note: this is for system time
stamp, and not the time stamp of the cameras).
Auto Screen Off: Enable / Disable screen sleep mode.
Tip: ‘Position’ allows you to change the located of the displayed information.

27
5.3.1.2 Time
Function: Set Time Zone, System Date & Time.
Time Zone: Select your local time zone
Summer Time: Set summer time manually
Date Format: Select date display format
System Date: Set the system date
System Time :Set the system time
Sync Time: Enable to sync time via internet connection. (Internet connection requires)
Time Format: Select time display format. (12h / 24h)
Note: Disable ’Sync Time’ option to set the date & time manually
5.3.1.3 Hard Drive
Function: Display hard drive information, and allows user to format the hard drive.

28
Hard disk list – Display list of hard drive with information.
Overwrite – Enable / Disable overwrite function when hard drive is full
Auto delete old files – Enable / Disable auto delete function. This option allows the system to
automatically delete the recordings older then the selected day.
(If the auto delete is set to 10 days the system will only keep last 10 days of recording.)
Note: As default the hard drive will automatically overwrite once the hard drive is full.
Formatting the hard drive:
1. Right click to bring up the main menu and go to: system setup > General > Hard Drive
2. Check the hard drive list and ‘check’ the box right of the hard drive.
3. After you have check the hard drive click ‘format’, and ‘yes’ for the confirmation message.
4. This process may take few minute, and when it is done click ‘OK’ to save & exit.
Note:
By formatting the hard drive it will delete all the recording from the hard drive. Please back
up important recordings before formatting the hard drive.
5.3.1.3 Screen
Function: Screen display setting
OSD Alpha: Change interface opacity
Screen Resolution: Change resolution of screen resolution
Sequence Display: Enable / Disable auto channel sequence
Skip Video Lost: Skip channel with no video source

29
5.3.1.5 Error
Function: Enable / Disable System error notification.
Error Type: Enable / Disable following system error notification
Alarm – display red triangle bottom right of screen
Buzzer – sound buzzer when error occurs
E-mail notice – Send E-mail notification with error information.
Tip: To use the E-mail notification you must first setup the E-mail under the ‘network’ > ‘e-mail’.
5.3.2 Record
5.3.2.1 Recording Plan
Function: Record enable you to set the recording schedule to record 24/7 or selected time
frame. You can also set the recording mode, so the system will record 24/7 (time) or record
with motion detection (motion).
** As default recording is set to ‘time’ (24/7) recording.

30
Setting up recording plan:
1. Right click to bring up the main menu and go to: System setup > Record > Record Plan.
2. From the record plan select the ‘channel’ (camera #) you like to change setting.
3. Click ‘Reset’ to clear all the setting.
4. Select ‘Continuous’ or ‘Motion’ recording depends on the setting you prefer.
5. With the recording type selected, ‘Click and Drag’ the area to select the date & time
6. When you are done click ’Apply’ to save the setting.
7. Repeat steps 2 ~ 6 to change the recording setting for different channels.
8. Click ‘OK’ to save & exit when you are done.
Tip:
You can individually setup the camera recording setting, or you can use ‘Copy to’ function
to copy the current setting to other channels.
Different recording mode will show in different color at the time bar below the schedule.
You can combine different recording mode, and record motion in day time and continuous
at night.
5.3.3 Network
5.3.3.1 Network
Function: Allow system IP Address configuration for the network / internet connection setup.
DHCP: Enable / Disable DHCP, (Disable this option to manually configure the NVR system)
Cloud (P2P): Enable / Disable NVR system cloud ID number.
Show QR Code: Display cloud ID in QR code.
IP address: Display current system’s IP address information, and can be change manually.
Subnet mask: Display current system’s subnet mask information, and can be change
manually.
Gateway: Display current gateway, and can be change manually.
MAC address: Display current system’s MAC address
Preferred DNS: Display current system’s DNS information, and can be change manually.

31
Web Port: Video signal transmit port for remote viewing. (Default: 80).
Net Diagnose Info: Enable / Disable Network status.
Network Status: Display current network status.
Healthy Network: NVR system is connected to the internet.
Network cable disconnected / Gateway unreachable: NVR system is not
connected to the internet.
Note:
Remote view will only work when NVR is connected to the router and connected to the
internet.
DHCP is Enable by the default
If the NVR system is connected to the internet, the ‘network status’ will display ‘healthy
network’
If you have an issue with automatic DHCP, you can disable the DHCP and manually
configure the IP address. Please refer to your router information.
5.3.3.2 DDNS
Function: Enable customer DDNS services
DDNS Function: Enable / Disable DDNS
DDNS Provider: Select from list of custom DDNS services providers
URL: Enter customer URL address. (Must be register with DDNS services providers first)
Username: Enter the username of the DDNS provider
Password: Enter the password for the username information above.
Test: Test the DDNS connection setup
Reset All: Reset all the DDNS information.
32
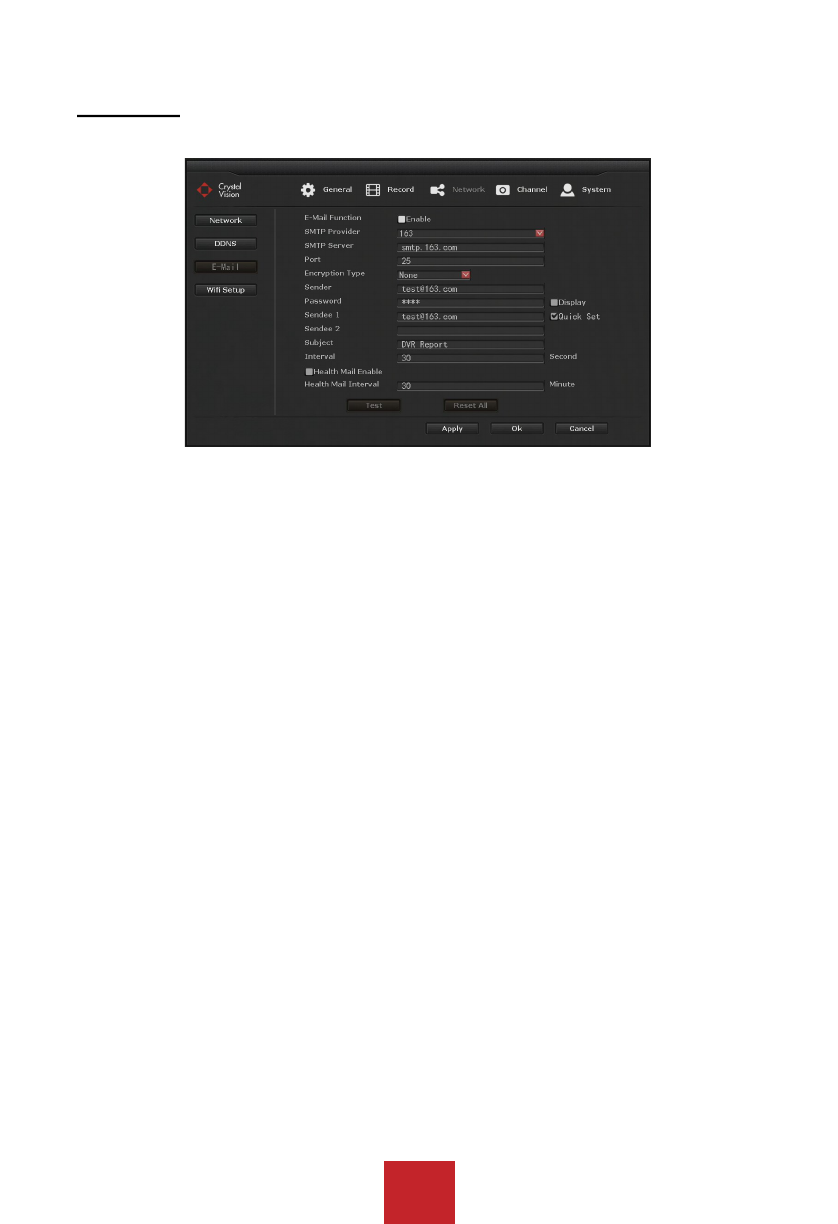
5.3.3.3 E-Mail
Function: Setup E-mail server information for e-mail alerts.
E-Mail Function: Enable / Disable E-mail
SMTP Provider: Preset information of e-mail providers. (If you provider is not listed, you will
need to enter in the SMTP information manually.)
SMTP Server: Enter in the SMTP server address of e-mail services provider you are using.
Port: Enter number of SMTP server
Encryption Type: Select the encryption type depends on the SMTP server
Sender: Enter your e-mail address
Password: Enter password of your e-mail address
Sendee 1: Enter the receiver’s e-mail address
Sendee 2: Enter the 2
nd
receiver’s e-mail (optional)
Subject: Title of the e-mail sent
Interval: The delay between sending e-mail notification
Health Mail Interval: Delay the time between sending e-mail notification by minute.
Test: Test the current e-mail setting
Reset All: Reset all the current setting
Tip:
To receive e-mail notification you will need to check ‘E-mail notification’ under the
‘Channel’ > ‘Motion Detection’.
Health Mail Interval need to be ‘Enable’ to take an effect.
If you fail to pass the test, please double check if you have enable the e-mail function, and
input the correct information.

33
5.3.3.4 Wi-Fi Setup
Function: This option allows users to change NVR’s Wi-Fi SSID & password setting and some
other router related settings
Wi-Fi Version: Current Wi-Fi card version
BSSIS: Wi-Fi MAC address
ESSID: Current SSID information
Password: NVR system Wi-Fi password information
Wi-Fi Channel: Current Wi-Fi channel information
Region: Wi-Fi Channel Region setup (Default: FCC)
Connect Information – Display current camera connection strength
Note:
Change the Wi-Fi information such as ESSID & Password will cause cameras to lose
connection with the system. Please make sure to re-sync the cameras to the system if you
decide to change the Wi-Fi setting information.
If you plan to use two NVR system in the same location, you can change the Wi-Fi Channel
to avoid interference.

34
5.3.4 Channel
5.3.4.1 Channel info
Function: Display the camera current setup information. Such as stream, resolution, bitrate,
frame rate, etc…
Note: You can only check the current setting, and not able to edit any information. All the
setting are fix and not changeable.
5.3.4.2 PTZ
Function: Allow to add optional PTZ / Speed dome camera into the system.
Pre-Requirement: Make sure the PTZ / Speed dome camera is connected to the system or
same network via Ethernet cable.
Channel: Select the channel you want to set the PTZ Preset
Protocol: Choose the correct protocol of the PTZ
Tour position list: use the ‘preset’ to move the camera and save the position to create a list
for PTZ tour.

35
5.3.4.3 Channel OSD
Function: Allow user to change the name / title of each camera, and enable / disable the
status display.
Operation Steps:
1. Right click to bring up the main menu, and go to: system setup > Channel > channel OSD.
2. Select channel you will like to edit the title and status display.
3. Type in the camera titles such as: Cam1, Front Door, Back yard, etc.
4. Enable or disable the ‘Status Display’ & ‘Connection Quality’
5. Click ‘apply’ to save the setting and repeat steps 2 ~ 5 to change the title or status display
for other channels.
Tip: You can also adjust the color & brightness by clicking the ‘Color adjust’, and change the
location of the status display area by clicking the ‘display
5.3.4.4 Motion Detection
Function: Allow system to trigger alarm, buzzer, E-mail & App notification when motion is
detected.

36
Operation Steps:
1. Right click to bring up the main menu, and go to: System setup > Channel > Motion
Detection.
2. Select the ‘Channel’ (Camera) you will like to receive notification from.
3. Set the ‘Detection’ as ‘Motion’ and set the ‘Sensitivity’ of the motion detection.
Move the slider to adjust the sensitivity. (Left - low / Right - high)
4. Select the ‘Alarm duration’ from 1 ~ 10 second. (for ‘Buzzer’)
5. Check the box to enable the following functions.
Alarm: Display notification icon on the screen.
Buzzer: Sound buzzer when motion is detected.
E-mail Notice: Send E-mail notification
APP Alarm: Send application notification via IP Pro
6. When you are done click ‘Apply’ to save and repeat the steps 2 ~ 6 to enable the setting
for different channel (camera).
Note:
Motion Plan: Allow user to set a schedule to send notification within the selected time
frame.
Detection Area: Allow user to select the area where the camera will detect motion from.
The ‘red highlighted’ area is the selected area where the camera will detect motion from.
You can also use the ‘right click’ to bring up the menu to: fill all, clear all, return.
Tip:
Alarm duration is only for the ‘buzzer’ function. It allows user to select the time for how long
the buzzer will sound. We recommend you to set the duration between the 1 ~10 second
long.
5.3.4.5 Bitrate
Function: Display current bitrate usage of the each channel in real time.

37
5.3.5 System
5.3.5.1 System info
Function: Allow user to check the device’s information including Device name, Device model,
Device SN, H/W version, S/W version, Built time, etc.
5.3.5.2 System log
Function: Allow users to search and check the system log file of the NVR system.
Operation Steps:
1. Right click to bring up the main menu, and go to: System setup > System > System log.
2. Select the event type from the drop down menu, and set the time rage and click ‘search’.
3. Log information will be displayed on the chart below right under the search button.
Tip:
Click Left or right arrow to navigate the log information page.
Log information are saved in the hard drive, formatting the hard drive will delete all the log
information.
Event log is available for: System bootup, System shutdown, Configuration change, etc…

38
5.3.5.3 User
Function: Allow users to add, delete and edit username and password.
Operation Steps:
User password change
1. Right click to bring up the main menu, and go to: System setup > System > User.
(Log into username you will like to change password).
2. Click on the ‘Set password’ and type in old password (as default there is no password).
3. Type in ‘New password’ and re-enter the same password on the ‘Repeated’ for
confirmation. (Password must be 0 ~ 8 characters long)
4. Click ‘OK’ and ‘OK’ one more time for the system setup to save & exit.
Creating new user
1. Right click to bring up the main menu, and go to: System setup > System > User.
(Log in to ‘Admin’ or ‘Super User’)
2. Click on ‘Add user’ and type in new username and password.
(Password must be 0 ~ 8 characters long)
3. For full access to the system ‘Check’ the box for ‘All’ and click ‘OK’.
4. To add more user please repeat steps 2, 3 to add more user.
5. When you are done click ‘OK’ to save & exit the system setup.
Edit user
1. Right click to bring up the main menu, and go to: System setup > System > User.
2. Select the username you will like to edit and click ‘Edit user’
3. Change the permission of the selected user.
4. When you are done click ‘OK’ to save the setting.
Delete user
1. Right click to bring up the main menu, and go to: System setup > System > User.
2. Select the username you will like to delete and click ‘Delete user’.
3. For the confirmation message click ‘Yes’ to delete the user

39
Tip: The default username is ‘admin’, and default password is ‘(blank)’ - no password.
Only ‘super users’ are allow to add, edit, and delete users and their permissions.
Admin (Administrator) CANNOT be deleted.
User Permissions
Super user: Allow user to add, edit, and delete other user.
Video Playback: Search and playback of recorded video.
Video backup: Back up the recorded video
PTZ control: Control the PTZ camera movement
Volume: Adjust the audio output volume *
Manual record: Enable / disable manual recording (overwrite current record setting to
‘Continuous’ until disable)
System setup: Configuration of system setup.
Split screen: Adjustment of single view or mulit-view *
Channel adjust: Adjustment of camera image brightness, color tone, saturation, and contrast.
Setup Wizard: Start up setting guide
System Mode: Set system mode *
Remote: Allow remote view using smartphone or PC
Config: Remote configuration of NVR system *
Playback: Remote playback using smartphone or PC
(*Does not apply to model CVT9604E/8E)
5.3.5.4 System upgrade
Function: Allow users to upgrade system firmware version.
Operation Steps:
1. Download the Latest Firmware on your USB Flash Drive.
(Please check the website at ‘www.cvtus.com’ for the latest firmware information)
2. Insert the USB Flash Drive into the available USB slot on the NVR system.

40
3. Right click to bring up the main menu, and go to: System setup > System > System
upgrade.
4. Check the 'Auto restart' box
5. Select 'USB storage' from the drop-down menu.
6. Click on the 'System' from the drop-down menu.
7. Click on the 'Start' and click 'OK' on the popup window.
Note: In case of the cameras lost the connection to the system after the upgrade please follow
the instruction below:
Adding disconnected cameras:
1. Right click to bring up the main menu, and go to: Video manage.
2. Click on the 'Refresh' from the right side menu
3. Wait for about 30 seconds and let the list occupy.
4. Add the cameras by Clicking 'Auto Add' on the list back into the system.
5. Click 'Yes' on the Popup box with 'Auto Add will perhaps modify IP of IPC, Are You Sure to
Continue' Message.
6. Click 'No' on 'Want to modify IP of IPC' Message.
7. Confirm that you have all your cameras and click 'Ok' to save and exit the system menu.
Tip:
Please use an USB flash drive to upgrade the firmware. USB hard drive may not be
recognized by the NVR system.
USB flash drive must be formatted to ‘Fat32’ format.
Make sure the upgrade firmware file (.rom) is located at the root directory of the USB flash
drive and not in the folder.
DO NOT unplug the system power during the upgrade, or the system may get damage.
5.3.5.5 Camera upgrade
Function: Allow user to upgrade camera firmware.

41
Operation Steps:
1. Right click to bring up the main menu, and go to: System setup > System > Camera
upgrade.
2. Check the select boxes next to the camera you want to update from the list.
3. Select 'USB storage' from the Firmware from drop-down menu.
4. Click 'Start' to start; this will open a confirmation dialogue box. Click 'Yes' to Confirm
5. Wait till and confirm 'Upgrade Successful' on Status for all of your selected camera/s.
6. Click 'OK' to save the change and exit.
Tip:
Please use an USB flash drive to upgrade the firmware. USB hard drive may not be
recognized by the NVR system.
USB flash drive must be formatted to ‘Fat32’ format.
Make sure the upgrade firmware file (.rom) is located at the root directory of the USB flash
drive and not in the folder.
DO NOT unplug the system power during the upgrade, or the camera may get damage.
If you are getting message ‘Upgrade fail’ this could be an issue with weak signal, or the
cameras has higher version of firmware already installed.
5.3.5.6 Default setting
Function: Reset NVR system setting to factory default.
Operation Steps:
1. Right click to bring up the main menu, and go to: System setup > System > Default
setting.
2. Check the functions you will like to reset and click ‘Apply’ > ‘Yes’ for confirmation message.
Note: To keep the camera connection please ‘UNCHECK’ the ‘Digital Channel’. Digital
channel is for the wireless camera connection setting, therefore, please uncheck this function
before resetting the system.

42
5.3.5.7 System maintenance
Function: Enable / Disable system auto maintenance function (system restart).
Operation Steps:
1. Right click to bring up the main menu, and go to: System setup > System > Sys
maintenance.
2. Enable ‘Auto maintenance’ by selecting ‘Once’, ‘Everyday’, or ‘Every week’
3. Select the ‘date’, ‘time’, and ‘weekday’ to setup a schedule.
4. Click ‘Apply’ to save the setting
Config Export: Export current setting to USB flash drive.
Config Import: Import setting from the USB flash drive.
Note:
With ‘Auto Maintenance’ enable the system will be automatically restart on the selected
date to fix any type of error or issue with the system. During the restart the system will not
be able to record any information.
USB flash drive must be plugged in, and formatted to ‘Fat32’ format.

43
5.4 Video Playback
Function: Playback recorded video.
Operation Steps:
1. Right click to bring up the main menu, and go to: ’Video Playback’.
2. Select the date using the calendar.
3. Once you have selected the date click on ‘Search’ to load the time frame at the bottom.
4. The time frame shows the recording as bars from 0 to 24 hours.
5. Use the player control to ‘Rewind’, ‘Pause’, ‘Play’, and ‘Fast Forward’.
Tip:
The highlighted dates indicates that there is recording.
The time frame bar color may vary depends on the recording type. (Time: Red, Motion:
Green, Manual: Blue).
Playback can be controlled through the playback control bar.
You can playback up to 4 channel simultaneously.
Pause Play Fast Forward

44
5.5 Video Backup
Function: Backup the recorded videos in the hard drive into the USB flash drive
You can back up the video to USB flash drive.
Before you start please make sure to plug the USB flash drive into the NVR’s USB port.
Operation Steps:
1. Right click to bring up the main menu, and go to: ‘Video Backup’.
2. Select the ‘Camera channel’ or ’All’ for search.
3. Select the record mode for search. (Select from ‘Manual’, ‘Time’, ‘Motion’)
4. Select the ‘Date’ & ‘Time frame’ (start time ~ end time) for search.
5. Click “Search” to load the recorded video files.
6. Find the channel and time frame of all of the files you will like to back up and ‘Check’ the
‘Box’ on the right.
7. Once you have check all the box click “Backup” to start the backup process.
Tip: Please make sure that the USB flash drive have enough storage space, and it is
formatted to Fat32 format.
Note: For HEVC (H.265) systems (CVT804A-20WB / CVT808A-20WB), you will need to
download the HEVC (H.265) codec for your media player, or download 3rd party media player
supports the HEVC (H.265) codec. For more information, please refer to the code information
depends on your media player.
45
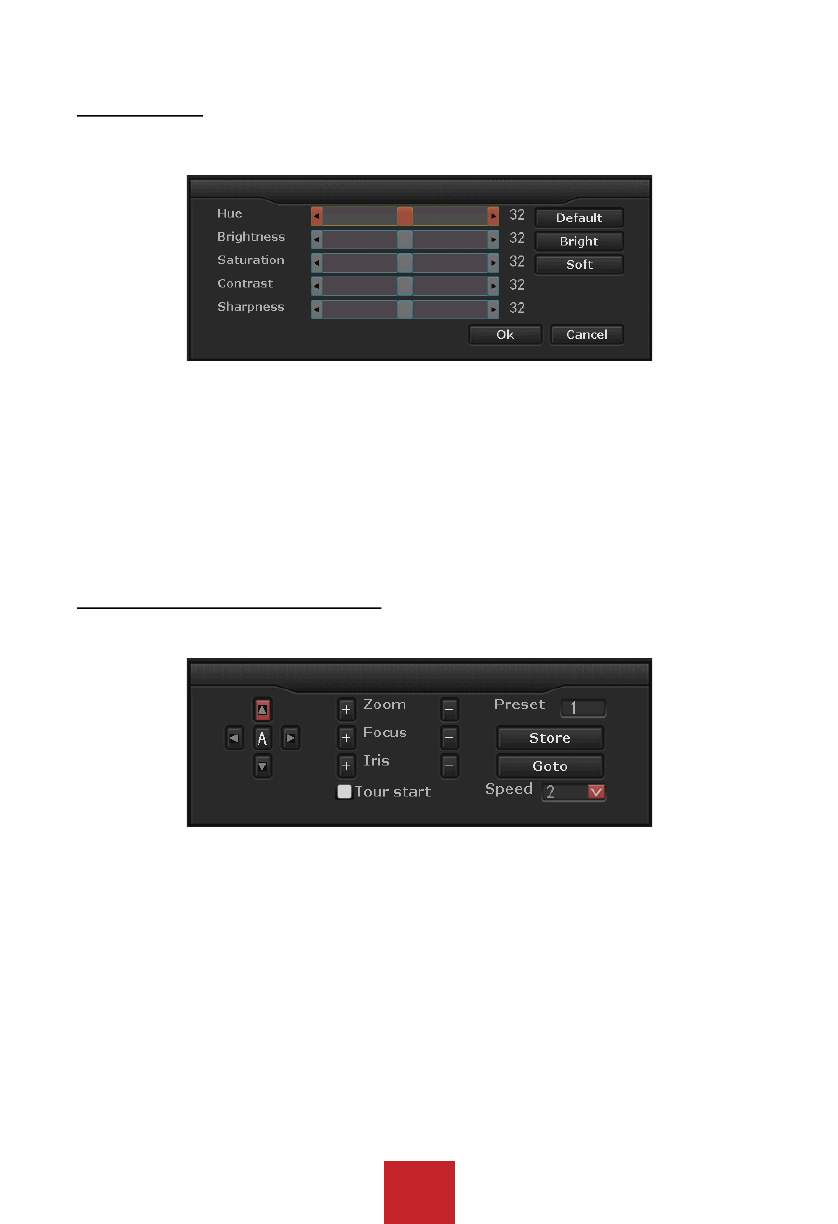
5.6 Color Adjust
Function: Adjust the color and brightness of each camera.
Operation Steps:
1. Select the camera you will like to adjust the color by ‘Double click’ on the camera image.
2. Right click to bring up the main menu, and go to: ‘Color adjust’.
3. You can change ‘Hue’, ‘Brightness’, ‘Saturation’, and ‘Contrast’.
4. When you are done click ‘Ok’ to save & exit.
5.7 PTZ Control (Requires PTZ camera)
Function: Allow user to control PTZ camera.
Operation Steps:
1. Right click to bring up the main menu, and go to: ‘PTZ Control’.
2. Control PTZ camera using the on-board PTZ controller
Tip:
This function only works with the PTZ camera connected.
If you have multiple PTZ cameras connected, please select the camera before opening up
the PTZ control.

46
5.8 Manual Recording
Function: Allow user to overwrite any recording plan to record continuously.
Operation Steps:
1. Right click to bring up the main menu, and go to: ‘Manual Recording’.
2. Select or deselect the ‘Channels’
3. Click ‘Ok’ to save & exit
Tip:
Selected channels will enable the manual recording, and overwriting any recording plan.
Deselecting the channel will disable the manual recording, and go back to regular
recording mode.
5.9 Setup Wizard
Function: Allow quick start up setup for the NVR system.
Operation Steps:
Please refer to 4.2 Setup Guide on page 15.
5.10 Fast Network
Function: Allow quick network setup and auto configuration / manual setup.

47
Operation Steps:
1. Right click to bring up the main menu, and go to: ‘Fast Network’.
2. Check the cloud status. (Online / Offline)
3. If the system is ‘Offline’ click ‘Auto Config’ to renew the IP address of the NVR system.
4. Click ‘Ok’ to save & exit.
Tip: In case you have an issue with the IP address you can manually setup the IP address
using the ‘Manual Config’.
5.11 Exit System
Function: Allow user to ‘Log out’, ‘System Reboot’, ‘Close Screen Display’, ‘System Shudown’
5.11.1 Log Out
Function: Allow user to lock the system by login out.
Operation Steps:
1. Right click to bring up the main menu, and go to: ‘Exit System’.
2. Click ‘Logout’.
Tip: Logout from the system to lock the system.
5.10.2 System Reboot
Function: Allow users to restart the system.
Operation Steps:
1. Right click to bring up the main menu, and go to: ‘Exit System’.
2. Click ‘Reboot’.
Tip: Reboot will restart the NVR system, and it will resolve any minor issue.

48
5.11.3 Close Screen Display
Function: Disconnect all display output
Operation Steps:
1. Right click to bring up the main menu, and go to: ‘Exit System’.
2. Click ‘Close screen output’.
Tip: This will only stop displaying the image, however, the screen is still “ON”. If you like to
turn off the screen please use the “Screen” button located font of the NVR system.
5.11.4 System Shutdown
Function: Allow user to power down the system.
Operation Steps:
1. Right click to bring up the main menu, and go to: ‘Exit System’.
2. Click ‘Shutdown’ > ‘Yes’.
3. ‘Unplug’ the ‘power adapter’ once you see the message “You can power of the
machine now.”
Tip: To turn the system back on simply plug the power back into the NVR system.

49
6. Remote view.
Note: Before setting up the remote view for the smartphone or PC please make sure the NVR
system is connected to the internet router / modem via Ethernet cable, and make sure it is
‘Online’.

50
6.1 Smartphone (Android / iOS)
Operation Steps:
1. Download the free application IP Pro from Google Play or App store, and install it on our
smartphone.
2. Open up the application and if you are a new user, please tap the ‘Register’ to create an
new account for the IP Pro. Creating an account will allow you to view your camera on any
mobile devices using the same account.
3. After you have log in to the application tap ‘+’ at the top right corner, then tap ‘Add device
by ID’ (Android) or ‘Cloud ID’ (iOS)
4. From add device enter in the following information.
Cloud ID: NVR systems Cloud ID number
Descriptions: Ex. Home, Office (optional)
Username: NVR system username (as default ‘admin’)
Password: NVR system password (as default ‘(blank)-no password’)
5. Once you have input all the information tap ‘Submit’ or ‘Save’ on the top right.
6. Now tap on the device you have just added to start the remote view.
7. When you are done tap the back arrow on the top left to exit the remote view before you
close the application.

51
6.2 CMS software for Windows & Mac
Function: Allow user to remote view from PC. Using the CMS software you can connect more
than one NVR system at the same time.
1. Go to our website at: www.cvtus.com > support > download
2. Download the ‘EseeCloud’ and install it on your computer.
3. Once installation is finish run the software and log in using the default username &
password. (Default username: ‘admin’ / password ‘(blank) – no password’)
4. After you have log in to the system go to ‘Device management’
5. Enter in your ‘Cloud ID’, NVR’s ‘Username’, NVR’s ‘Password’, and ‘Note’ (ex, home,
office).
6. With the information entered click ‘Add’ to add the device.
7. Now click on the ‘Live View’ and click ‘All connect’ located at the bottom right to start the
remote view.
Note:
In you are unable to start the software with just a black screen, please try to run the
software by right clicking the ‘EseeCloud’ icon and click ‘run as administrator’.
For more information about the EseeCloud please vision out website at: www.cvtus.com
for full manual.

52
WARRANTY:
Crystal Vision Technology, Inc. (“Crystal Vision”) provides the following warranty to the
original retail purchaser only (the “Purchaser”) with respect to this product (the “Product”): For
a period of one (1) year after the date of sale, the Product shall be free from manufacturing
defects in material and workmanship. In the event that the Product is defective, the Purchaser
must return the Product with the original proof of purchase receipt. In its sole discretion,
Crystal Vision will either repair or replace the Product at no additional cost to the Purchaser.
Any replacement Product (or parts) will be covered by the same warranty as the original
Product through the expiration date of the original warranty period.
EXCLUSIONS:
This warranty does not apply to the following parts or upon the following events:
•Bulbs, LEDs and batteries;
•The Product was not used or installed in the manner described in the installation instructions;
•Negligent use of the Product or misuse or abuse of the Product;
•Electrical short circuits or power surges;
•Use of replacement parts not supplied by Crystal Vision;
•Product is either tampered with, modified or repaired by another service provider;
•Product has not been maintained in accordance with the instructions;
•Accident, fire, flood or other acts of God;
•Failure to use Crystal Vision approved accessories;
•Defects or damages arising by use of the Product in other than normal conditions (including
normal atmospheric, moisture and humidity conditions).
Except as otherwise prohibited by law, this warranty is in lieu of other warranties, express or
implied, and Crystal Vision neither assumes nor authorizes any person to assume for it any
other obligation or liability in connection with the sale or service of the Product.
In no event shall Crystal Vision be liable for any special or consequential damages arising
from the use of the Product or arising from the malfunctioning or non-functioning of the
Product or for any delay in the performance of this warranty due to any cause beyond its
control. This warranty shall not apply to installation or the removal and reinstallation of
products after repair.
Crystal Vision does not make any claims or warranties of any kind whatsoever regarding the
Product’s potential, ability or effectiveness to prevent, minimize or in any way affect personal
or property damage or injury. Crystal Vision is not responsible for any personal damage, loss
or theft related to the Product or to its use for any harm, whether physical or mental related
thereto. Any and all claims or statements, whether written or verbal, by salespeople, retailers,
dealers or distributors to the contrary are not authorized by Crystal Vision and do not affect
this provision of this warranty.
RETURNS UNDER THIS WARRANTY:
In order to obtain service, please make sure that you have registered your product on-line no
later than thirty (30) days after purchase at http://www.cvtus.com in the warranty registration
section or in any other matter described in the instructions.

53

