
www.DuxxBakDecking.com APRIL, 2021 V13.8 Page 1 of 16
DUXXBAK DEKK WATER SHEDDING DECK SYSTEM
INSTALLATION INSTRUCTIONS
DuxxBak DekkWater Shedding Deck System
• The DuxxBak Dekk Water Shedding Deck System is an innovave product designed to shed water in any
environment. Properly installed, DuxxBak Dekk will provide a funconal, dry underdeck area, without the moisture
buildup and structural compromise associated with convenonal underdeck drainage systems. Installaon of this
product is vastly dierent from our other quality oerings. Strict adherence to these installaon instrucons will
ensure delivery of an aracve, funconal system.
By DuxxBak Composite Decking
A Division of Green Bay Decking, LLC

www.DuxxBakDecking.com APRIL, 2021 V13.8 Page 2 of 16
TABLE OF CONTENTS
Important Installaon Tips 3
General Informaon 4
Product Informaon 4
DuxxBak Dekk Product Proles 4
Storing and Handling 4
Sucient Pitch 4
Substructure Framing 4
Proper Caulk and Flashing System 5
Caulk and Flashing On Masonry 5
Fasteners Installaon 5
Fascia Installaon 6
Special Design Concepts 6
Installaon Hints 6
Final Preparaon 7
Proper Endcap Selecon 7
Parts of DuxxBak Dekk Board 7
Installaon Guide 8
Step 1: Install The First Deck Board 8
Step 2: Install The Second and Subsequent Deck Boards 9
Step 3: Install The Final Deck Board 9
Step 4: Install Seal and Flashing 10
Step 5: Install Endcaps on Exposed Boards 11
Step 6: Install Guers 11
Step 7: Compleon 11
DuxxBak Dekk End Cap Installaon On A 45 Degree Angle Deck 12
Installaon of Replacement Board 13
Stair Installaon 14
Care and Maintenance 14
Warranty 14
Fasteners 15
Product Features 16
List of Revisions 16

www.DuxxBakDecking.com APRIL, 2021 V13.8 Page 3 of 16
DuxxBak Dekk WATER SHEDDING DECK SYSTEM
IMPORTANT INSTALLATION TIPS
• If quesons arise during installaon for which you can nd no answer, or for general product or installaon quesons, please call
us toll-free at 1-877-804-0137.
• All composite decking will expand and contract as temperatures change. To minimize potenal system failure resulng from these
movements, avoid installing your decking during extreme temperatures.
• DuxxBak Dekk is designed for use as weather protecon above an outdoor living area. DuxxBak Dekk is not designed or approved
to be used over a temperature-controlled, enclosed living space.
• An unrestricted minimum pitch of 1/8” per foot in the direcon of intended water ow (along the length of the deck board) is
required.
• A gap of at least 3/16” must be provided where the deck boards meet the house or other structure. A gap of 3/16” must be
provided at each side of posts or other obstrucons.
• See important board-gapping informaon in step 2 of installaon instrucons, page 9.
• Use genuine DuxxBak Composite Decking screws, or equivalent.
• All fasteners must be located a minimum of 3/4” from the ends of the deck boards. Addionally, any necessary face fasteners
should be placed near the deck board structural septum, but not directly through the septum. Avoid over penetraon of the
fastener heads.
• DuxxBak Dekk should be installed on an open structure that allows venlaon through the deck structure. If installing a ceiling
below a DuxxBak Dekk, installers should defer to the venlaon requirements of the structural component manufacturer.
• As with any manufactured decking product, be aware of condions where reecve heat buildup from “Low-E” glass may cause
damage to your deck.
• No special tools are required to work with DuxxBak Composite Decking products. Typical wood-working tools are recommended.
• It is always good idea to wear personal protecve equipment, such as safety glasses, hearing protecon, and a dust mask when
working with any construcon materials.
• Composite decking is not designed to act as a structural element. Avoid placing weight bearing loads, such as roof-support
columns, on top of a composite decking surface.
• Installaon and care instrucons & videos can also be found on our website at www.duxxbakdecking.com
• An numeric superscript is used at various locaons in this document to reference a revision from V13.7. All revisions can be found
on the “List of Revisions” document.
Thank you for choosing the DuxxBak Dekk Water Shedding Deck System
®

www.DuxxBakDecking.com APRIL, 2021 V13.8 Page 4 of 16
GENERAL INFORMATION
PRODUCT INFORMATION
DuxxBak Dekk boards have laser-engraved idencaon
informaon on the board edge, including a code-
compliance report number.
DuxxBak Dekk boards are made from a formulaon of
BioDac®, rice hulls (a rapidly renewable resource), HDPE,
and other high-quality materials. Its properes are an
innovave deviaon from those of other manufactured-
decking opons. Therefore, DuxxBak Dekk has dierent
handling and installaon requirements which must be
considered during planning and installaon.
Typical woodworking tools are recommended. No special
tools are required.
If quesons arise during installaon for which you can nd
no answer, or for general product or installaon
quesons, please call us toll-free at 1-877-804-0137.
DUXXBAK DEKK PRODUCT PROFILES
DuxxBak Dekk Product Proles
• DuxxBak Dekk
Descripon: 5/4” x 7-1/4”
Height: 1-1/4”
Width: 5-3/4” Coverage
Lengths: 12’, 16’,20’ and 24’
Weight: Approx. 2.1 lbs./.
• DuxxBak Dekk End Cap (Right & Le)
Height: 1-1/4”
Width: 5-3/4”
Weight: Approx. 0.06 lbs.
To determine end cap direcon for DuxxBak Dekk or I.Dekk®
T&G: While looking at the open end of installed deck boards,
simply refer to the side of the deck at which you began
installaon—LEFT or RIGHT. (See illustraon on pg 7).
• Fascia Board
Height:12”
Thickness: 7/16”
Length: 12’
Weight: Approx. 2.6 lbs./.
SUFFICIENT PITCH
Before installing DuxxBak Dekk, be sure your deck structure
has an unrestricted minimum pitch of 1/8” per foot to help
shed water from the deck surface. Remember: Pitch must
run lengthwise direcon of the DuxxBak Dekk boards.
SUBSTRUCTURE FRAMING
Plan your deck substructure to use current framing
techniques as outlined in the Internaonal Residenal Code
(IRC) and your local building codes.
Remember that the deck pitch must be unrestricted. The
deck structure must be constructed such that the top of the
structure is in plane, avoiding the introducon of a high point
or a low point along the pitch of the deck.
DuxxBak Dekk is designed for installaon on joists that are
spaced at 24”, or less, on center. Each joist longer than 6’
should be installed with at least three points of aachment.
If a joist is aached or supported only at each end, and is
longer than 6’, internal blocking must be installed at 6’
intervals to stabilize the structure. The mid-joist beam or
blocking will also enable the installer to bring the enre deck
structure into plane.
Support blocking should be installed to support the full width
of every deck board where it is cut around obstrucons such
as railing posts.
I.Dekk® or I.Dekk HD S4S or OPTIMA® Dekk Square Edge deck
boards can be used as stair treads, to complement the
DuxxBak Dekk system.
STORING & HANDLING DUXXBAK®
DuxxBak Dekk should be stored on a at surface with
supports every 48”. Do not stack decking more than four
units (bundles) high. Trim boards should have supports every
24”, to avoid sagging, which could make proper installaon
challenging.
It is always a good idea to wear personal protecve
equipment, such as safety glasses, hearing protecon, and a
dust mask when working with construcon materials.

www.DuxxBakDecking.com APRIL, 2021 V13.8 Page 5 of 16
PROPER CAULK AND FLASHING SYSTEM
Successful installaon of your deck is dependent on proper
sealing and ashing at the surfaces where the deck meets
your home or other structure. Water must be properly
directed to avoid leakage.
• Sealants: Use LEXEL Adhesive Sealant or equivalent to
form water barriers where a sealant is recommended.
• Sealing Tape: Use the best sealing tape available from
your supplier to form a waterproong barrier at the
point where the ashing and house wrap are joined.
• Butyl Tape: Use butyl tape to form a waterproong
barrier at those points where structural objects
penetrate the deck, to form a waterproong seal.
• Flashing: Use exterior-grade vinyl, coated aluminum, or
galvanized ashing rated for contact with your deck’s
structural components.
Counterashing is a piece of metal or vinyl designed to shed
water away from the wall of a building, and is an essenal
step when installing DuxxBak No Drip Through Decking on a
deck structure that is aached to a masonry wall where tra-
dional ashing cannot be achieved. This approved method
of counterashing for masonry walls is called Reglet counter-
ashing.
CAULK AND FLASHING ON MASONRY
Counterashing
Wall
Sealant
Sealant
Counter Flashing Wedge
or Copper Wool
Deck
Reglet Counterashing is done by using a masonry saw or
grinder to cut a 3/4” to 1-1/2” Reglet in the masonry. The
Reglet can be cut into a joint, or into the stone itself. The
ashing is then inserted into the Reglet, and held in place
with a lead wedge or copper wool, or ashing wedge. A bead
of caulk is then used to ll the reglet opening. Sealant should
also be installed where the deck meets the wall, and where
the ashing meets the deck boards.
FASTENERS INSTALLATION
General Notes
• DuxxBak Composite Decking screws, or equivalent, are
recommended.
• Avoid the use of “composite screws”—those with re-
verse threads near the top end of the screw—as the re-
verse threads displace too much material, compromising
the aachment of decking to structure. Ideally, a screw
with a smooth (non-threaded) sha at its top should be
used.
• Make sure the fastener coang is approved for use in
your structural material.
• Stainless steel screws are recommended for use near
salt water.
• Addional fastener informaon can be found on the
Fasteners page at end of this instrucon manual.
DuxxBak Dekk
• Use 1-1/4” (or longer) DuxxBak Composite Decking
screws to aach the decking through the fastening wing.
Insert fasteners at an angle of 55-60 degrees. (Please
see illustraon, above)
• Use 2-1/4” (or longer) DuxxBak Composite Decking
screws to aach decking when it is necessary to insert a
fastener through the face of the deck board.
I.Dekk® Fascia
• Use 1-1/2” (or longer) DuxxBak Composite Decking
screws to aach fascia.
• Use a minimum of three fasteners every 12” to secure
the connecon.
DuxxBak Dekk End Cap
• End caps can be secured using an adhesive sealant ap-
plied to the legs of each cap before inseron.
• Alternavely, a 1/8” hole may be drilled through the
underside of the decking and through 2 legs of the end
cap, into which a #6 x 1” truss-head or pan-head screw
can be inserted.

www.DuxxBakDecking.com APRIL, 2021 V13.8 Page 6 of 16
FASCIA INSTALLATION
Install fascia to the outer joists (rim joists and end joists) of
the deck substructure.
• Use a minimum of three evenly spaced screws every
12” (or two every 12” if the fascia has been ripped to 6”
or less).
• End-to-end “bu-joints” must have a 3/16” minimum
gap to allow for expansion and contracon with
variaons in temperature. There are several methods of
concealing the gaps in fascia bu-joints, as follow:
Leave a wider gap and cover with a ripped piece
of fascia installed vercally. Be sure the screws
that aach the cover do not limit movement of
the boards being bued together (see below
illustraon).
Apply a dark wood stain (similar to the color of
the fascia) to the joist 1”-2” in each direcon
from where the bu-joint will lie. As the fascia
opens and closes, the wood stain will render
the gap praccally invisible.
• The same 3/16” gap should be allowed at corners to
allow for expansion and contracon. A corner molding
can be ripped from a spare piece of decking or post
sleeve. This cover should only be aached through one
side to allow for expansion and contracon. (Please see
illustraon below) Alternavely, the wood-stain process
described above can be used here to conceal the
required gap (see below illustraon.
SPECIAL DESIGN CONCEPTS
Special design concepts may require that you and your
designer consider how to best implement those concepts,
prior to construcon, to avoid problems during or aer
installaon. The following may be such situaons:
• DuxxBak Dekk is available in 12’, 16’, 20’, and 24’ lengths.
Custom lengths are available subject to restricons.
Design concepts must be considered if condions require
longer spans to assure that water can properly shed from
the deck.
• Deck boards should not be bued end to end, as this
would compromise the waterght integrity of the DuxxBak
Dekk installaon.
• Contact DuxxBak Composite Decking for technical
guidance for special design consideraons relave to your
specic project.
INSTALLATION HINTS
• Lay the deck boards out prior to installaon to determine
the most pleasing eect of the grain paern.
• It is best to mark, cut, and install deck boards when they
are all at similar temperature.
• Cut boards to length, aer installaon, allowing a 1-7/16”
overhang past the deck structure. This will allow for the
installaon of a 7/16” fascia board and a nal overhang of
1”.
• Fascia may be installed before or aer decking installaon.
• A guer apron (drip edge) should be installed on top of
the outermost framing member, or fascia, to divert
drainage away from the deck structure and fascia, and to
prevent water from wicking back on the underside of deck
boards. A bead of adhesive sealant should be installed
between the deck boards and the top of the apron.
• It is possible to conceal the heads of GBD trim head
screws in both decking and trim boards. Simply drive the
screws just below the surface of the board. Then, gather
the material (which has been displaced by the screw) on
top of the screw head, and tap with a hammer.

www.DuxxBakDecking.com APRIL, 2021 V13.8 Page 7 of 16
FINAL PREPARATION
Here are a few nal steps to take before beginning actual in-
stallaon of the DuxxBak Dekk deck boards.
Step 1: Determine Your Starng Point
Determine which side of the substructure will be the starng
point for your deck. If aaching to an inside corner of a house,
start on the end of the deck away from the house, and work
toward the house. For a deck aached only at one edge, you
can choose either side as a starng point. For the purposes of
this installaon guide, we’ll assume we’re working with an in-
side-corner deck, and we’ll start the decking on the le side as
we are looking at the back of the house from the rear yard.
Step 2: Assure most desired appearance
Lay the deck boards out on the structure, and look from dier-
ent perspecves, to determine how the deck will best show its
aesthec features.
Step 3: Prepare for ashing
If possible, remove the boom course of siding, to ease instal-
laon of ashing & sealant as decking installaon progresses.
Be sure to mark each piece of siding so that it can be reinstalled
in the same place from which it was removed.
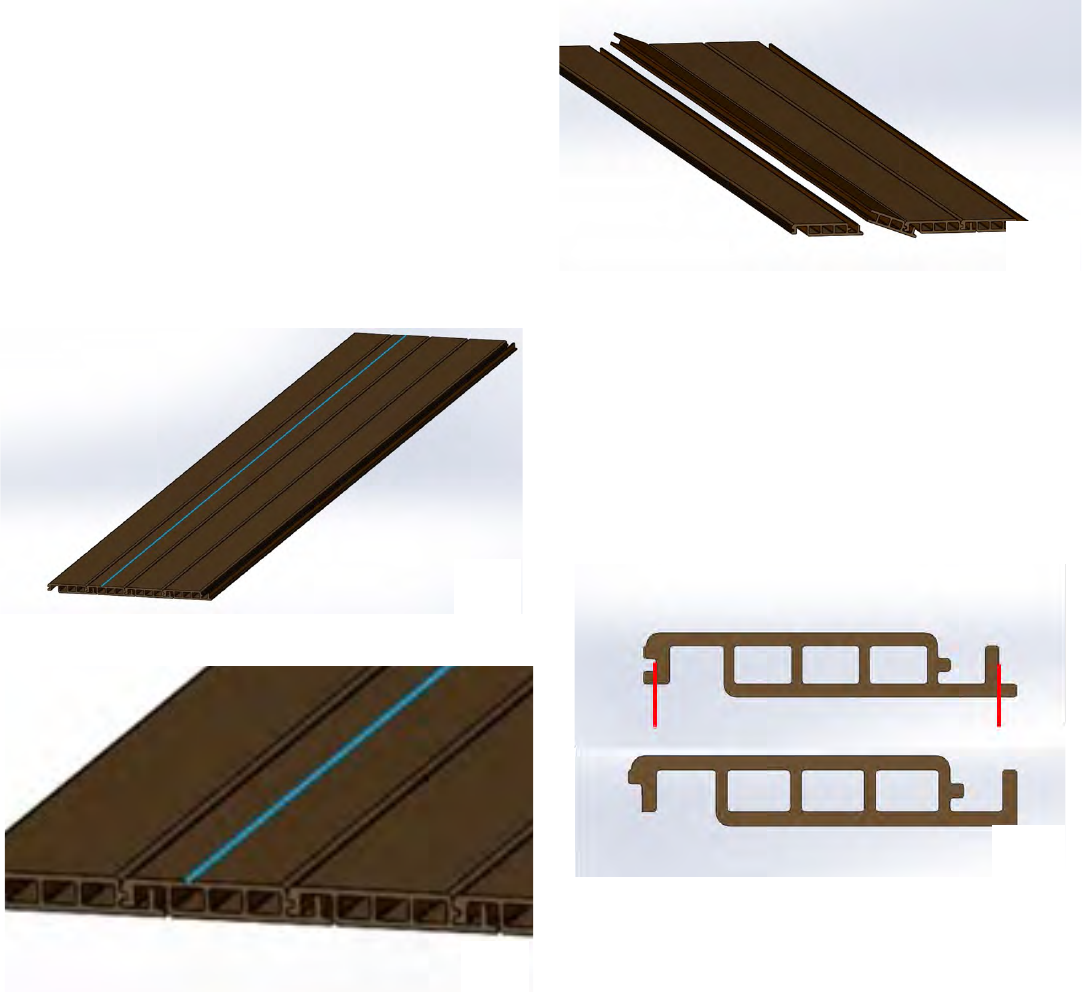
PROPER ENDCAP SELECTION
Right End Cap needed.
Le End Cap needed.
Parts of a DuxxBak Dekk Board
To determine end cap direcon for DuxxBak Dekk or I.Dekk
T&G: While looking at the open end of the installed deck
boards, simply refer to the side of the deck at which you be-
gan installaon—Le or Right.

www.DuxxBakDecking.com APRIL, 2021 V13.8 Page 8 of 16
Installaon Guide
Step 1: Install the rst deck board
Cut the enre groove wing (1-9/16” cut) away from the rst
board to leave a smooth outer surface. A sander or router can
be used to make the cut edge more uniform in appearance,
and to round over the cut edge. (see Fg1)
Posion the rst board on the deck with the fastening wing to
the right, with the board overhanging the edge of the structure
1 7/16” (or past the installed fascia board 1”).
(Not shown in these illustraons is a recommended guer
shroud, or drip edge, which should be installed between the
deck boards and the outermost structural members or fascia).
A 3/16” gap must be allowed where the end of the board
meets the house, as well at any point where the deck board
meets an abutment.
Notch the rst and second boards, if necessary, to allow for any
obstrucon that will penetrate the decking surface, such as
wooden railing posts. Cut the notches to allow for a clearance
of 3/16” on all sides of obstrucons.
Before installing the rst and all subsequent DuxxBak Dekk
boards, a bead of sealant (LEXEL is recommended) should be
installed on top of the outermost structural members (or on
top of the guer shroud) to act as a water-stop to prevent
drainage from wicking back on the underside of the deck
board.
12
Aer notching the second board to allow penetraon of
obstrucons, place a connuous bead of sealant into the enre
length of the interlocking groove of the second board, to
prevent water penetraon into the now-interrupted drainage
channel below. Because the railing post will interrupt the
channel, any water entering the channel could become trapped
without introducon of sealant in the interlocking groove. (See
Fg2)
Assure that the rst deck board is properly posioned and is
square to the structure.
Secure the deck board to the joists by inserng one 2 1/4” (or
longer) trim head screw through the face of the board at each
joist, with the screw being placed near a septum of the deck
board to take advantage of the points of highest strength. Set
the screw heads just below the top surface of the board to
avoid pullout, and to parally conceal the screw head.
Complete the installaon of the rst board by inserng a 1-
1/4” (or longer) trim screw through the fastening wing at each
joist. Insert the screw at ≥ 55 degree angle. (See Fg3)
Note: If there are no obstrucons, such as wooden railing posts,
there is no need to insert sealant in the interlocking groove
between the courses.
Step 1: (connued)
Fg1
Fg2
Fg3

www.DuxxBakDecking.com APRIL, 2021 V13.8 Page 9 of 16
Step 2: Install the second and subsequent deck boards.
With the rst and each subsequent board, insert a bead of
sealant onto the end joist, under where the board will be
installed closest to the house. (See Fg4)
And apply a generous dollop
of sealant into the drainage
channel, closest to the
house, to prevent wind-
driven rain from being blown
backward through the
channel toward the house.
(See Fg5) This dollop should
also act as a water-stop,
compressed between the
deck boards as they are
being installed.
Posion the second and subsequent boards by engaging the
interlocking grooves of each board to lock the boards together,
allowing a minimum 3/16” from the board ends to the wall.
Using a 1/32” gapping tool (typical credit card thickness),
secure each board using the prescribed fasteners (See Fg6). Do
not introduce a gap between deck boards that are to be sealed
at the interlocking groove to prevent water penetraon
because of a drainage channel interrupon. (You may use any
gapping mechanism that measures 1/32” [.03” or 1 mm] to
introduce this gap). Do not allow the gapping tool to drop
between the interlocking groove interface. GBD recommends
Perfect Level Reuseable Crosses.
NOTE: For installaons over a pre-exisng Pressure Treated or
a metal structure or if the air temperature at me of
installaon is 80°F or greater, the introducon of a gap
between the boards is not recommended.
Note: The gap between deck boards will allow the deck struc-
ture to move without compromising the integrity of the deck
surface.
Notch each subsequent board as necessary to allow for ob-
strucons that may penetrate the deck substructure at the
point where the board is being installed. Remember to install
support blocking to ensure rigidity across the deck surface
where boards have been notched.
Allow for a clearance of 3/16” on all sides of posts or other
structure obstrucons when installing the deck board.
And once again, at any point where an obstrucon interferes
with the ow of water through the channel, place a connuous
bead of sealant in the enre length of the interlocking groove
so that water will not nd its way through the deck surface,
into the drainage channel, where it may become trapped. (See
Fg2, page 8)
Step 3: Install the nal deck board.
Measure the area to be covered by the nal deck board.
If the nal board will be against the house, rip the board to at
least 3/16” less than the distance to the house.
If the nal board will overhang the deck, rip the board back to
a septum to overhang the fascia an acceptable distance. As in
preparaon of the rst board, clean up the ripped edge using a
sander or router.
Step 2: (connued)
Fg4 Fg6
Fg5
Installaon Guide (cont’d)

www.DuxxBakDecking.com APRIL, 2021 V13.8 Page 10 of 16
Secure the last deck board to the joists by inserng one trim
head screw through the face of the board at each joist, with
the fastener being placed near a septum of the deck board to
take advantage of the points of strength. Assure that the
screw heads are seated just below the top surface of the
board. (See Fg8)
Step 3: (connued)
Notch the board as necessary to allow for obstrucons that
may penetrate the deck substructure at the point where the
board is being installed. Allow for a clearance of 3/16” on all
sides of posts or other structure obstrucons when installing
the deck board. Be sure that support blocking is installed to
support the deck board where notched around obstrucons.
As with all obstrucon-based notches, place a connuous bead
of sealant in the enre length of the interlocking groove if the
board seam will intersect an obstrucon, to assure that water
will not nd its way through the deck to the surface below.
Place a bead of sealant along any joist where the deck board
will rest, on all sides of the deck. (See Fg7)
Step 4: Install seal and ash
Cut and dry-t a piece of corrosion-resistant ashing to be
installed behind the house-wrap membrane and on top of the
decking. The ashing should be bent so that when installed it
will naturally compress against the wall and the deck, and will
shed water away from the house.
Set the ashing aside unl the sealant, described below, is in
place.
Place a generous, connuous bead of sealant on top of the
DuxxBak Dekk boards approximately 3/4” away from the
house. This sealant will create a barrier to keep wind-driven
water from being blown back underneath the ashing. (See
Install your pre-bent ashing at the house-to-deck connecon,
holding the ashing ght against the house and sliding it down
onto the decking, thereby compressing the sealant installed in
the previous step. Be sure that a connuous seal is formed be-
tween the ashing and the decking. (See Fg10)
Fg7
Fg8
Fg9
Fg10
Installaon Guide (cont’d)

www.DuxxBakDecking.com APRIL, 2021 V13.8 Page 11 of 16
Step 4: (connued)
Secure the ashing to the wall behind the house wrap, using a
roong nail, staple, or other appropriate fastener.
Secure the house wrap to the face of the ashing using an
appropriate sealing tape. (See Fg11)
Install or reinstall siding if it has been removed for the deck
installaon.
Install waterproong butyl tape to the deck board (7/8”) and
obstrucon at all locaons where an obstrucon penetrates
the deck, so that water does not nd its way through the deck
to the area below. (See Fg12)
Step 4: (connued)
The waterproong butyl tape will be concealed by the post
sleeve and base trim when the rail system is installed. (See
Fg13)
If the railing posts are not sleeved, a trim piece can be created
to conceal the butyl tape. Be sure to only fasten the trim piece
to the wood post, and not to or through the decking.
If installing structural railing posts,
• Adhere to post manufacturer’s installaon guidance.
• Seal interlocking groove if fastener penetrates through
drainage channel (Step 1, page 8)
• Apply a generous amount of Lexel (or equivalent) around
base of post and around each fastener head to prevent
water penetraon.
Step 5: Install end caps to exposed board ends
Install the appropriate end caps, detailed on page 7.
Insert the end cap with the drain slots down and the arrow
poinng up.
End caps can be secured using an adhesive sealant applied to
the legs of each cap before inseron. Alternavely, a 1/8” hole
may be drilled through the underside of the decking and
through 2 legs of the end cap, into which a #6 x 1” truss-head
or pan-head screw can be inserted.
Step 6: Install guers
Install system per your design concept.
Step 7: Compleon
Install rail system to assure the safety of those who will use
your deck.
Enjoy your new deck!!!
Fg11
Fg12
Fg13
Installaon Guide (cont’d)

www.DuxxBakDecking.com APRIL, 2021 V13.8 Page 12 of 16
DuxxBak Dekk End Cap Placement On A 45 Degree Angle
15
End Caps for the GBD products are primarily designed for
square end applicaons. Occasionally, it is necessary to install
an end cap on a DuxxBak installaon that is at 45° angle. The
following informaon will allow easy and aracve applica-
on of end caps into a 45° angle applicaon. Please note, this
will require 2 (two) end caps per board.
Step 1:
Cut your rst end cap as shown below. Fg14
Step 2:
Remove the lleted edge of the end cap as shown. Fg15
Step 3:
Posion the rst end cap while being sure to align the hole of
the end cap with the drainage channel of the deck board. Use
LEXEL brand adhesive or equivalent to secure the end cap.
(See Fg16)
Step 4:
Cut the second end cap as shown below. Fg17
Step 5:
Posion the second end cap as shown and mark where the cap
must be cut to sit ush with the rst. Fg18
Step 6:
Cut the second end cap and insert it into the end of the
DuxxBak board. Use LEXEL brand adhesive or equivalent to
beer secure the end cap if necessary. When done properly,
only a small seam will be visible where the two end caps meet.
Fg19
Step 6:
Repeat this process for the remaining boards. See Fg20
Split and Remove Inserts as Shown
Remove Inserts
Cut As Shown
Remove Inserts Cut As Shown
Fg14
Fg15
Fg16
Fg17
Fg18
Fg19
Fg20
www.DuxxBakDecking.com APRIL, 2021 V13.8 Page 13 of 16
DuxxBak Dekk Replacement Board Guide
Step 1:
Determine the number of DuxxBak dekk board(s) that must
be replaced. If replacing more than one board, the DuxxBak
Replacement Board Guide will only apply to the last board
installed. All other adjacent boards will be replaced in accord-
ance with the normal installaon guidelines, above.
Step 2:
If you are replacing more than one board, remove the boards
in the opposite direcon of the original installaon, which will
allow the fasteners to be exposed for easy removal of the
second and subsequent boards.
Step 3:
Place a chalk line or other mark along the length of the board
to be removed as shown (see Fg 21), near the groove edge of
the board as shown (see Fg 22).
Step 4:
Using a circular saw set to a depth of 1 1/4”, cut the length of
the board to divide the board into two pieces. Avoid cung
into the structural component beneath the board. It may be
necessary to use an oscillang tool or other tool that can
work in close quarters to complete the cut near a wall or oth-
er obstrucon.
Step 5:
Aer the board has been separated into two secons, maneu-
ver the unfastened groove secon of the board out of its posi-
on and discard. Some eort may be necessary to remove the
secon.
Step 6:
Aer the loose secon has been removed, the remaining se-
cured secon can be removed by using a pry bar to li at each
joist to break the fastening wing at the points where its fasten-
ers are located (see Fg23). The fasteners can then be removed
using a reciprocang saw or oscillang tool equipped with the
appropriate blade, using cauon to not damage adjacent deck-
ing.
Step 7:
To prepare the new board for installaon, cut away the fas-
tening wing along the enre length of the board. Also cut away
the boom lip of the groove along the enre length of the
board (see Fg24). Note that if more than one deck board is be-
ing replaced, only the last one to be installed will have to be
modied.
Fg21
Fg23
Fg22
Fg24

www.DuxxBakDecking.com APRIL, 2021 V13.8 Page 14 of 16
DuxxBak Dekk Replacement Board Guide (cont’d)
Step 8:
Prepare the substructure to accept the replacement board or
boards. Assure that there are no interference points.
• Place a bead of sealant on the joists where the ends of
the deck boards will rest (See Fg 4 on Page 9). Assure
that all points of potenal water entry are properly
sealed as the board replacement proceeds.
• Apply a generous dollop of sealant into the drainage
channel, closest to the house, to prevent wind-driven
rain from being blown backward through the channel
toward the house (see Fg 5 on Page 9)
• Posion the prepared deck board and secure it to the
joists by inserng two trim head screws through the face
of the board at each joist. Assure that the fasteners are
placed near the septum of the deck board to take ad-
vantage of the points of strength. Set the screw heads
just below the top surface of the board to avoid pullout,
and to parally conceal the screw head.
Occasional cleaning will help to keep your deck looking fresh.
A nylon bristle brush or broom will make the task easier.
A pressure washer with a fan p may be carefully used to
clean your deck if it is guided along in the direcon of the
grain at a consistent height above the deck. A Water-Broom
can be used to assure even coverage and a consistent result.
Always test a small area to assure that the surface texture is
not damaged. Always follow safety precauons.
Although your DuxxBak Dekk Water Shedding Deck System is
durable, care should be taken to avoid scratching. If scratch-
es appear in brushed-surface DuxxBak®, it is possible to
carefully draw a stainless steel brush across the scratches in the
direcon of the grain to remove or reduce the scratches. Al-
ways test a small area before proceeding. (Do not use a wire
brush on OPTIMA-nish DuxxBak®).
Many household spills can be removed with an all-purpose
household cleaner, concentrated dish soap, laundry detergent,
degreaser, or deck cleaner. Fresh spills are more easily re-
moved, and a nylon bristle brush will help achieve the best re-
sults. Always test a small area before proceeding.
Mold and mildew that may form on the surface of your deck are
environmentally generated and will not damage your deck.
These can generally be removed with cleaners that are designed
to remove mold and mildew along with the use of a pressure
washer and nylon bristle brush as described above. Always test
a small area before proceeding.
Always make necessary repairs to maintain a safe and enjoyable
deck.
Your DuxxBak Dekk Water Shedding Deck System comes with a
lifeme limited warranty that provides coverage against splin-
tering and spling, rot and decay, and termite damage.
Your deck is designed to shed water and will keep the under
deck area dry when properly installed.
Every material expands and contracts with temperature varia-
ons, and engineered decking is no excepon. Avoid potenal
problems by allowing me for proper acclimaon of your deck-
ing to local temperatures prior to installaon. Expansion and
contracon is not a product defect and is not covered under the
DuxxBak Dekk Water Shedding Deck System warranty.
You will nd the complete Warranty Agreement and Warranty
Registraon at www.duxxbakdecking.com.
It is the responsibility of the Homeowner to register
the warranty for your new deck when the deck has
been completed.
16
STAIR INSTALLATION
Use I.Dekk or I.Dekk HD S4S or OPTIMA Dekk boards for the
construcon of stair treads for a safe installaon. Use
appropriate fastener as for each product per the Fastener
Page.
Stair tread installaon should be made on stair stringers that
are no more than 12” on center.
Leave a 3/16” gap between the stair tread boards.
Install according to local codes and acceptable construcon
CARE AND MAINTENANCE
WARRANTY

www.DuxxBakDecking.com APRIL, 2021 V13.8 Page 15 of 16

www.DuxxBakDecking.com APRIL, 2021 V13.8 Page 16 of 16
Product Features
• Unique water shedding board eliminates the need for a secondary drainage system
• DuxxBak Dekk prole contains inherent hidden fastener system
• Outdoor furniture can be safely stored under the deck
• Outdoor acvies can connue during periods of rainfall
• Resistant to decay and mold
• Strong and durable
• Less maintenance
• Eco-friendly
• Lifeme limited warranty
• Fast, easy installaon
• DuxxBak Dekk decking can be installed on joists spaced at 24”
1518 South Broadway
Green Bay, WI 54304
(877) 804-0137
List of Revisions
When accessing the installaon instrucons on www.duxxbakdecking.com, clicking on the applicable revision will bring you to the
details of what was revised, and why the revision was important.
2020DB13.7—Revisions to document made Oct of 2020
2021DB13.8—Revisions to document made April of 2021
For the most up-to-date installation instructions, please visit
www.duxxbakdecking.com
By DuxxBak Composite Decking
A Division of Green Bay Dec LLC
