
30"
48"
36"
60"
A
good furniture maker is part artist
and part engineer. An overemphasis
on either side of this equation leads
to furniture that is ugly, impractical or both.
Tables are especially vulnerable in this regard.
Tables serve many purposes and are simpler
than cabinets or chairs. But this simplicity
calls for a thorough knowledge of how wood
works when in the form of a large flat surface
and an underlying structure.
Regardless of style, there are many mis-
takes lying in wait to spoil the plans of the
would-be table maker. Whether you are new
to the craft and getting ready to make your first
occasional table or are more experienced and
aiming to build a showpiece for your dining
room, there are many aspects of table design
that you need to consider.
Shape and Size
The design process begins with establishing
practical parameters. A dining table needs to
accommodate a certain number of people on a
regular basis, and more on special occasions.
An end table provides space for a lamp and a
beverage, and an entry table may hold a vase,
the mail or your keys.
In addition to being the right size for its
use, a table must also fit in the available space.
Seating 12 for Thanksgiving dinner is a worthy
goal, but not at the expense of daily navigation
through the dining room.
At this early stage of the process, a scale
drawing of the room or a 3D model in SketchUp
will allow you to consider alternatives. Chang-
ing your mind at this stage is much easier than
it is after you start cutting wood.
How Tables Work
B Y R O B E R T W. L A N G
Numerous shapes,
forms and functions
share a common set
of issues.
Form follows function. Tables of different sizes, made for different uses,
share a common set of engineering problems.
ILLUSTRATIONS BY THE AUTHOR
If you find it difficult to visualize things
on paper or on the computer screen, you can
mock up sizes and shapes with cardboard. Put
your idea together with packing tape, place it
in the room and live with it for a day or two.
You don’t want to invest the effort to build
the real thing only to hear, “I didn’t realize it
would be like that” from someone you love
when you’re done.
Consider also how shapes play a role. Rect-
angles are easy shapes to make, but sharp cor-
ners are painful reminders of too much table
in too little space. Rounded shapes are more
adaptable if you need to squeeze in an extra
diner or two, but will be more demanding to
build. Clipping square corners will protect
How many for dinner? A rule of thumb for seating is to allow 24"-30" per person around the perimeter
of the table. But you also must consider the shape and overall size of the table. Extra space is needed
at each corner, and while a narrow table may accommodate two settings across from each other, there
may not be room for serving dishes in between. There is no substitute for a scaled layout. More exam-
ples are online at popularwoodworking.com/apr10.
your hips or shins if you need to make the
most of a tight space.
For dining tables, a simple ratio of human
body to perimeter space rarely works. Con-
sider the available space at corners or across the
table, and how that affects the table’s function.
The drawings below give some examples, and
an article adapted from my book “Drafting &
Design for Woodworkers” (Popular Wood-
working Books), gives many more (see “Go
Online” at the end of the story).
Perfect the plan first, then work on estab-
lishing the proper height for the structural
elements. Standard heights have evolved over
the years for the distance from floor to tabletop
for different types of tables. You may want to
40 ■ popular woodworking magazine April 2010

Coffee or
Cocktail Tables
16"- 20" high
18"- 24" deep
24"- 42" wide
End or
Lamp Tables
16"- 20" high
18"- 24" deep
24"- 42" wide
Sofa or
Entry Tables
28"- 42" high
12"- 18" deep
30"- 48" wide
Typical dining table is
29"-30" above floor.
Typical chair
seat is 16"-18"
above floor.
Space available for apron is limited.
Apron height of 2"-3" is typical.
Balance the need to support end of table with
clearance for feet. 10"-12" minimum, 16"-18" ideal.
“Figure-8” fasteners
swivel in partial hole
in aprons, allowing
top to move.
“Buttons” will slide in
slots in aprons,
allowing top to move.
30"
suggests a method to you that includes the
phrase, “that will keep it from moving,” be
aware that you are listening to a fool.
Wood movement can’t be controlled, but
it can be directed. In a dining table you can
screw the top to the base in the center and use
sliding fasteners on the perimeter to let the
top move equally toward each long edge. On
a desk, you can use a solid connection at the
front edge to maintain appearances and force
the results of the movement to the back.
In most tables, the wood grain will be in
line with the longest dimension of the table.
If you want an attractive table, use the widest
material you can find and arrange the indi-
vidual boards for the most attractive appear-
ance. Historically, tables were made this way
without suffering any dire results.
The common advice to use narrow strips
and to alternate the direction of growth rings
may have some merit if you’re operating a large
vary the height to suit your needs, but consider
the consequences. Restaurants often provide
tables an odd height to make people uncom-
fortable so they won’t linger.
Desks and dining tables must also be able
to accommodate a chair, and the person on
the chair, with enough room between the
table and wall to get in and out. Compare what
you are considering to existing designs, and
spend a few minutes with a yardstick, a fold-
ing chair and a card table and you’ll find out if
the dimensions you’re considering will work
in real life.
Start on Top
With the overall parameters of size and shape
established, stylistic and structural details are
next in line. Here is where the balance between
structure and style is most important. As you
develop your plan, consider the forces that will
be working against you. Considerations one
and two are movement of the top, and leverage
on the ends of the legs.
A solid-wood top will move across the grain
as the seasons change. Moisture (or the lack
of it) in the air will migrate to (or from) the
top and it will change in width. The number
of variables involved makes predicting how
much change will take place a guessing game,
but it will happen. This is a force that you can’t
control, but you can design around it.
In most table designs, the top and the base
are individual units that work together. The
connection between the two must be strong,
with some provision for the top to shrink and
swell. Cabinetmaker’s buttons and figure-8
fasteners are time-tested solutions. If someone
Irresistible force. Wood movement can’t be
stopped, but it can be accommodated. When
attaching a top to a base, use fasteners that will
slide or swivel.
No advantage to ugly. If you want an attractive
top, use the widest boards available and arrange
them for appearance (top). Gluing tops from
many thin strips with alternating end grain is
often presented as good technique. In reality, it is
more work, with more opportunities for failure-
and it makes an ugly top (bottom).
Standard is a range. This range of sizes for occasional tables is only a guide-
line; there are no laws in furniture design.
Tight squeeze. Dining tables and desks don’t leave much room for experi-
mentation. If in doubt, pull up a chair and grab a yardstick.
Go with the flow. Attach the top to the base
structure with a method that allows the top
to expand and contract with fluctuations in
humidity.
popularwoodworking.com ■ 41

Force applied to the end of a
typical table leg generates
leverage on the joints above.
Rails and stretchers
counteract leverage, but
interfere with legroom.
With narrow legs, space for
mortises is limited. Tenons are
mitered to allow for additional
length, not to fit each other at
the ends.
Wider legs allow tenons
to be longer without
interference. Taper legs
below aprons to make
them appear lighter.
Mortises too close to
the edge will weaken the
leg. Size the components
of joints based on the
amount of material left in
place, not the amount
removed.
Tenons don’t have to
be centered. Moving
them away from the
face of the aprons will
leave more material
in the leg.
Glue the central mortise and peg the outer
mortises to accommodate the cross-grain
construction.
Braces across corners provide additional
strength with thin legs and aprons. Metal
brackets are available that can simplify
this joint.
Looks good, what do they do? Breadboard ends
might help keep a top from warping; they also
might keep elephants away. If you use them, take
care to attach them solidly.
The force may be against you. Table legs make excellent levers if there is no supporting structure near
the bottom end.
arrange the boards for appearance. You can
overcome surfacing problems by adjusting
tools and techniques, but you won’t be able to
change ugly. Let the wood acclimate to your
shop and carefully mill each piece as flat and
as straight as you can. Establish a flat surface
for gluing to minimize the work you need to
do on the assembled top.
Breadboard ends look nice, but their ability
to keep a top flat is overstated. You won’t be
able to straighten out a large warped piece of
wood with a skinny straight one. In addition
to attaching the breadboard to the top with a
tongue and groove, add three or five tenons.
The tenon in the center is the only one that
should be glued. Allow room for movement
in the outer mortises, and use pegs to hold the
joint tight. Get used to the fact that the only
time you will see the end of the breadboard
flush with the edge of the top will be the day
you make it.
A Sound Structure
The most common type of support structure
is four legs connected by aprons. This design
has been used for centuries, but there are weak
points. As long as a table is sitting still, skinny
legs and aprons are fine. Put some pressure on
the bottom of the leg, however (think of drag-
ging a heavy table or kicking a leg as you pass
by), and there is enough leverage to break apart
the joints or the wood around them.
Mortise-and-tenon joints offer the stron-
gest connection, but two aprons intersecting
a leg at a right angle introduce complications,
especially if the legs are narrow. Rules based
on making a framed panel won’t apply for the
size and location of the tenons.
Size the elements of the joints so that plenty
of material remains around the mortises.
Tenons don’t have to be centered on an apron’s
Two joints, one space. Narrow legs leave little room for joinery. Mitering the ends increases the length of
the tenons; there should be a gap between them where they meet.
This has your back. No one that matters will ever
look behind the legs and under the top. Add a
wood or metal brace behind the corner if you
need to.
Size and location matter. How much material is
left around a joint is just as important as the size
of the joint. Don’t put strong tenons in weak legs.
Justifiable bias. Moving tenons to the back face
of a rail is one method to avoid a weak area
around a tenon.
factory, using suspect material and a finish that
will take the life out of the wood. If you’re care-
fully making one table at a time, this procedure
will lead you to do more work than necessary
to produce an ugly table.
Use the best material you can find for the
top. It will be the prominent visual feature
of your table, and bad decisions during con-
struction will haunt you forever. I make tops
first so I can pick the best material from what I
have available, and I usually spend more time
finding the right pieces to put together than I
spend in actual fabrication.
Match the color and grain patterns, and
42 ■ popular woodworking magazine April 2010
Span of legs should
equal 75-80 percent
of top diameter
Use hanger bolts in
ends of legs to
attach to pedestal
Rails between the legs
add strength, but
encroach on footroom.
Connect the
legs on a
diagonal and
you leave room
for your feet.
Combinations of
connections are
also effective and
add visual interest.
Many ways to make a connection. Look for a way to secure the legs without interfering with your feet.
“You can use an eraser on the
drafting table or a sledge hammer
on the construction site.”
– Frank Lloyd Wright (1867 - 1959)
American architect, interior designer & educator
thickness; they can be offset if need be. The
longer the tenon the better, and mitering the
ends of tenons that would otherwise intersect
gains additional length.
Dominos, dowels and biscuits are easy
alternatives for mortises and tenons, but won’t
be as strong or last as long. Of the three, Domi-
nos are the most durable alternative as they
most closely approximate a mortise-and-tenon
joint. Biscuits should be used in pairs to maxi-
mize the meat of the joint. Dowels may seem
strong enough in the short term, but over time
either the dowels or the holes for them will
move out of round and the joints will fail.
A brace at a 45° angle between the aprons
and behind the leg will not be seen and will
add support to smaller pieces. These braces
can be made of wood as seen in the drawing
on the previous page at bottom right, and held
in place with screws or other joinery. There
are also a variety of metal brackets available
that serve the same purpose.
Even the best joinery won’t eliminate the
effects of leverage. The addition of rails and
stretchers near the bottom of the legs will
form a stronger base, but the trade-off is in
both appearance and in use. More structure
equals a heavier appearance and interferes
with legroom.
On a desk or worktable, rails and stretchers
may not be a problem, but in dining tables this
can be an issue. Horizontal parts near the floor
make inviting footrests and are areas where
wear will quickly show.
Connecting rails can be like aprons run-
ning from leg to leg, or they can connect pairs
of legs. These rails are then connected to each
other by a stretcher running the length of the
table. A third method is to join the legs from
corner to corner, with the cross pieces joined
to each other in the center.
The best joint to use is a mortise-and-tenon,
but there are alternatives. A single dovetail
is effective for rails that join legs at the top of
the leg. This allows the rail to be thin, and the
wedge shape of the dovetail resists the outward
movement of the legs. Sliding dovetails are
traditionally used on small stands to join legs
to a central pedestal.
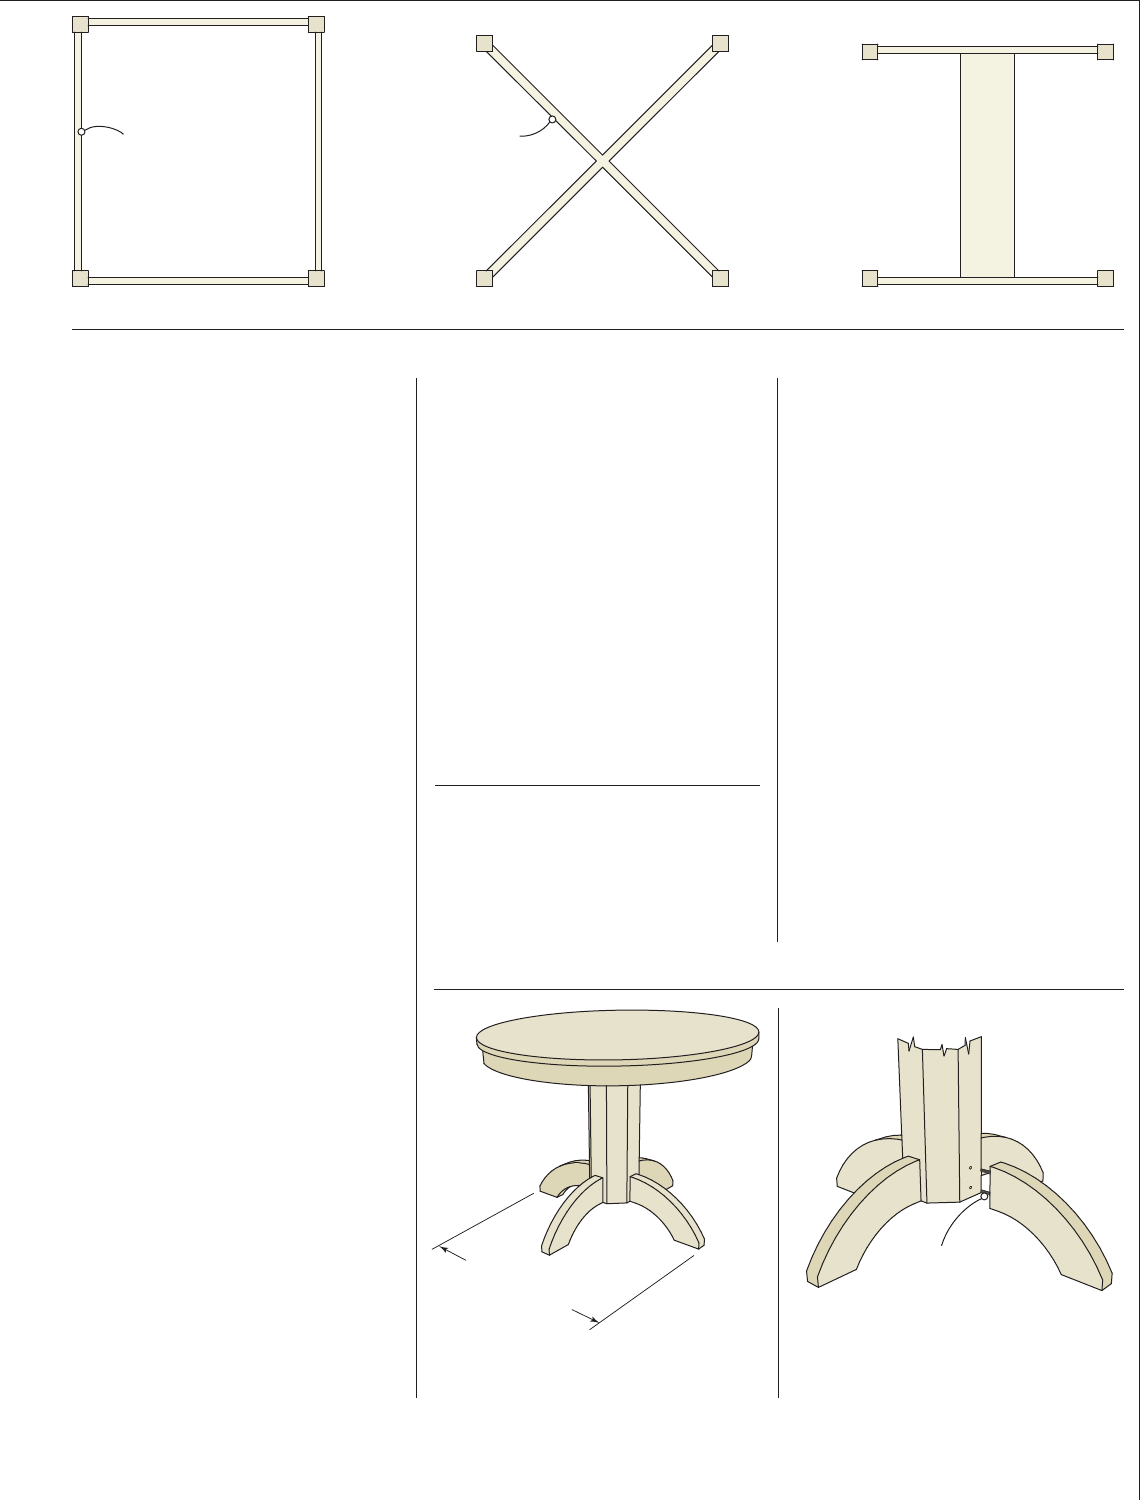
On a Pedestal
There are alternatives to placing a leg on each
corner. Tables that are square or circular can
be supported by legs attached to a central post.
Keep the footprint as large as is practical to pre-
vent the table from tipping if weight is placed
on one end. Imagine the ends of the feet to be
vertical legs to get an idea of how they will act
in their supporting role.
In small pedestal tables, such as the iconic
Shaker candlestand, the legs attach to the ped-
estal with sliding dovetails. In commercially
made dining tables, the typical connection
is with hanger bolts in the ends of the feet,
held firm with nuts on the inside of a hol-
low post.
At the top of a pedestal table, a plate wider
than the column is used as an intermediate
connection for the top. With small tables the
connection to the column can be a permanent
joint. For larger tables, it’s better to use screws
or hanger bolts, down to the column and up
to the tabletop.
To make a dining table extend, leave a few
inches of space between the base and the top
for an extension-slide mechanism. In most
extension tables, the grain direction is rotated
90˚ to run across the table. This avoids making
an end-to-end match where the two halves
join. A side-to-side match will be less obvious
when the table is closed.
While you could make your own slides,
buying manufactured ones has advantages.
Put it on a pedestal. A central column with
three or four feet is often a good solution in a
limited space.
Opportunity to over-think. In factory-made
tables, legs bolt on to a hollow pedestal. Small
pedestals often connect the legs to the post with
sliding dovetails.
popularwoodworking .com ■ 43

Tabletop must be thick
enough to provide stiffness
without additional support.
End assemblies must be
placed in from the end of
the tabletop to provide
legroom. The feet will
become footrests and
show wear and tear.
24"
16"
Small legs and flush
aprons leave no room
for adequate joints.
Solid-wood top in mitered frame
will self-destruct due to seasonal
wood movement.
Space at end is too narrow
to accommodate chair.
Aprons too wide to allow
room for leg above chair seat.
34"
There is a lot of engineering and fitting involved
in making a slide that will work predictably
for an extensive period of time.
Two types of slides are available: one for
pedestal tables and one for tables with legs.
The type for pedestal tables includes a gear
mechanism that equalizes the movement from
the center outward. The two types are also
crowned in opposite directions to compensate
for sagging as the table is opened. Equalized
slides raise slightly at each end in the open
position, and the other raises slightly in the
center. When the leaves are in place, the sur-
face will be level.
Get the hardware (or at least the actual
sizes) first and engineer the table around it,
with the appropriate space between the base
and the top. Attach the slides with screws to
the top and to the structure below. If your
extension design incorporates an apron, attach
the apron to the top. The joint in the apron
will likely open as the top moves seasonally.
A small piece of trim to cover the gap, attached
to one apron only, is a common fix.
The aggregate width of the leaves should
be a couple inches less than the opening range
of the slides. Short dowels with dome-shaped
ends will fit the leaves to each other, and to
the tabletop.
On the Beam
Feet can also be placed laterally, and connected
by posts and beams to make a trestle table.
This time-tested alternative to four legs can
simplify joinery and make maximum use of
minimal amounts of material. Trestle tables are
essentially a series of connected I-beams.
Each end has an obvious “I” shape, but
looking down on the structure in plan view
reveals that the two ends connected by central
rails also form an “I.” The top in this scheme
often plays a structural role, connecting the
outer ends of the upper beams, thus keeping
the post-and-beam assemblies at each end
from twisting or racking.
Hybrid structures are often seen, and are
a good creative outlet. You can have a trestle
form at the base and conventional aprons at
the top. Whatever the form, keep an eye on the
structural elements. You want the table to be
strong and attractive, and you don’t want wood
movement of the top causing problems.
Structural elements will have an impact on
the appearance of the table. Elements associ-
ated with specific styles can look odd if placed
inappropriately. The proportions of the ele-
ments will also impact the overall proportions
and appearance of the final design. Tapers,
bevels and curves can make parts appear
smaller or thinner than they really are.
The last illustration shows an unfortunate,
but common combination of design mistakes.
For a design to look good, it has to make sense,
and ignoring hundreds of years of techniques
isn’t wise. Learn the basics and build on a firm
foundation – then get creative.
PWM
Bob is senior editor of this magazine, and the author of
“Drafting & Design for Woodworkers” and several other
books. Visit his web site,
craftmanplans.com.
Beginner’s bad luck. Table design isn’t always intuitive. The drawing above shows several mistakes that
beginning table builders tend to make.
On the beam. Trestle tables are another alternative to four legs. Trestles provide a strong structure with a
small amount of wood.
Appearance can be deceiving. Proportions of individual components have an impact on the overall
perception of a design. These two tables are the same size, shape and basic structure, but make wholly
different design statements.
Go Online for more …
3D models of the tables in the opening illus-
tration are available for free download at:
u popularwoodworking.com/sketchup
For an article excerpt from “Drafting and
Design for Woodworkers” on dining table
shapes and sizes, visit:
u tinyurl.com/ybhanum
For a catalog of manufactured solid wood
table legs and kits, visit:
u tablelegs.com
To purchase the book “Drafting & Design for
Woodworkers”, visit:
u tinyurl.com/ybb2vxq
All of our online products are available at:
u WoodworkersBookShop.com
u
44 ■ popular woodworking magazine April 2010

27
1
⁄2"
1
1
⁄8"
2"
18"
14"
11
3
⁄4"
3
1
⁄2"
1"
3
⁄4"
3
⁄4"
5
⁄8"
1
⁄2"
3
⁄
8"
1
1
⁄
8"
3
⁄
16"
3
⁄
8"
3
⁄
4"
3
⁄
4"
9
⁄
16"
1
1
⁄
8"
3
⁄
16"
3
⁄
4" x 5"
side apron
3
⁄
4" x
3
⁄
4"
front rails
3
⁄
4" x 5"
side apron
3
⁄
4" x 5"
back apron
3
⁄
4" x 1" drawer
guide at top &
bottom of apron
3
⁄
4" x 1" drawer
guide at top &
bottom of apron
A Good Example
I
f you’ve never made a table before, or if
you just need to exercise your table-
building muscles, this small Shaker side
table, featured in Issue 2 of
Woodworking
Magazine (Autumn 2004), is a good prac-
tice piece. The proportions are excellent,
the joinery is sound and it won’t require
a large investment in materials or time.
When you’re done you will have an attrac-
tive end table or nightstand.
The top is 18" square, and connects to
the frame with screws in oversized holes in
the upper drawer guides. If you choose not
to include the drawer, simply repeat the
joints from the back aprons at the front and
attach the top to the top edge of the aprons.
Starting with a good example is also a
good way to practice developing your own
designs. One secret to becoming a good
designer is to study many different existing
forms and experiment with them. Design is
a skill that can be learned through practice;
it isn’t a gift that some of us have and some of
us don’t.
A SketchUp model of this table is available
as a free download at popularwoodworking.
com/sketchup. If you have SketchUp installed
on your computer, you can download the
model and view it in three dimensions to
see how it goes together, or you can use the
model as a starting point for designing a simi-
lar table of a different size.
– RL
BACK LEG JOINT DETAILS
FRONT
LEG JOINT
DETAILS
SHAKER TABLE ELEVATION
TENONS AT
BACK LEG
DOVETAIL AT
FRONT LEG & RAIL
popularwoodworking .com ■ 45
