
USER’S
GUIDE
RIDE COMMAND

WARNING
Operating, servicing, and maintaining a passenger vehicle or off-road
vehicle can expose you to chemicals including engine exhaust, carbon
monoxide, phthalates, and lead, which are known to the State of California
to cause cancer and birth defects or other reproductive harm. To minimize
exposure, avoid breathing exhaust, do not idle the engine except as
necessary, service your vehicle in a well-ventilated area and wear gloves
or wash your hands frequently when servicing your vehicle.
For more information go to www.P65Warnings.ca.gov/passenger-vehicle.
For videos and more information
about a safe riding experience with
your Polaris vehicle, scan this QR
code® with your smartphone.
!

Ride Command User’s Guide
Unless noted, Polaris and Ride Command are trademarks of Polaris Inc.
Bluetooth® is a registered trademark of Bluetooth SIG, Inc. iPhone® is
registered trademarks of Apple Inc. iOS® is a registered trademark of Cisco
Systems, Inc. Android® is a registered trademark of Google LLC. Kingston®
is a registered trademark of Kingston Technology Corporation. Sandisk® is a
registered trademark of SanDisk LLC.
Copyright 2021 Polaris Inc. All information contained within this publication is
based on the latest product information at the time of publication. Due to
constant improvements in the design and quality of production components,
some minor discrepancies may result between the actual vehicle and the
information presented in this publication. Depictions and/or procedures in this
publication are intended for reference use only. No liability can be accepted
for omissions or inaccuracies. Any reprinting or reuse of the depictions and/or
procedures contained within, whether whole or in part, is expressly
prohibited.
The original instructions for this vehicle are in English. Other languages are
provided as translations of the original instructions.
Printed in U.S.A.
9940303 Rev 01

Thank you for purchasing a POLARIS vehicle, and welcome to our world-wide
family of POLARIS enthusiasts. Be sure to visit us online at www.polaris.com for
the latest news, new product introductions, upcoming events, career
opportunities and more.
Here at POLARIS we proudly produce an exciting line of utility and recreational
products. We believe POLARIS sets a standard of excellence for all utility and
recreational vehicles manufactured in the world today. Many years of experience
have gone into the engineering, design, and development of your POLARIS
vehicle, making it the finest machine we’ve ever produced.
For safe and enjoyable operation of your vehicle, be sure to follow the
instructions and recommendations in this owner’s manual. Your manual contains
instructions for minor maintenance, but information about major repairs is
outlined in the POLARIS Service Manual and can be performed by a factory
certified Master Service Dealer (MSD) technician.
Your POLARIS dealer knows your vehicle best and is interested in your total
satisfaction. Your POLARIS dealership can perform all of your service needs
during and after the warranty period.
For the most up-to-date owner’s manual visit https://www. polaris. com/en-us/
owners-manuals
.
3
WELCOME

The following signal words and symbols appear throughout this manual and on
your vehicle. Your safety is involved when these words and symbols are used.
Become familiar with their meanings before reading the manual.
DANGER
DANGER indicates a hazardous situation which, if not avoided, WILL result in
death or serious injury.
WARNING
WARNING indicates a hazardous situation which, if not avoided, COULD result
in death or serious injury.
CAUTION
CAUTION indicates a hazardous situation which, if not avoided, COULD result
in minor to moderate injury.
NOTICE
NOTICE provides key information by clarifying instructions.
IMPORTANT
IMPORTANT provides key reminders during disassembly, assembly, and
inspection of components.
The Prohibition Safety Sign indicates an action NOT to take in
order to avoid a hazard.
The Mandatory Action Sign indicates an action that NEEDS to
be taken to avoid a hazard.
4
SAFETY SYMBOLS AND SIGNAL WORDS


6

INTRODUCTION
OVERVIEW
Welcome to Polaris Ride Command. This intuitive software includes a variety of
interactive features and access to your snowmobile’s custom information.
For a safe and enjoyable riding experience with your new display, be sure to
read your vehicle’s owner’s manual and this user’s guide. Should you need
additional assistance with display operation or software updates, please see
your Polaris dealer or visit ridecommand.polaris.com.
For the latest Ride Command information, including software, maps, and trails
updates, please visit ridecommand.polaris.com.
WARNING
Do not enter information while operating your vehicle. Failure to pay attention
to the operation of your vehicle could result in loss of control, injury, or death.
You assume all risks associated with using this device. Read your user’s guide
thoroughly and always drive with the latest maps and road data from
ridecommand.polaris.com
.
BEFORE YOU RIDE
Before riding with your new display, please complete the following:
• Read this manual in its entirety.
• Familiarize yourself with the features and operations of the display while the
vehicle is stationary.
• Download the Polaris Ride Command application from your phone’s app store
and create your personalized account.
• Check your display to ensure you have the appropriate maps and roads
visible for your area. For instructions on updating the maps on your display,
see page 8.
• When updating software, be sure you are using a compatible USB flash drive.
See page 42 for more information.
• Check https://www.polaris.com/en-us/owners-manuals for the latest updates
to the owner’s manual.
NOTICE
Using the display for an extended period of time while the vehicle’s engine is
off can drain the battery.
7
INTRODUCTION

DEVICE OPERATING REQUIREMENTS
Phone functionality, in pairing with this display, is dependent on the capabilities
of your cell phone.
NOTICE
Some cell phones or operating systems will not work as shown in this manual.
DEVICE COMPLIANCE STATEMENTS
NOTICE
Some vehicle models contain radio equipment as follows:
USA RADIO COMPLIANCE
This vehicle contains the following radio equipment or components that contain
radio equipment:
COMPONENT COMPONENT ID MANUFACTURER
9200 Series Display RC-7W Polaris Industries Inc.
This device complies with part 15 of the FCC Rules. Operation is subject to the
following two conditions: (1) This device may not cause harmful interference,
and (2) this device must accept any interference received, including interference
that may cause undesired operation.
CAUTION
Changes or modifications not expressly approved by the party responsible for
compliance could void the user’s authority to operate the equipment.
CANADA RADIO COMPLIANCE
This vehicle contains the following radio equipment or components that contain
radio equipment:
COMPONENT COMPONENT ID MANUFACTURER
9200 Series Display RC-7W Polaris Industries Inc.
This device contains license-exempt transmitter(s)/receiver(s) that comply with
Innovation, Science and Economic Development Canada’s license-exempt RSS
(s). Operation is subject to the following two conditions:
8
INTRODUCTION

1. This device may not cause interference.
2. This device must accept any interference, including interference that may
cause undesired operation of the device.
IMPORTANT
For applications that use vehicle-to-vehicle (V2V) communication, radio
transmitter IC 5966A-RC7W has been approved by Innovation, Science and
Economic Development Canada (ISED) to operate with Polaris antenna (part
number 4019211) with gain of 3 dBi. Any antenna that has a gain greater than
3 dBi is prohibited for use with this device.
EUROPEAN UNION (EU) RADIO COMPLIANCE
This vehicle contains the following radio equipment or components that contain
radio equipment:
COMPONENT 9200 Series Display
COMPONENT ID RC-7W
MANUFACTURER Polaris Industries Inc.
TRANSMITTING FREQUENCY* 2.4 GHz
MAX RF TRANSMITTING PWR 100 mW
* Other transmitting radio frequencies may exist outside of EU markets.
Hereby, Polaris Industries Inc. declares that the above radio equipment is in
compliance with Directive 2014/53/EU.
The full text of the EU declaration of conformity is available at the following
internet address:
https://www.polaris.com/en-us/radio-conformity/
9
INTRODUCTION

10

FEATURES AND CONTROLS
RIDE COMMAND OVERVIEW
WARNING
Driving while distracted can result in loss of vehicle control, crash, and injury.
We strongly recommend that you use extreme caution when using any device
that may take your focus off the trail. Your primary responsibility is the safe
operation of your vehicle. We recommend against the use of any hand-held
device while riding and encourage the use of voice-operated systems when
possible. Be aware of all applicable local laws that may affect the use of
electronic devices while riding.
For the latest information about your Ride Command display, including software,
maps, and trails updates, please visit: https://ridecommand.polaris.com.
11
FEATURES AND CONTROLS

RIDE COMMAND BUTTONS
BUTTON DESCRIPTION FUNCTION
q
5-Way User
Interface (UI) Control
Moves the cursor and pans the focus
on the map screen.
w
Up Button
Zooms in when using the map and
scrolls up through lists of features.
e
Polaris Button
Opens and closes the Badge Panel.
r
Down Button
Zooms out when using the map and
scrolls down through lists of features.
t
Back Button
Cycles all screens and backs user
out of menus.
12
FEATURES AND CONTROLS

GAUGE SCREEN
The Gauge Screen displays upon start-up and will serve as your primary
interface when operating the vehicle.
The Gauge Screen is fully
customizable and can be
configured to display as
much, or as little, vehicle
information as you like.
Options include vehicle
speed, RPM, fuel level,
engine temperature,
engine hours, trip meter,
battery voltage, and
compass.
CONFIGURE GAUGE SCREEN
The display allows up to four customized gauge screens. All but one screen can
be deleted; one will always remain as the default.
NOTICE
In the gauge configuration panel, display buttons and hand controls will not
work. You must use the touchscreen to change screen settings and layouts.
Follow the instructions below to create customized gauge screens.
1. Press the Gear icon in
the bottom right corner
of the touchscreen.
2. On the right side of the
configuration panel,
press the Screens tab
q
followed by the Add
New button
w
.
13
FEATURES AND CONTROLS

3. In the left side panel,
choose a gauge layout
from the three provided
options.
ICON DESCRIPTION
e
Two circular widgets and up to three linear widgets.
r
Up to five linear widgets.
t
Four circular widgets.
4. Select the Data tab
y
. As the widget slots on the left are selected, the
selection of what data item to populate that widget slot with is selected on
from the list on the right.
For single value slots,
choose 1 data item. For list
slots, choose up to 3 or up
to 5 data items, depending
on the configuration of the
gauge layout as selected
above.
NOTICE
Keep your display software up-to-date as more widget options become
available. For more information, see page 40.
14
FEATURES AND CONTROLS

5. Reorder the widgets by
pressing and holding
down on the widget and
sliding the widget up or
down into the desired
position.
6. Click the green check mark or Done to close the configuration panel.
GAUGE VIEW MODE
Press
q
to toggle between the two available gauge view modes, analog and
digital.
15
FEATURES AND CONTROLS
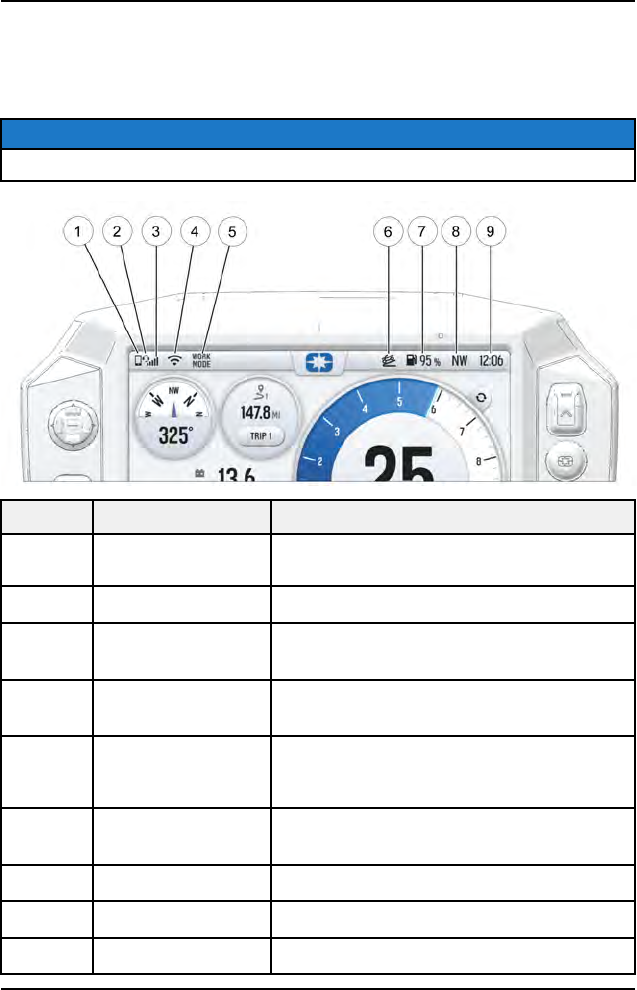
ICON BAR
The Icon Bar is located across the top of the touchscreen and displays cell
phone, headset, and wireless internet connectivity, fuel level, compass heading
and local time.
NOTICE
The Icon Bar will not appear when the Badge Panel is open.
ICON DESCRIPTION FUNCTION
q
Mobile Device
Indicator
Displays icon if mobile device is connected
w
Headset Indicator Displays icon if headset is connected
e
Cellular Signal
Strength
Displays current cellular signal strength
r
Wireless Internet
Signal Strength
Displays current wireless internet signal
strength
t
Drive Mode Displays current drive mode. When in
standard mode, “STD MODE” will only
show for 10 seconds.
y
Active Decent
Control (ADC)
Displays icon if ADC is enabled
u
Fuel Level Displays current fuel capacity percentage
i
Vehicle Direction Displays vehicle direction
o
Clock Displays current time
16
FEATURES AND CONTROLS

BADGE PANEL
The Badge Panel provides easy access to frequently used features, basic
display and vehicle controls, and a list of recent notifications.
q
Controls Tab
w
Notifications Tab
e
Ride Mode
r
EPS Level Assist
t
Day/Night Display Mode
y
All Settings Button
u
Badge Panel Button
i
Display Brightness
o
App Tray
ACCESSING THE BADGE PANEL
There are two ways to
open the Badge Panel,
press the Badge Panel
button (Polaris Logo)
q
at
the top of the touchscreen
or the Polaris Menu hard
button
w
on the right of the
display.
17
FEATURES AND CONTROLS

APP TRAY
The App Tray provides easy access to key features on the display screen. Tap
on any of the listed icons to navigate to that display screen. For example, tap the
Maps button to navigate to the Map Screen, or press the Music button to
navigate to the Audio Screen.
CONTROLS TAB
Press the Controls tab to change display mode, display brightness, activate
heated grips, and change fuel type.
DISPLAY MODE
From the Controls tab, select the Display Mode from the available options. The
display mode can be set to Day, Night, or AUTO mode.
Day Mode
Night Mode
DISPLAY BRIGHTNESS
From the Controls tab, select Display Brightness by moving the touchscreen
slider to the left or right. Press the AUTO check box to allow the screen to adjust
automatically based on ambient light conditions.
NOTIFICATIONS TAB
Press the Notifications tab to view DTC codes, installed software, and vehicle
warnings.
18
FEATURES AND CONTROLS

ENGINE OVERHEAT INDICATOR
If the engine goes over temperature, a red banner will appear at the top of your
display stating: ENGINE OVERHEATING – STOP IMMEDIATELY.
The appearance of this banner indicates continued operation of your ATV could
result in serious engine damage.
The engine
management system
will automatically
reduce engine power
and set a fault. Stop
the engine
immediately. Allow
the engine to cool
down.
NOTICE
If engine overheating seems to be caused by something other than poor
cooling conditions, see your dealer or other qualified technician for service.
19
FEATURES AND CONTROLS

20
OPERATION
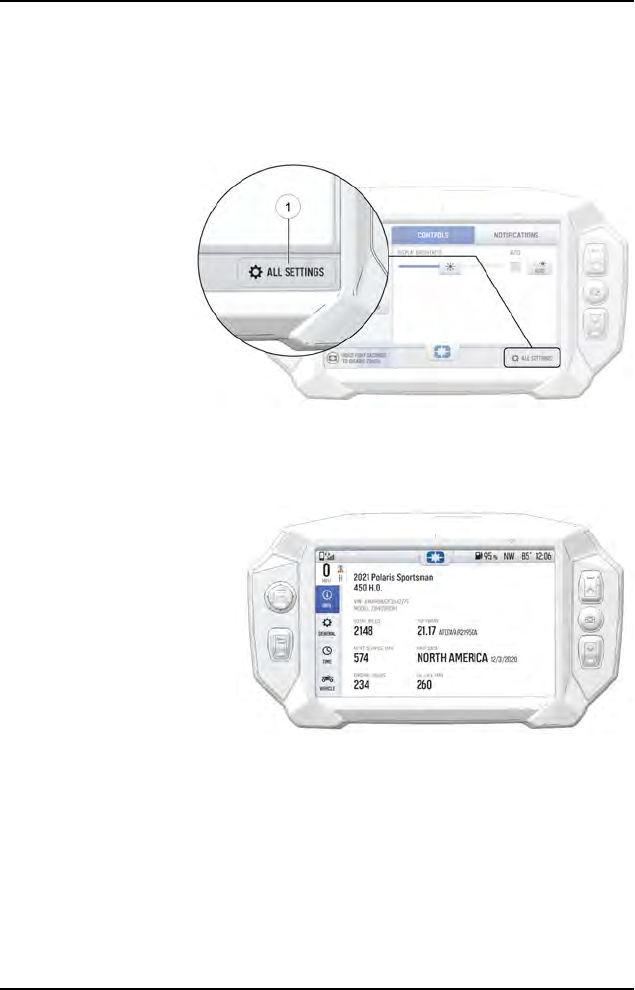
ALL SETTINGS
From All Settings, you can view important details about your vehicle and
personalize your touchscreen display. The settings menu is comprised of four
categories: Vehicle Info, General, Time, and Vehicle Settings.
To open Settings,
press the Badge
Panel button on the
display and then the
All Settings button
q
from the
touchscreen.
INFORMATION
From the Info tab you can view the following:
• Vehicle Identification
Number (VIN)
• Model Number
• Installed Software
Version
• Mileage
• Total Engine Hours
• Next Service Interval
21
OPERATION

GENERAL
From the General tab you can do the following:
• Connect to Ride
Command account
• Manage wireless
internet connections
(Wi-Fi)
• Manage Bluetooth®
devices
• Change the display
language
• Set the speed units of
measure (mph or km/h)
• Set the temperature
units (F or C)
• System information
• Update software
• Update maps and trails
TIME
From the Time tab you can do the following:
• Set time from internal
GPS location
• Set time zone
• Set time (if GPS time is
not enabled)
• Set date
• Enable GPS Time
(automatically sets the
time to the time zone
you are currently in)
• Set the time format (12-
hour or 24-hour)
22
OPERATION

VEHICLE
From the Vehicle tab you can do the following:
• Access vehicle
diagnostics
• View oil life and service
hours
• Enable/disable engine
start lockout
• Access plow control
settings
• Setup V2V group ride
settings
• View GPS status
• Access handlebar
shortcut settings
PIN ACTIVATED SECURITY SYSTEM (P.A.S.S.)
The optional PIN Activated Security System (P.A.S.S.) is to prevent
unauthorized use. When enabled, the vehicle cannot be operated until a valid
passcode has been entered using the Ride Command display screen.
ENABLE P.A.S.S.
NOTICE
After activating P.A.S.S. for the first time you must power down the vehicle and
allow the electronic control module (ECM) to fully shutdown before restarting.
This may take up to three minutes.
1. Go the settings menu by pressing the Menu button.
2. Select Vehicle Settings from the left toolbar.
3. Select Engine Start Lockout.
4. If this your first time activating P.A.S.S. you will be prompted to enter a new
passcode. Enter and verify new passcode.
Please record your passcode.
5. Turn Engine Start Lockout from No to Yes.
6. Turn off the vehicle using the key ignition switch.
23
OPERATION

NOTICE
If the battery becomes low while the P.A.S.S. system is enabled, the gauge
may show “New Vehicle Detected” after the battery has been recharged/
replaced. Leave the key in the ON position to allow system reconfirmation.
DISABLE P.A.S.S.
1. Go the settings menu by pressing the Menu button.
2. Select Vehicle Settings from the left toolbar.
3. Select Engine Start Lockout.
4. Enter passcode to disable P.A.S.S.
5. Turn Engine Start Lockout from Yes to No.
CONNECTED DEVICES USING BLUETOOTH
IPHONE® PAIRING
To connect your iPhone® to the display, do the following:
ON YOUR IPHONE®
• In your iPhone® settings turn on Bluetooth®.
• If available, make your phone discoverable to other devices in your phone’s
Bluetooth® settings.
ON THE RIDE COMMAND DISPLAY
• Go the Settings menu by pressing the Badge Panel button followed by the All
Settings button.
• Select General from the left toolbar and click on Bluetooth Devices.
ON YOUR IPHONE®
• A prompt will appear on your iPhone® requesting permission to pair with your
phone.
• Ensure the confirmation code on the screen and your phone are the same
then press Pair on your phone.
• For optimal experience, enable notifications and sync contacts from your
phone’s Bluetooth® settings.
24
OPERATION

ANDROID® PAIRING
To connect your smartphone to the display, do the following:
ON YOUR SMARTPHONE
• In your smartphone settings, turn on Bluetooth®.
NOTICE
On some phones you have to make the phone visible to other devices. If your
phone has this feature, it should show up on the Bluetooth® connection screen
of your phone. If no option exists to make your phone visible to the display, it is
already visible to the display.
• If available, make your phone discoverable to other devices in your
Bluetooth® settings.
ON THE RIDE COMMAND DISPLAY
• Go the Settings menu by pressing the Badge Panel button followed by the All
Settings button.
• Select General from the left toolbar and click on Bluetooth Devices.
• Press the Add Device button.
• When your phone appears on the display, press the + button next to it to pair
with your phone.
• Ensure the confirmation code on the screen and your phone are the same
then press Pair on your phone.
ON YOUR SMARTPHONE
• A request will appear to pair with the display. Ensure the confirmation code
matches between the Ride Command display and your phone.
• Press OK.
• For an optimal experience enable notifications and sync contacts from your
smartphone’s Bluetooth® settings.
ON THE RIDE COMMAND DISPLAY
• The display will now show a list of previously connected phones on the
display. If it is unpaired, click on your phone from the list.
• Once the display says connected/paired, your phone is now connected to the
display via Bluetooth®. After a phone is connected, the Device Manager
Screen will appear.
25
OPERATION

HEADSET PAIRING
The Ride Command touchscreen display can be connected to a smartphone
and headset simultaneously. The display can connect with Polaris-approved
Bluetooth® headsets to listen to music, take phone calls, and talk with other
riders.
To connect your Bluetooth® headset to your display, do the following:
ON YOUR HEADSET
• Put your device into pairing mode.
ON THE RIDE COMMAND DISPLAY
• Go the Settings menu by pressing the Badge Panel button followed by the All
Settings button.
• Select General from the left toolbar and click on Bluetooth Devices.
• Press the Add Device button.
• When your device appears on the display press the + button next to it to pair
with your device.
NOTICE
For a better riding experience, connect your headset directly to the display, not
your mobile device.
26
OPERATION

CONNECTING DEVICES USING WI-FI (IF
EQUIPPED)
The Ride Command display can connect to a home network or mobile hotspot.
To connect using wi-fi, do the following:
1. Go the Settings menu
by pressing the Badge
Panel button followed
by the All Settings
button.
2. Select General from
the left toolbar and click
on Wi-Fi.
3. Slide the button to ON.
4. A list of networks within range are shown.
5. Select the network that you wish to connect to.
6. If required, enter the network password.
PHONE SCREEN
Connect a smart phone and headset to listen to audio, make and receive calls
and text messages, access a phone’s contact list, and call history.
When a smartphone is
connected to the display,
users are able to make
phone calls from the
display through the
keypad, recent calls, or
their contacts by pressing
the phone icon in the
device manager screen or
through the pull down
menu.
The Ride Command display is compatible with Android® and iOS®. Go to
https://ridecommand.polaris.com/en-us/supported-devices for latest operating
system compatibility.
27
OPERATION

NOTICE
There is no built-in microphone in the display. Phone call audio will play
through the phone speakers or a Polaris approved headset if connected. Some
dial options may be unavailable at speeds greater than 3 mph (5 km/h).
AUDIO SCREEN
NOTICE
Your vehicle is not equipped with a speaker system. Audio can only be
transmitted through a Bluetooth® media device or headset. Only one device
and one headset can be connected at a time.
Audio playback through
USB or Bluetooth®
devices are compatible
with your Ride Command
display. The Music Screen
allows you to access music
stored on your smartphone
or other music device. You
can pair your device using
Bluetooth®, or by
connecting it to the
display’s USB port.
DEVICE REQUIREMENTS
Audio playback is only available on USB flash drives formatted to ex-FAT or
FAT32 and operating systems iOS® 10 and Android® 5.0 or newer.
28
OPERATION

MAP SCREEN
Press the Map button
from the App Tray in
the Badge Panel or
press the Back
button to cycle to the
map screen. The
map will center you
based on the location
of the in-vehicle GPS.
NOTICE
Controls on the map surface disappear after 10 seconds of inactivity, return
with a tap anywhere on the map.
ZOOM
Use the Plus and
Minus buttons on the
left side of the
screen, the 5–way
user interface (UI)
control, or pinch the
screen with your
fingers to zoom in
and out on the map.
The waypoint icon appears when navigation is in use and the
GPS is routed to a specific waypoint. Press the Waypoint icon
to focus on the destination point. To set the focus back to your
location, press the Target icon in the bottom right corner of the
screen.
29
OPERATION

MAP ORIENTATION
The compass icon on the right side of the screen toggles how the map orients
itself during navigation. There are two orientation options: North Up and Course
Up. Pressing the Compass icon will also re-center your vehicle if not already
centered.
MAP ORIENTATION MAP ICON
North Up view locks the maps orientation so that
North is always at the top of the screen, regardless
of your vehicle’s position or direction.
Course Up view rotates the map to match the
direction of your vehicle.
30
OPERATION

WAYPOINTS
Waypoints are user-defined locations on the map. Waypoints can be saved and
shared with friends.
ADD A WAYPOINT
To add a waypoint, do the following:
1. From the Map Menu,
tap the Add Waypoint
q
from available
options.
2. A menu for the
waypoint will pop-up.
3. From the pop-up menu
you can see the
distance to the
waypoint and edit the
details of this waypoint.
NAVIGATING TO A WAYPOINT
To view a saved waypoint, do the following:
1. From the Map Menu,
tap the Rides &
Waypoints
w
from
available options.
2. A list of saved
waypoints will pop-up.
3. From the list you can
see the distance to
waypoints and
directional bearing.
31
OPERATION
POINTS OF INTEREST (POI)
Points of interest (POI), such as restaurants, gas stations, hotels, dealers, and
more, are available from the map screen. POI will display on the Map Screen as
you zoom in and out of the map. Tap on the POI icon to view more information
about the location.
GO TO NAV
Go to Nav is available from the Map Screen when viewing a waypoint or point of
interest (POI). Pressing Go to Nav will display the distance and directional
bearing of the POI.
NOTICE
Go to Nav does not provide turn-by-turn directions to a POI.
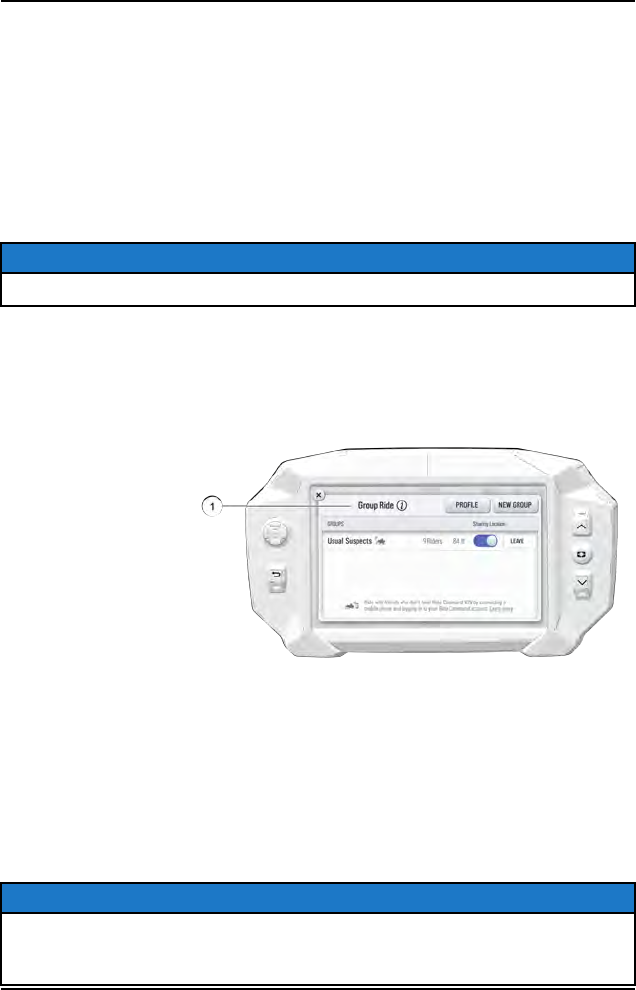
GROUP RIDE
Invite your friends to a group to see their live location on the map of your
smartphone, tablet, or in-vehicle Ride Command display.
For information on
how Group Ride
works and for
instructions on how to
set up Group Ride
using your
smartphone, or with a
vehicle-to-vehicle
(V2V) antenna, tap
the i icon beside the
title from the Group
Ride Panel
q
.
For a video on setting up a Group Ride, please visit:
https://youtu.be/ZCWIOXLGYUY.
GROUP RIDE SETUP
There are two ways to set up a group ride.
• Cellular-Based (Cell-Based)
• Vehicle-to-Vehicle Antenna
NOTICE
In order for vehicles with a V2V antenna and vehicles using cell-based group
ride to join the same group, at least one member of the group must be
connected to both the V2V antenna and the cell-based group ride.
32
OPERATION

CELLULAR-BASED GROUP RIDE
Features of using your mobile phone for group riding:
• Works within cellular
range
• Requires a tethered
mobile phone
• Infinite range between
vehicles
• Works with friends using
the mobile app
Use the following procedure to set up a cell-based Group Ride:
NOTICE
The display requires a GPS lock, indicated by a blue navigation arrow marker,
before you are able to setup or join a group ride.
To set up a group ride using a mobile phone, do the following:
1. From the Map Menu, tap the Map Menu icon at the bottom of the screen and
select the Group Ride button.
2. Tap the i icon beside the Group Ride title.
3. Select Setup Mobile Phone Group Ride button on the display screen.
• Enable your Bluetooth® tethering or personal hotspot in your phone's
settings.
4. Tap Instructions on the display for more information of how to enable
tethering on an iPhone® or Android® phone.
5. If not previously paired to the display, connect your phone to the Ride
Command display by pressing the Bluetooth® Settings button.
6. In the Bluetooth® device menu, press the Add Device button to bring up the
pairing prompt.
• Open your phone’s Bluetooth® settings and ensure the device is in pairing
mode.
7. Select the device you wish to pair on the display screen.
33
OPERATION

• Verify that the numbers that appear on your phone match the numbers
that appear on the display screen and accept the prompt to pair on your
phone.If your mobile phone and the display fail to pair, cycle the ignition
switch and repeat this process.
• Verify that your Bluetooth® tethering is active before proceeding.
8. Press the Log In button to login to your Ride Command account. If you do
not have a Ride Command account, sign up at ridecommand.polaris.com.
• Once you've logged in, if you wish, you can choose to upload vehicle rides
and waypoints to your Ride Command account.
NOTICE
After successfully logging in the first time the display will store your Ride
Command information unless manually cleared, and you will not have to log in
again for future Group Rides.
9. Press the X in the upper left-hand corner to close the menu.
34
OPERATION

VEHICLE TO VEHICLE (V2V) ANTENNA
Features of using the Vehicle-to-Vehicle antenna for group riding:
• Works anywhere, no phone required
• 1+ miles range between vehicles
• Messaging to other vehicles utilizing V2V communications
Use the following procedure to set up a V2V Group Ride:
NOTICE
The display requires a GPS lock, indicated by a blue navigation arrow marker,
before you are able to setup or join a group ride.
1. From the Map Menu, tap the Map Menu icon at the bottom of the screen and
select the Group Ride button.
2. See page 36 to join a ride group or see page 35 to create a new group ride.
CREATING A RIDE GROUP
To create a Ride Group, do the following:
1. From the Map
Menu, tap the
Map Menu icon at
the bottom of the
screen and select
the Group Ride
button.
2. On the Group
Ride Panel, tap
the New Group
button
q
to create
a group for others
to join.
35
OPERATION

3. Enter a name in the Group Name field.
4. Select whether to enable a passcode. When enabled, you will be prompted
to enter a 4–digit passcode.
NOTICE
If Passcode Required is left unselected, any rider can freely join your Ride
Group.
5. Select the Create Group button.
Your newly created group is now shown. If your ride group has the passcode
enabled, other riders must enter your chosen passcode to join the group. .
NOTICE
After a second rider joins, the map will switch to zoom-to-group and as you ride
it will automatically zoom to keep all riders in view. Tap the zoom control to
return to manual zoom mode.
JOINING A RIDE GROUP
NOTICE
The display requires a GPS lock, indicated by a blue a navigation arrow
marker, before you are able to setup or join a group ride.
To join a group, do the following:
1. From the Map
Menu, tap the
Map Menu icon at
the bottom of the
screen and select
the Group Ride
button.
2. Nearby ride
groups will display
in order of
distance.
3. Tap the Join button
q
to join a group.
36
OPERATION

NOTICE
You can only be active in one ride group at a time.
Close the pop-up to show the map view of your chosen ride group. Other riders
appear as dots on the map. If a rider is moving, the dot includes a heading arrow
pointing in the direction they are riding. The Ride Group Panel on the side of the
screen shows the name of the group and lists all group members with their
name, icon color, distance and bearing from you to that rider.
NOTICE
The map is set to zoom-to-group and as you ride it will automatically zoom to
keep all riders in view. Tap the zoom control to return to manual zoom mode.
RIDING WITH A GROUP
1. Tap the Handle
q
by the group
name to minimize
the panel and
show more map.
2. After 10 seconds
of not interacting
with the screen,
the map controls
will disappear. Tap
the screen to
make them visible
again.
3. Tap on a Rider icon in the Ride Group Panel to show that rider relative to
your location. If center-on-me is enabled, the display reverts to the centered
state after 10 seconds.
37
OPERATION

38

MAINTENANCE
CARE AND MAINTENANCE
To clean the display shell, use a soft cloth with mild soap and water. Do not use
harsh or abrasive cleaners. For best results, use a micro-fiber towel to clean the
screen.
NOTICE
Certain products will damage the screen and other plastic surfaces. Do not use
alcohol to clean the display. Immediately clean off any gasoline that splashes
on the display.
VEHICLE STORAGE
When preparing the vehicle for storage make sure the ignition switch is in the
OFF position to prevent battery drain and diminished battery life.
SPEED LIMITATION
Various aspects of the display such as the front and rear cameras, phone
contacts, and call logs may be unavailable while driving at high speeds.
CREATE ACCOUNT
You can create a personalized Ride Command account either by computer at
https://ridecommand.polaris.com or in the Polaris Ride Command app, which
can be downloaded to your personal device through your phone’s application
store.
ON YOUR COMPUTER
Create Account
1. Open your preferred internet browser and navigate to https://ridecommand.
polaris.com.
2. From the top menu bar, click Create Account.
3. In the pop-up, type your email address and password.
4. Accept the Terms of Service agreement.
5. You should receive a confirmation email from Polaris within 24 hours of
creation.
Add Your Vehicle
6. After signing into your Ride Command account, click on Garage from the top
menu bar.
7. Press the + button to add vehicle.
39
MAINTENANCE

8. Type in your vehicle’s VIN number.
9. Add a vehicle nickname, such as “My Snowmobile”.
10. Press the Add My Vehicle button.
ON YOUR DEVICE
Create Account
1. Download and install the Polaris Ride Command app from your phone’s
application store.
2. You may receive a prompt that “Ride Command” wants to access to location
information. Click Continue.
3. Tap the menu button and select Log In or Sign Up from the dropdown
menu.
4. Select the Sign Up tab.
5. Type your email address and password.
6. Accept the Terms of Service agreement.
7. You should receive a confirmation email from Polaris within 24 hours of
creation.
Add Your Vehicle
8. Press the More button on the home screen.
9. Select Garage from the options menu.
10. Press the + button.
11. Connect your phone to your vehicle via Bluetooth or press the Enter Your
VIN button.
12. Add a vehicle nickname, such as “My Snowmobile”. This is optional.
13. Type in your vehicle’s VIN number.
14. Press Next from the top ribbon.
SOFTWARE & MAP UPDATES
OVER-THE-AIR (IF EQUIPPED)
Displays equipped with Wi-Fi connectivity will check for updates automatically
once the display is successfully connected to a network. When a software
update is available, a notification will be shown on the display. The notification
will prompt you to download and install the update.
40
MAINTENANCE

USB DRIVE
NOTICE
Before updating the display, always export your existing rides and waypoints to
a secondary USB drive to avoid losing them. Do not save them to the same
USB used for installing the software update. You must use an empty USB drive
for all software and map updates.
To update the display software, complete the following steps:
ON YOUR PERSONAL COMPUTER
NOTICE
For optimal download speed and connection stability, it is recommended to
have a wired internet connection to your personal computer while downloading
updates to your USB flash drive.
1. Go to ridecommand.polaris.com.
2. Log in to your account, or create a new account.
3. Click Garage on the menu bar and select Map & Software Updates from
the menu.
4. From the list of displays, click 7” ATV (7S) from the list.
5. Follow the on-screen direction on how to download the latest software or
map to a USB flash drive (8+ GB).
ON YOUR ATV
1. Plug the USB drive into your vehicle's USB port and turn on the display.
2. On the Ride Command display, press the Badge Panel button at the top of
the screen, followed by All Settings.
3. Select General from the tabs on the left, and scroll down to Update
Software or Update Maps / Trails.
4. Select the file you wish to load (the latest will be automatically displayed next
to the newest version detected on the USB drive for software updates).
5. The display will reboot and install the software or map updates.
6. After your display has restarted and you’ve determined the update to be
successful, power down your vehicle before disconnecting your USB flash
drive from the vehicle.
ERROR MESSAGES
If an error occurs while updating your software or map, perform one or all of the
following measures to resolve the issue:
41
MAINTENANCE

1. Ensure you are using a Tier 1 USB flash drive. For more information on USB
requirements, see page 42.
2. Remove and reconnect the USB flash drive securely.
3. Ensure display files are not inside a folder on the flash drive.
4. Only Polaris display files should be on the flash drive while performing
updates. Remove other files, if necessary.
5. Format the USB drive on your personal computer using FAT32 or exFAT
formatting systems.
6. Try a different USB flash drive.
USB HARDWARE
SOFTWARE UPDATES
For software update, POLARIS recommends using a SanDisk®, Kinston®, or
similar USB flash drive with a minimum of 4GB in available memory, formatted
using the FAT32 or exFAT file systems. For best results remove all files from the
flash drive before starting the update process.
MAP UPDATES
For Map updates, a 32GB USB drive is required (USB 3.0 drive is highly
recommended) USB drive must be formatted to exFAT before copying the map
file onto it.
TRAIL UPDATES
For Trail updates, a 4GB drive formatted to FAT32 can be used.
42
MAINTENANCE

FREQUENTLY ASKED QUESTIONS
1. How do I know whether my software is up-to-date?
From the Badge Panel menu, select All Settings. Navigate to the General
Settings tab. Press Update Software.
2. How do I update my display software?
• If your software is out-of-date, log in to your Ride Command account at
ridecommand.polaris.com to download the latest software data. For
detailed instructions for updating display software, see page 41.
• If your display is Wi-Fi capable your software will automatically update
once the display is successfully connected to a network and logged into
your Ride Command account. See page 27.
3. Why can’t my display acquire a satellite signal?
The GPS may take several minutes to lock on signal if the vehicle has been
sitting cold. Let the system warm up for a few moments before
troubleshooting.
If less than 4 satellites are appearing on the GPS satellite screen, drive the
vehicle to an area free of overhead obstructions.
4. My phone is Bluetooth®-enabled. How do I connect it to my Ride
Command display?
Depending on the brand or model of phone, there are varying processes to
connect to Bluetooth® on the display. See page 27 for detailed instruction on
pairing your mobile device. For specific Bluetooth® functionality related to
your smartphone, refer to your device’s user manual.
5. How do I adjust the screen brightness on my display?
Tap the Badge Panel icon at the top of the display screen. Adjust the slider
to the desired brightness.
6. How do I set the clock?
There are several options for managing time on your Ride Command display.
Press the Time tab of the Settings menu to get started.
Option 1: Set the time zone (GMT offset) and daylight savings mode to your
region. correct for your location. GPS automatically sets the clock when there
is a locked GPS signal.
Option 2: Tap the Badge Panel icon at the top of the display screen. Press
the All Settings button then select Time from the menu on the left toolbar.
43
MAINTENANCE

44

A
All Settings. . . . . . . . . . . . . . . . . . . . . . . . . . . . . . . 21
App Tray. . . . . . . . . . . . . . . . . . . . . . . . . . . . . . . . . . 18
Audio Screen. . . . . . . . . . . . . . . . . . . . . . . . . . . . 28
B
Badge Panel. . . . . . . . . . . . . . . . . . . . . . . . . . . . . 17
Before you Ride . . . . . . . . . . . . . . . . . . . . . . . . . . 7
C
Cleaning. . . . . . . . . . . . . . . . . . . . . . . . . . . . . . . . . . 39
Connecting Devices
Android® Pairing . . . . . . . . . . . . . . . . . . . . 25
Headset Pairing . . . . . . . . . . . . . . . . . . . . . 26
iPhone® Pairing . . . . . . . . . . . . . . . . . . . . . 24
Connecting Devices Using Wi-
Fi (if equipped) . . . . . . . . . . . . . . . . . . . . . . . . 27
Controls Tab . . . . . . . . . . . . . . . . . . . . . . . . . . . . . 18
Copyright Info . . . . . . . . . . . . . . . . . . . . . . . . . . . . . 2
Create Account . . . . . . . . . . . . . . . . . . . . . . . . . 39
D
Device Compliance Statements . . . . . . 8
Device Operating Requirements . . . . . 8
Display Brightness . . . . . . . . . . . . . . . . . . . . . 18
Display Mode. . . . . . . . . . . . . . . . . . . . . . . . . . . . 18
E
Engine Overheat Indicator . . . . . . . . . . . 19
F
FAQ. . . . . . . . . . . . . . . . . . . . . . . . . . . . . . . . . . . . . . . . 43
G
Gauge Screen . . . . . . . . . . . . . . . . . . . . . . . . . . 13
Gauge Screen Configuration. . . . . . . . 13
Gauge View Mode . . . . . . . . . . . . . . . . . . . . . 15
General Info . . . . . . . . . . . . . . . . . . . . . . . . . . . . . 22
Group Ride . . . . . . . . . . . . . . . . . . . . . . . . . . . . . . 32
Creating a Group. . . . . . . . . . . . . . . . . . . . 35
Join a Group. . . . . . . . . . . . . . . . . . . . . . . . . . 36
Riding with a Group. . . . . . . . . . . . . . . . . 37
Group Ride Setup. . . . . . . . . . . . . . . . . . . . . . 32
Cellular-Based Group Ride . . . . . . . 33
Vehicle to Vehicle (V2V)
Antenna . . . . . . . . . . . . . . . . . . . . . . . . . . . . . . 35
I
Icon Bar. . . . . . . . . . . . . . . . . . . . . . . . . . . . . . . . . . . 16
Info. . . . . . . . . . . . . . . . . . . . . . . . . . . . . . . . . . . . . . . . . 21
M
Map Screen. . . . . . . . . . . . . . . . . . . . . . . . . . . . . . 29
Map Orientation . . . . . . . . . . . . . . . . . . . . . 30
Points of Interest (POI) . . . . . . . . . . . . 32
Waypoints. . . . . . . . . . . . . . . . . . . . . . . . . . . . . 31
Zoom . . . . . . . . . . . . . . . . . . . . . . . . . . . . . . . . . . . 29
N
Notifications Tab. . . . . . . . . . . . . . . . . . . . . . . . 18
O
Overview . . . . . . . . . . . . . . . . . . . . . . . . . . . . . . . . . . . 7
P
Phone Screen. . . . . . . . . . . . . . . . . . . . . . . . . . . 27
PIN Activated Security System
(P.A.S.S.)
. . . . . . . . . . . . . . . . . . . . . . . . . . . . . . . 23
R
Ride Command
45

Badge Panel. . . . . . . . . . . . . . . . . . . . . . . . . . 17
Ride Command Buttons . . . . . . . . . . . . . . 12
Ride Command Overview. . . . . . . . . . . . 11
S
Safety Symbols . . . . . . . . . . . . . . . . . . . . . . . . . . . 4
Signal Words . . . . . . . . . . . . . . . . . . . . . . . . . . . . . . 4
Software & Map Updates. . . . . . . . . . . . . 40
Over-the-Air (if equipped) . . . . . . . . . 40
USB Drive. . . . . . . . . . . . . . . . . . . . . . . . . . . . . 41
Speed Limitation . . . . . . . . . . . . . . . . . . . . . . . 39
T
Time Info . . . . . . . . . . . . . . . . . . . . . . . . . . . . . . . . . 22
U
USB Hardware. . . . . . . . . . . . . . . . . . . . . . . . . . 42
V
Vehicle Info . . . . . . . . . . . . . . . . . . . . . . . . . . . . . . 23
Vehicle Storage. . . . . . . . . . . . . . . . . . . . . . . . . 39
W
Warning Symbols . . . . . . . . . . . . . . . . . . . . . . . . 4
Welcome Page . . . . . . . . . . . . . . . . . . . . . . . . . . . 3
46


For your nearest Polaris dealer,
call 1-800-POLARIS (765-2747)
or visit www.polaris.com
Polaris Industries Inc.
2100 Highway 55
Medina, MN 55340
Part No. 9940303 Rev 01
Printed in USA
