
1
M-0111E
Hand auger set for heterogeneous soils
Eijkelkamp Soil & Water
Nijverheidsstraat 9, 6987 EN
Giesbeek, the Netherlands
T +31 313 880 200
E info@eijkelkamp.com
I www.eijkelkamp.com
© 2020-12
Meet the difference
Manual
0111SO
0111SZ
2
Contents
On these operating instructions ..........................................................................................................................................3
Introduction ..............................................................................................................................................................................3
1. Description ..........................................................................................................................................................................3
1.1 Edelman auger ..............................................................................................................................................................3
1.2 Riverside auger .............................................................................................................................................................4
1.3 Auger for stony soil .....................................................................................................................................................4
1.4 Spiral auger ...................................................................................................................................................................4
1.5 Piston sampler .............................................................................................................................................................. 5
1.6 Gouge auger .................................................................................................................................................................. 5
1.7 Accessories .................................................................................................................................................................... 5
2. Technicalspecications ...................................................................................................................................................6
3. Safety ..............................................................................................................................................................................6
4. Preparing for use ............................................................................................................................................................... 7
5. Use of the augers ...............................................................................................................................................................8
5.1 General ...........................................................................................................................................................................8
5.2 Edelman auger ..............................................................................................................................................................9
5.3 Riverside auger and stony soil auger .....................................................................................................................9
5.4 Spiral auger ................................................................................................................................................................. 10
5.5 Piston sampler ............................................................................................................................................................10
5.6 Gouge auger .................................................................................................................................................................11
5.7 Accessories ...................................................................................................................................................................11
6. Applications .......................................................................................................................................................................11
7. Problems and solutions ................................................................................................................................................. 12
8. Maintenance ..................................................................................................................................................................... 13
Appendix: Rust on augers and gouges ............................................................................................................................ 14

3
On these operating instructions
If the text follows a mark (as shown on the left), this means that an important instruction follows.
If the text follows a mark (as shown on the left), this means that an important warning follows
relating to danger to the user or damage to the apparatus.The user is always responsible for its
own personal protection.
Italic indicated text indicates that the text concerned appears in writing on the display (or must be
typed).
Introduction
The hand auger set for heterogeneous soils consists of a number of types of augers held in a transport case.
An auger consists of a bottom part with auger body to which a handle and optional extension rods can be
attached. This manual is written for the set with bayonet connection, but it also applies for the set with concical
screwthread connection. Contrary to the single type auger this set is suitable for almost any type of soil. It is
lightweight and easy to manipulate by a single person.
The hand auger set for heterogeneous soils is suitable for manual augering and sampling in a wide variety
ofsoiltypesforthepurposeofgeneralsoilresearch(proles,geologyandmineralogy)andsamplingin
environmental research. Depending on the water table, structure and type of soil, augering can be done up to
a depth of 5 m. Augers are available for any type of soil above or below the water table, and may be selected
toadjusttothesituationathand.Itispossibletoswitchaugersintheprocess(see5.Theuseofaugers).
1. Description
1.1 Edelman auger
ThemaindrillingsectionoftheEdelmanaugerisconicalinshapeandconsistsoftwoblades(1)thatruninto
apointatthelowerend(2)andatthetopendarejoinedwiththeuseofabracket(3)tothelowerpiece(4)
(seegureonpage3).Thetwobladessitalongsideeachotherintheaugerpointandcanbelikenedtotwo
spoons. During the drilling process the auger point twists into the ground and draws the soil from the bottom
of the auger hole into the body of the auger. The auger blades perform the job of scooping up and holding
together the soil sample in the auger body in a way that also allows it to be emptied with ease.
Nearly all Edelman augers in the set have the same diameter (measured diagonally between the blades at the
widestpointofthemainaugersection).ThevarioustypesofEdelmanauger
differ from each other in blade width and the way the auger point is shaped.
There are four different types:
clay type
combination type
sand type
coarse sand type
Edelman auger, clay type. As wet clay soils are generally strongly cohesive, the
blades of this type of auger do not need to be very large. On account of the
narrow blades this auger encounters little resistance from the soil. This means
that drilling can be carried out with a minimum of force and effort while the
resultant sample is hardly disturbed. Wider blades would cause additional
frictionandthesoilwouldbedifculttoemptyout.
Text
1
3
4
2
Edelman auger combination
type (left) and coarse sand type
(right).

4
Edelman auger, combination type. The blades of the combination type Edelman auger are slightly wider and
more rounded than those of the clay type. This allows soils with poor cohesion to be held together quite well
while the cohesive soils can be emptied out quite easily. The auger point is longer than that of the clay type
which means the auger rotates more easily in harder soil.
Edelman auger, sand type. This type of Edelman auger is suitable for soils with poor cohesion such as sandy
soil. The longer, twisted auger point ensures that the auger cuts into the soil readily. The blades of the sand type
are wider than those of the combination type, giving the auger a wider surface area for holding on to the soil.
Edelman auger, coarse sand type. This type of Edelman auger was developed from the sand type but has wider
blades.Thishasproducedanaugerthatismuchmoreclosedin(seegure)andcanholdinsoilswithlittle
or no cohesion such as soils containing very coarse or dry sand.
1.2 Riverside auger
Where soils are very hard or dry the concentric auger point of the Edelman auger can no longer turn in the
soilandtheRiversideaugerneedstobeused(seegure).Thebodyoftheaugerconsistsofanopentube(1)
withtwospoon-shapedaugerbladesatthebottomend(2).Abracket(3)fastenstheopentubetothelower
piece(4).Thepointsoftheaugerbladeswhichgodownatanangleloosenthesoilbyscrapingitandpushing
it evenly into the tube. The auger blades project out a little beyond the tube which means that the auger
encounters a minimum of resistance from the soil.
1.3 Auger for stony soil
The auger for stony soil is heavier and more robust than
the other auger types. The auger has slightly protruding
angledpointsthatcurveintowardseachother(seegure).
They form a more or less enclosed auger body but don’t
actually come in contact with each other. This creates a
certainexibility.Thepointscutdownwardsduringthe
augering process. Stones that are encountered are wedged
inbetweentheaugerblades,whiletheslightlynersoil
(coarsesandwithnegravel)alsostaysintheauger.
1.4 Spiral auger
Thespiralauger(diam.4cm)(seegure)isthealternative
option when other augers in the case of extremely hard,
resistant soils are no longer able to penetrate the soil.
This narrow spiral auger pushes the stones aside during
augering while its specially shaped point digs a hole.
Because of its straight design there is a great deal of
resistance from friction while pulling out the auger.
4
3
1
2
Riverside auger (left), auger for stony soil
(middle) and spiral auger (right)

5
1.5 Piston sampler
Thepistonsampler(seegure)isconstructedfromathin-walled,4cmdiameter,stainless
steeltube(4).Thebottomendisopen,whereasthetophasalit(3)throughwhicha
stainlesssteelpistonrod(5)canbemoved,andoutowopenings.Thebottomendofthe
pistonrodholdsapiston(6),andtoitstop-endawireeye(2)isattached.Thetop-endof
thetubeisequippedwithabayonetconnection(1)weldedonitsoutsidetopermitfree
passage of the piston rod. Due to the eccentricity of the sampler one has to reckon with
a maximum of 6 cm when working with auger holes. The maximum length of the sample
is 75 cm.
1.6 Gouge auger
The auger body of the gouge auger is almost completely semi-cylindrical and has cutting
edges that are equidistant running from the top to the bottom. The top part of the auger
body is attached to the lower piece. It has a smaller diameter than the above augers. The
maximum length of the sample is 50 cm.
1.7 Accessories
Extension rods and coupling sleeves.
Theextensionrodsare1minlength.Sincethetoppiece,extensionrodsandlowerpiecesarettedwith
bayonet couplings, the auger can be any desired length. Coupling sleeves are cylindrical sleeves that lock the
coupling in place.
The Push/Pull Handle.
Thepush/pullhandlehastwopartsthatcanbettedarounda
rod. Once pressure is exercised on the two bars of the handle its
constructionensuresarmholdontherod.
Utility probe.
Thebreglassutilityprobeis105cminlengthandendsinaconewithadiameterof19mm.Theprobeis
well insulated and can therefore be safely used to test the augering spot for cables and various types of
underground pipes.
1
6
5
4
3
2
Piston sampler
Gouge auger body
Extension rod (left) and coupling sleeve (right)

6
2. Technicalspecications
The most important dimensions of the various types of augers are set out in the table below. The diameters
are measured across the widest point between the auger blades!
Theaugerbodiesaremanufacturedfromiron-manganesesteel(notstainlesssteel,butnon-toxic).Asis
appropriate for environmental research, all the auger bodies are unvarnished.
Auger type Diameter (mm) Blade width (mm)
Edelman auger clay type 70 30
Edelman auger combination type 70 35
Edelman auger sand type 70 40
Edelman auger coarse sand type 70 75
Riverside auger 70 -
Auger for stony soil 70 -
Spiral auger 40 -
Gouge auger 30 -
Piston sampler
Tube 40
Total ca 60
-
3. Safety
Before commencing with the drilling ascertain whether there are (power) cables or pipes running
through the ground (make inquiries). Use the probe to carry out a safe inspection of the augering
location. If cables or pipes are present, choose another location.
Always hold on to the auger by its synthetic handgrip during the drilling process.
This ensures insulation if a power cable should be encountered with the auger.
Take hold of a coupling sleeve by its middle. This prevents the skin from catching under a coupling
sleeve while components are being added or removed from the auger.
If an auger is longer than 4 m, divide it up into smaller sections. This prevents damage to the auger
rods and reduces the risk of injury if an auger were to fall over. This applies when the auger is being
lowered as well as when it is being pulled up.
Do not bang on the auger or force it. Banging can lead to serious damage such as tears in the steel
or broken couplings.
Wear strong protective gloves when emptying the gouge auger with the spatula. This prevents cuts
tothengers.
Afterdrillingmakesurethattheaugerholeisproperlylledupagainwithdrilledmaterialorwith
special bentonite plugs. This ensures that persons or animals will not step into the auger hole and
be injured.
Takespecialcareduringthunder.Thepossibilityofbeinghitbylightningintheopeneldismuch
greater, especially when holding a metal auger.
Werkzame lengte
Totale lengte
Blad-
breedte

7
4. Preparing for use
1. Whenusingtheaugerforthersttime,loosenthecouplingsleevesfromtheextensionrodsandtheupperpart.
2. Screw the synthetic handle into the upper part.
3. Selecttheappropriateauger(see6.Application).TheEdelmancombinationtypeaugeroftenprovestobe
the best choice.
4. Connecttheaugerparts(seegure).
4.1 Hold the coupling sleeve in the middle and slide it onto the upper part until it clicks on the nipple
(step1).Thesleeveislockedwhenitcannotberotated.
4.2 Jointheupperandbottompart(step2).
4.3 To lock the connection, unscrew the sleeve from the upper part, and slide it across the connection
(step3)andclickitontothenipple(step4).Checkthelock.Noticeitwillhaveaslightplay.
Hold the coupling sleeve in the middle, this will prevent you from catching the skin of your hands
between the parts while (dis)connecting them.
When using a set with conical screw thread connections the extension rods are screwed together. Use the two
open ended spanners for a hand tight connection.
Clean screw threads ensure easy tightening and loosening.
Connecting the auger parts
1 2
4
3

8
5. Use of the augers
5.1 General
Eachtypeofaugerhasitsspecicapplication.However,theinstructionsbelowapplytoallaugers.
Prior to augering use the utility probe to check for cables, tubes and pipes. If necessary, select
another spot to auger.
While augering hold the auger by its synthetic handle. It is fully insulated should you hit an electricity
cable.
The auger should always be rotated in a clockwise direction.
Augering is done in a vertical position.
Over 1,20 m extension rods should be used:
1. Placetheaugeratonthegroundneartheborehole.
2. Slide the sleeve off the bottom part, and lock it onto the upper part.
3. Detach the upper and bottom part.
4. Select an extension rod and a sleeve. Lock the sleeve over the bayonet at the bottom end of the
extensionrod(theopenend).
5. Attach the upper and bottom part to the extension rod
Always check the coupling sleeves. Well-attached sleeves will prevent jamming or loss of parts
when augering.
An auger over 4 m should be inserted and hoisted in parts:
1. Insert the auger in the borehole and place the bottom part on end for approximately 50 cm. Grip the
augerrmly!
2. To attach: connect the two parts, and slide the sleeve of the upper part across the connection and lock
it onto the bottom part.
To detach: slide the sleeve upward and lock it onto the upper part. Unclamp the upper and bottom part.
Augers over 4 m should be handled in parts. This will prevent damage to the rods and reduce the
risk of being hit by augers tipping over. This applies to inserting and hoisting the auger.
The auger’s depth is indicated by marks. Small nipples on the bottom part indicate 50 cm from the bottom
end of the auger. The piston sampler has no marking and the gouge auger has a small nipple at 75 cm.
The upper part has a larger nipple indicating a depth of 1 m, except for the piston sampler and gouge
auger, however, where it indicates a depth of 1.35 and 1.25 m respectively. Additional meters depend on
the number of extension rods.
To obtain an undisturbed sample rotate the auger clockwise without pushing, this will cause the sample
to detach from the soil.
To withdraw the auger after sampling, pull it upward while turning it (not when using the Riverside auger
ortheaugerforstonysoils).Keepyourbackstraightandyourkneesbenttopreventinjuries.Weargloves
for a full grip on the rods.
Place the samples in a logical order of augering to allow examination.
Shouldyouencountervarioustypesofsoils,switchtoothertypesofaugers(see6.Application).
Do not force, or pound on, the auger. This may cause serious damage, such as cracks or snapped joints.
Afteraugeringlluptheboreholewithsoilorspecialbentoniteplugs.Thiswillpreventhumansor
animals to trip into the hole and incur injuries, and restores impermeable soil layers.

9
Becautiousduringathunderstorm.Lightningstrokesoftenoccurintheopeneld,inparticularwhen
one holds metal objects.
Clean the parts of the auger by rinsing them after use. This will prevent jamming of the sleeves or the
pistonsamplertoleak(see8.Maintenance).
5.2 Edelman auger
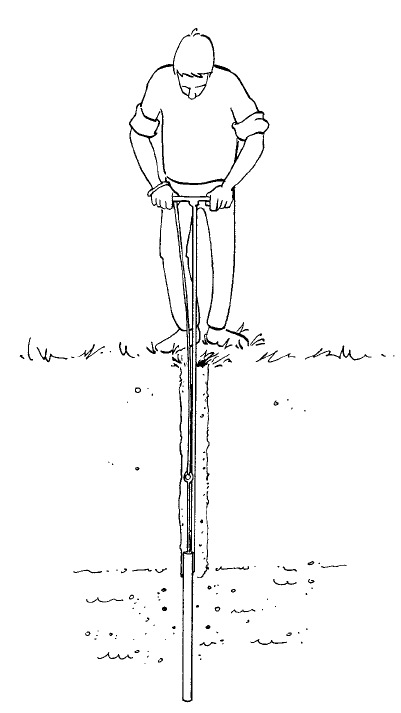
Holdtheaugerbythehandlesandplaceitonthesoil(seegure).Applyinglightpressureturntheaugerto
therightintothesoil.Afterabout2¼completerotations(of360°)theaugerwillhavepenetratedthesoilby
10cm(rotationscanbecountedwiththeaidofthehaltknob).Theaugerwillbelledwithlightlystirred-up
soil right up to the bracket. Depending on the type of soil, fewer or more turns may be required to reach the
desired result.
Turn the full auger off and pull it up with gentle twists. Place the auger on an angle on the surface of the
ground(seegure)foremptyingoutcohesivesoil.Lightlypressandturntheaugerby180°ontheground.The
material is loosened and can be emptied out of the auger using your hands or by giving it a light tap on the
ground. Material that is not very cohesive comes out virtually unaided. The samples can now be examined.
Avoid:
Overllingtheauger.Thiscausesexcessmaterialbeingspreadagainstthewalloftheaugeredhole,causing
ittobecomenarrowerandmakingsubsequentdrillingmoredifcult.Italsomakesemptyingoutthesoil
verydifcult.Wherethedrillingextendstobelowgroundwaterlevel,anoverlledaugercanencounter
strongsuctionwhichmakespullingouttheaugermoredifcultandcanalsoleadtothelossofthesample.
Loss of sample material. Pull the full auger up with gentle turns and therefore not upright.
5.3 Riverside auger and stony soil auger
Turn the auger into the ground with some pressure. The material is stirred up regularly and forced into the
auger. The soil stays in the auger because it becomes slightly compacted. Pull the full auger up in an upright
position(withoutturningtherefore!).Taptheaugerlightlyonthegroundwhichwillcausethesoiltodrop
out.IfthesoiliscohesivetheRiversideaugerisdifculttoemptyanditisthereforebettertouseanother
typeofauger(Edelmanauger).
Augering (left), emptying (middle)
and studying (right)
10
5.4 Spiral auger
Turn the auger into the ground with some pressure. The auger body will push any stones it encounters out of
the way. Use gentle twists to pull up the auger. Because of the shape of this auger it can encounter considerable
resistance in certain types of soil. The discharged material is strongly stirred. The spiral auger is often used
for drilling through a hard layer or for pre-drilling a small hole before drilling with another type of auger.
5.5 Piston sampler
1. Attach a polyester cord to the piston sampler’s wire eye
andletthe(extended)augerdowntothebottomofthe
augered hole. The piston rod should remain in the lowest
position. By shaking the piston rod it will fall to its lowest
position.
2. Pull the cord attached to the wire eye of the piston rod and
an underpressure will be created below the piston.
3. Pushthetubesteadilydown(seegure)whilekeepingthe
cord(andthepiston)stationary,i.e.ataconstantdistance
to the sample material.
Pressing down the tube may cause resistance. Small
pulling movements of the cord will cause an increase
of the underpressure, thus reducing resistance and
disturbance of the sample.
4. Whenthetubehasbeenlled,pushoncemoreandpullit
out of the auger hole.
To keep the sample in the tube, the piston should
remain in the highest position by keeping the cord
taut (if necessary, tie the cord to the handle). Keep
the piston rod parallel with the auger rod to prevent
the piston to leak, and consequently loss of sample.
5. Place the sampler horizontally on the surface and push the
sample out of the tube with the piston. Shaking the tube
willfacilitatethisprocess.Thesamplewillhavea75cmundisturbedprole.
Remarks:
In the case of cohesive soils it is necessary to auger a hole up to a moderately cohesive layer under the
water table using another type of auger. Thin and cohesive strata (such as clay or loam up to a maximum
ofseveralcentimetres)withinamoderatelycohesivelayermaycausecloggingofthetubeThisimpedes
pressing the tube into the soil. It is recommended to note the depth of the cohesive layer. Pushing out
thesamplemaycauseittoowasaresultofincreasedwaterpressurebehindthecohesivelayer,thus
disturbing the sample.
The piston sampler should be used to sample one auger hole at a time. After sampling the auger hole may
cave in and cannot be augered further.
If the difference in height between the water level in the auger hole and the surface is too large, the sample
mayowoutofthetube.Fillingtheaugerholewithwatercanpreventthis.

11
5.6 Gouge auger
Push the gouge auger into the ground without turning. Cut a sample of no more than 50
cm in length. If the gouge auger encounters strong resistance, this can be resolved by
turning the auger off during the process. Then continue to push it down.
Turn the full gouge auger off and pull it up with gentle twists.
Use the curved spatula to cut the cylindrical column of soil off up to the rim of the
gouge(seegure).Thesoilleftbehindprovidesavirtuallyundisturbedlayerprole.If
desired a mark can be applied every 10 cm with the use of the spatula and using the
measurement markings on the outside of the gouge auger as a guide.
Use tough protective gloves when emptying out the gouge auger. Use the spatula (curved
sideup)topushthesampleout.
When using extension rods during deeper gouge drilling sessions, keep attaching them to the top end of
the auger, directly under the upper piece. The rods may have a slight bend caused through use and this will
thereforeinuencetheborehole.Whendividingofforreconnectingtherodsitisimportanttokeeptothe
original sequence.
5.7 Accessories
Push/pull handle.
The push/pull handle is ideal for insertion or withdrawal of the auger without straining
yourback(seegure).Itisclampedaroundtheextensionrodsatanydesiredheight.
Two persons may also use the push/pull handle. To that purpose clamp the handle
perpendicularlytothedirectionoftheauger’stophandle.Facetheotherpersonholding
the bars of the push/pull handle with your right hand and holding the bars of the top
handle with your left hand exerting up-or downward pressure.
Sounding device.
The sounding device is used to determine the ground water level in the auger hole. Drop
it into the auger hole until it hits the water surface with a ‘plopping’ sound. The depth
is crucial in determining the choice of auger. Note that, depending on the type of soil,
it may take some time for the water in the auger hole to level with the water table.
6. Applications
The auger set for heterogeneous soils is suitable for drilling in almost every type of soil
(exceptforsolidstoneorverystonyground).Thereisaspecictypeofaugerbestsuited
to every type of soil. With heterogeneous soils different types of augers can be used at
different times. The auger set can be used to carry out drilling to a depth of 5 m depending on the depth of
the groundwater, the structure of the soil and the nature of the material for drilling.
The Edelman auger is suitable for many different types of soil. In homogeneous type of soil there will always
be one of the four types that will be suitable. Where the type of soil is unknown or of a mixed type, the
combinationtypeisthepreferredchoice.ForhardorstonysoilstheRiversideauger,theaugerforstonysoil
and the spiral auger provide the answer. The gouge auger is suitable for soft, cohesive soils both above and
below groundwater level.
The table provides an overview of the ways in which the various types of augers can be used.

12
Auger type Application
Hand auger set Soil research in almost any type of soil
Edelman clay type Marshy or clay soils above the water table
Edelman combination type Universal: clay soils below the water table
Edelman sand type Sandy soils above the water table
Edelman coarse sand type Coarse sand soils above the water table
Riverside auger Hard,rigidsoils,suchasdryclaysoils;nestonysoils
Stony soil auger Stony soils, gravely soils containing small stones
Spiral auger
Veryhard,rigidsoilssuchasironpans,chalkandlimeproles.Particularlysuitableto
drill through, or to pre-auger in combination with other types of augers
Gouge auger Soft, cohesive soils such as clay, loam and peaty soil
Piston sampler Sandy soils below the water table or in open water.
7. Problems and solutions
Thecouplingsleevehasseizedontheaugerasaresultofdirt(soilparticles)caughtbetweenthecoupling
sleeveandtheaugerrod(s).Pourcleanwaterinonedirectionbetweenthecouplingsleeveandtherod.
Thiswillushoutanydirtyparticles.Pickthespatulaupbyitspointandtapthesyntheticbackedgeof
it on the coupling sleeve. Coarser sand grains are loosened this way thus allowing the coupling sleeve to
turn freely again. During freezing conditions ice can cause the coupling sleeve to seize.
Augeringisstrenuous.Thismaybecausedbyafaultymatchofaugerandtypeofsoil(see6.Application),
orincorrectaugering(see5.Theuseofaugers).
Loss of sample during augering. This may be caused by a faulty match of auger and type of soil (see 6.
Application),orincorrectaugering(see5.Theuseofaugers).
The piston sampler leaks, leading to loss of sample. Slide the piston rod up and down parallel with the
auger rod to prevent the piston to dislocate. Non-parallel movements can damage the piston permanently.
Grains of sands may cause damage and leakage to the piston. Damaged pistons should be replaced (see
8.Maintenance).
Loss of sample material. The difference in height between the water level in the auger hole and the surface
istoolarge.Filltheaugerholewithwater.
Make sure not to lose the coupling sleeves. Count them after augering. Carry them attached to an extension
rod or to the upper part. Always check whether the sleeves are locked. Two spare sleeves are provided.
Make sure to withdraw every single part of the auger. Always check whether the sleeves are locked.
The sounding device does not produce a ‘plopping’ sound when passing the water table. Move it quickly
up and down to increase its downward speed. Make a rough estimation of the depth of the water table in
the tube and increase accuracy upon every examination.
13
8. Maintenance
Keepmaterialscleanduringusebyrinsingaccumulateddirtoffwithwater.Note:Donotaimthejetofan
high pressure cleaner on the ratchet. Dirt can get in the mechanism.
Clean the augers with water from the tap after use. Remove the coupling sleeves from the rods and the
handle to ensure that the insides are less likely to oxidise and become roughened because of water that
hasbeenleftbehind(causingthemtoseizemorequickly).Alloweverythingtodrythoroughly.Whenan
auger body is not used for longer periods, it is advisable to coat it with Vaseline to prevent excessive rust
fromforming(notforthepistonsampler).
The piston of the piston sampler can be removed for cleaning. Hold the wire eye and turn the nut on the
pistonusinga(ring)spanner13.Pushthepistonrodtoremovethepiston(slantitslightly)fromthetube.
Clean the piston, position it in the tube, insert the piston rod, place the spring washer and tighten the nut.
The auger bodies do not require sharpening. During normal use they continue to become sharper. Any rust
that appears is normally not harmful and will disappear when the equipment is used.
Nothinginthispublicationmaybereproducedand/ormadepublicbymeansofprint,photocopy,microlmoranyothermeanswithout
previouswrittenpermissionfromEijkelkampSoil&Water.Technicaldatacanbeamendedwithoutpriornotication.
EijkelkampSoil&Waterisnotresponsiblefor(personal)damagedueto(improper)useoftheproduct.
Eijkelkamp Soil & Water is interested in your reactions and remarks about its products and operating instructions.
14
Appendix: Rust on augers and gouges
These augers and gouges are made of high tensile-strength forgeable iron-manganese steel. Both iron and
manganese are non-toxic metals, abundant in the earth’s crust on which we live. Natural concentrations are
veryhigh.Duringstorageandtransportsomerustmaydeveloponthebaremetalsurface.Duringrstusethis
rustwillscouroffquickly.Youmayalsoscourwithsomewetsandpriortorstuse.Theaugerorgougeisthen
ready for sampling of soil on all metals like zinc, cadmium, chromium, copper and even iron and manganese!
Question 1: How do I clean and maintain my augers / gouges?
Inpracticeaugerskeepthemselvesclean(andsharp)bythehighfrictionofsoilparticlesrubbingtheaugers
surface. Augers or gouges used in acid, saline or alkaline soil are prone to oxidation and should be rinsed with
pH neutral water after use. After a drilling in an oil-polluted borehole you may clean the auger with a brush
in a bucket with water with neutral baby-shampoo added. Spraying our detergent 20.05.29 is very effective
too and will also mobilize trace-metals, even the zinc plating from the extension rods! Use this detergent
withcareorlimittheusetostainlesssteelorplastictoolsonly.Isopropylalcoholonatissueisneforrapid
on-site cleaning. Acetone is more effective and will even remove tars from metals. Dismantle coupling sleeves
andotherloosepartspriortocleaningtoallowrapidandcompletedryingafterthenalwaterrinse.Store
in a well ventilated area free from dust and, for plastic materials, smells.
Question 2: Why did we not prevent the development of natural rust?
A paint will blister off quickly and will pollute samples with a variety of organic pollutants during a prolonged
period,necessitatingadifcultandcumbersomecleaningprocedurepriortorstuse.
A zinc plating is very soft. The zinc will be scratched off in a few dozens of drillings resulting in measurable
quantitiesofzincinyoursoilsamplesandinuencingyourmeasurementsduringaprolongedperiod.After
a few days or weeks the zinc has completely disappeared and is not effective anymore.
A wax or grease is easy to put on, but fairly hard to remove and, again, risky. Greases, oils and waxes will
inuenceagaschromatogram(GC)madefromsoilsamplestakenwithsuchanaugerorgouge.Inadditionthe
layer is sticky and it is unavoidable that it will spread all over in carrying bag or case, extension rods, gloves
and consequently soil samples. This should be avoided at all times.
Question 3: The extension rods and upper part are zinc plated. Does this zinc plating contaminate the soil
sample?
No,sincethereisnointensescouringcontactbetweensoilsampleandtherodsthereisnoinuence.
Question 4: Do stainless steel soil samplers (coring tubes and rings) contaminate soil samples?
Stainless steel is an alloy of high percentages of mainly chrome, iron and nickel. Alloys have characteristics
that are different from the characteristics of a simple “mix” of these metals! Stainless steel is so chemically
stable that no loose oxides are formed. It is also hard; scouring with soil will not lead to detectable levels of
iron, chromium or nickel concentrations in soil.
Question 5: Does the chromium plated gouge Model P (04.03) contaminate a soil sample?
This gouge is plated with a pure thick layer of nice shining chromium. Chromium is an extremely hard metal
and will only and partly be rubbed off in years of use! Although there is very little chance that these quantities
willcontaminateasamplewithChromiumwewouldnotrecommendthisgougeasrstchoiceforsoilanalysis
on chromium.
