
Do-It-Yourself
Sprinkler Planning
& Installation Guide
Your beautiful landscape awaits...

TABLE OF CONTENTS
BEFORE YOU BEGIN........................1
USING THE TORO DESIGN SERVICE ...........4
QUESTIONNAIRE ..........................5
PROPERTY PLAN LAYOUT SHEET..............6
TRADITIONAL IRRIGATION INSTALLATION ..1-12
STEP 1 - Gather Required Information .......2
STEP 2 - Map Out Your System ............7
STEP 3 - Install It!.......................9
TROUBLESHOOTING ......................13
APPENDIX A-E ........................14-16
FREQUENTLY ASKED QUESTIONS ............18
IRRIGATION INSTALLATION TIPS ............19
TWO SYSTEMS ARE BETTER THAN ONE
Congratulations on your decision to install an automatic
irrigation system. An automatic irrigation system will help you
create the landscape you’ve always wanted by making sure
your plants get the water they need, just when they need it.
How many times have you forgotten to water your lawn, or
worse yet, over-watered it and ended up with unsightly brown
spots and muddy puddles? You could be using up to 50%
more water than your yard needs. That isn’t good for your lawn
or your pocketbook. The solution is precision watering using
an automatic irrigation system which can be adjusted to the
individual needs of different plantings. You will get a thicker,
greener lawn and more beautiful gardens, as you save time
and water.
There are two different styles of irrigation systems you can
use: traditional sprinkler-based systems and drip irrigation
systems. The good news is you don’t have to choose between
them because they work better together. This is an instance
where two really are better than one.
Traditional sprinkler-based systems are well suited to
watering large areas of grass and areas with plants having
similar watering needs. They water uniformly by broadcasting
water in well defined patterns, five feet or more in diameter.
To water smaller areas, we recommend drip irrigation.
Drip irrigation is the ideal complement to traditional irrigation.
Rather than broadcasting water over large areas, a drip system
is set up to water very small, specific areas. For that reason, drip
systems are good for patios, near foundation walls, watering
specific plants within larger garden areas and tight, slow-
draining clay soils. In so doing, drip systems use little water
and discourage weed growth. (For details on drip irrigation
and planning, refer to the Toro Blue Stripe Drip Planning &
Installation Guide.)
So, in order to create the best irrigation system possible for
your plants, don’t think in terms of traditional or drip; think in
terms of traditional and drip. You get the best of both worlds
and the very best results.
%#842!
An example of traditional sprinkler-based and drip irrigation
systems. This system uses automatic in-line valves.
Do-It-Yourself
Sprinkler Planning
& Installation Guide
•
INTRODUCTION

✓
A
DRAW YOUR PROPERTY
Use the layout paper provided on page 6 of this guide.
Each small square on the graph should represent one square
foot of actual property or use a scale such as 1 inch = 10 feet,
1 inch = 20 feet, etc. Using the tape measure, measure your
property and draw it to scale on the layout paper. Use the
drawing below as an example.
BEGINNING YOUR DESIGN
There are two options for getting a design for your
automatic irrigation system:
1. Follow the instructions in this guide and use the layout paper
on page 6 to design and draw your irrigation system.
OR,
2. Let Toro do the irrigation system design for you!
See page 4 for more information on Toro’s
Sprinkler Design Service.
In either case, you will need to complete sections A - D. We
suggest you use the following planning tools: pencil, scratch
paper, drawing compass, 50’ tape measure, straight edge or
ruler, line marking paint for marking trenches, Toro flags for
marking sprinkler locations and a Toro Flow & Pressure Gauge.
TIP:
If you do not own a flow & pressure gauge, ask your local
home center if they have one in their rental center.
PVC pipe cutter
Screwdriver
Pipe wrenches
Hammer
Trenching shovel
Line marking paint
1” pipe clamps (poly only)
PTFE tape
Duct tape
Tape measure
Solvent, primer, rags (PVC only — do not
use pipe dope on plastic-threaded fittings.)
Toro flow and pressure gauge
Toro marking flags
Toro water-proof connectors or grease caps
18 gauge, multi-strand direct burial wire
(number of strands varies depending on
the number of zones).
CHECK LOCAL CODES AND PERMIT
REQUIREMENTS
Before beginning your irrigation project, contact your
local water company or the proper municipal authority for
information on building codes and required permits. They can
also tell you about requirements for the backflow prevention
devices required in your area. These devices protect your water
supply from contamination and are required for inground
irrigation systems.
WARNING!
Serious injury may result from damaging
buried electrical or gas lines. Before digging or trenching, have
your local utility companies mark all buried cables, pipes, and
gas lines!
TOOLS AND OTHER SUPPLIES YOU MAY NEED
During installation, you will need several accessories and
a variety of pipe fittings. The list below shows materials
you may need:
BEFORE YOU BEGIN
There is no question that planning and installing an irrigation
system is a big job, but it is not a difficult one. To make it easier,
we have divided the process into just three steps that walk
you through the job from beginning to end. They are: Gather
Required Information, Map Out Your System and Install It.
Remember, we’re here to help you.
Visit www.toro.com or www.torodesign.com
or call 800-367-8676.
REMEMBER:
• Outline your house, garage, and other structures.
• Show walkways, drives, slabs, patios, and other surfaces.
• Identify trees and major obstacles.
• Measure and record the perimeter of your property.
• Identify any slopes.
• Show groundcover, grass, flower beds and landscaping.
• Identify the size and location of the
water meter (or pump) and main line.
• Identify the type of soil in your yard: sand, loam, or clay.
TIP:
Be sure to double
check all measurements.
Water
Meter
1
GETTING STARTED

C
WATER SERVICE INFORMATION
Once you have the property plan completed, you will need to
gather some very important information about your property’s
water supply system.
What is the diameter of the water supply line?
Call your local water company or, if they can’t help you,
measure your supply line (the pipe coming out to meter).
Wrap a piece of string around the pipe once and then
measure the string. Use the chart below to determine
the supply line diameter.
Diameter =
__________inches
Length of
String
2
3
/
4
” 3
1
/
4
” 3
1
/
2
” 4” 4
3
/
8
” 5”
Copper
Service Line
3
/
4
” - 1” - 1
1
/
4
” -
Galvanized
or PVC
-
3
/
4
” - 1” - 1
1
/
4
”
EMITTER
CLAY
LOAM
SAND
Wetting patterns for
different soil types
B
DETERMINE YOUR SOIL TYPE
There is a simple way to determine what type of soil – sand,
loam, or clay - you have in your yard. All you need is a
clean, empty jar with a lid, some clean water, a tablespoon of
detergent, and a sample of the soil you want to test. To do so:
• Fill the jar about
1
/
3
full with the soil to be tested.
• Fill the jar with water and detergent then cap it.
• Shake the jar vigorously and set aside
for several hours or overnight.
Evaluate the results:
A. If the water is clear and the
soil has settled to the bottom,
you have predominantly sand
soil.
B. If the water is still murky with
bits of matter still suspended
in it, you have loam soil.
C. If the water is still murky,
and there is a visible ring of
sediment around the jar, then
your soil is mostly clay.
For more information on soil
types and more precise ways to
ascertain soil composition, you
can refer to: www.yardcare.com.
2
STEP 1 - GATHER REQUIRED INFORMATION

USING A BUCKET & STANDARD
PRESSURE GAUGE
• Find the outside faucet that is closest
to your water supply line.
(Call this Faucet 1)
• Select a different outside faucet on
your house and attach a pressure
gauge. (Faucet 2)
• With Faucet 1 closed, open Faucet 2 all the
way and record the static water pressure below.
• With Faucet 1 open all the way, check the
pressure reading on the gauge at Faucet 2.
*If it is less than 40 PSI, turn down the water flow from
Faucet 1 until the reading reaches 40 PSI.
• Place a 5-gallon bucket under Faucet 1 and time how long it
takes to fill it. Use the chart below to convert to GPM. This
test tells you what your home’s water capacity is measured
in GPM at 40 PSI.
• Repeat this procedure at 45 PSI and 50 PSI and
record these three results on the chart below:
This is how much water is available with a working pressure
of 40 PSI or the higher reading that you recorded. (Minimum
operating pressure for most sprinklers is 35 PSI.)
Record the static
pressure here:
Record the GPM here:
NOTE:
If you use a different size bucket, time how long it takes
to fill it. Convert this to GPM using the following formula:
60 ÷ Seconds x Gallons
For example: A 2-gallon bucket that fills in 15 seconds means the
available flow is 8 GPM
60 ÷ 15 x 2 = 8 GPM
WATER FLOW & PRESSURE
DETERMINE YOUR WATER PRESSURE & FLOW
You can use either of the two methods listed:
USING A TORO FLOW & PRESSURE GAUGE
The Toro Flow and Pressure Gauge is a dual purpose device
designed to measure water pressure to 160 PSI and water flow
to 13 GPM. This flow and pressure gauge is not intended for
use on lines larger than one inch. The gauge will only measure
flow through the outside faucet – not in the line.
To measure the static pressure:
• Make sure no water is being used inside or outside the
home.
• Attach the flow gauge to the outside faucet nearest to
where the main line enters the house.
• Make sure the flow gauge is closed by completely
turning the handle clockwise.
• Open the outside faucet slowly to avoid damaging
the flow gauge.
• When the outside faucet is fully opened, read the
system static pressure and record it below.
Record the static
system pressure here:
NOTE:
Static pressure measures the pressure in the system with
no water running. It is measured in pounds per square inch or PSI.
To measure the dynamic pressure
and gallons-per-minute rates:
• Continue to open the flow gauge slowly by turning the
handle counter-clockwise.
*As the flow gauge opens, pressure will drop from the static
reading and the gallons-per-minute (GPM) reading will rise.
• Open the flow gauge until pressure drops to 50 PSI.
• Record the gallons-per-minute reading on the chart below.
• Continue to close the gauge to 45 and 40 PSI and record
the GPM readings.
If the pressure does not drop to 40 PSI after opening the flow
gauge all the way then take the flow and pressure reading at
the full-open position. If rapid fluctuation occurs on the flow
gauge, record the average reading.
NOTE:
Dynamic or working pressure is the pressure in the
system with the water running. The dynamic pressure will
determine how far your sprinklers will spray.
Record the GPM indicated
on your flow and pressure
gauge here:
D
2
1
Static PSI __________
Time To Fill Bucket Gallons Per Minute
15 seconds 20 GPM
20 seconds 15 GPM
25 seconds 12 GPM
30 seconds 10 GPM
40 seconds 7.5 GPM
Static PSI __________
______GPM at 40 PSI
______GPM at 45 PSI
______GPM at 50 PSI
______GPM at __ PSI
If readings are higher,
record here:
______GPM at 40 PSI
______GPM at 45 PSI
______GPM at 50 PSI
______GPM at __ PSI
If readings are higher,
record here:
3
GATHER REQUIRED INFORMATION - STEP 1

Your Name: ________________________________________ Scale: _____ Inch = _____Feet
PROPERTY PLAN LAYOUT SHEET
6

1
2
3
1
2
3
LAYOUT THE VALVES ON YOUR PLAN
We recommend grouping the valves together. For example,
grouping all the valves needed to operate the front yard zones
together. This symbol
represents a valve location.
Locate the first set of valves in a convenient spot near the main
water connection. A good idea is to place valves next to walks
or in planters for easier access.
The example on the next page shows two valve manifold
locations. The front valve manifold controls zones 1, 2, 3 and 4.
The backyard valve manifold controls zones 5, 6, 7 and 8.
It is recommended that the timer be able to control more
valves than are called for in your plan. This will make any future
expansion much easier. The Toro ECXTRA
®
expandable timer
would be ideal to use in this example.
CREATE YOUR ZONES
Now it’s time to determine how many zones you will need.
A zone is a group of sprinklers that operate together using
one common irrigation valve. Each valve, and thus each zone,
is operated by your system’s timer.
HEAD-TO-HEAD COVERAGE
For proper coverage, layout your sprinkler heads so that the
spray from one reaches all those adjacent to it. Head-to-head
coverage ensures uniform water application, which saves water
and creates the best possible results. (Refer to diagram.) For
areas with winds regularly above 8 mph, place sprinklers closer
together — 90% of the spray radius or less depending on the
prevailing wind direction and speed.
Determine the correct spacing using the sprinkler radius. For
example, if you are using Toro 570™ sprinklers with a radius
of 15’, place your sprinklers no more than 15’ apart - closer
together if you are in a windy area.
TIP:
To make sure you have proper head-to-head spacing,
use a compass to draw arcs representing sprinkler coverage,
as shown in the diagram.
MAP OUT YOUR SPRINKLERS
AND EMITTERS
Now it’s almost time to draw in your sprinklers on your
irrigation plan. Before you do, be sure to consider the
following information:
• Draw sprinklers within each zone of
your plan one area at a time.
• Place sprinklers with the greatest radius in larger areas.
*Pay attention to the allowable spacing range for the
sprinklers selected to create head-to-head coverage.
• Always place sprinklers in a way that avoids spraying the
side of your house, walls, fences, etc. Also, minimize the
water spraying onto sidewalks, driveways and streets.
• Place half-circle sprinklers on edges and borders,
quarter-circle sprinklers in corners, and full-circle
sprinklers in the middle of spaces.
• Use rotor or impact sprinklers to cover large areas.
They can distribute water up to 48’.
• Use 570
™
fan spray sprinklers to cover smaller areas.
They are effective up to radii of 15’.
• Use bubblers or drip irrigation in small confined
areas and to water plants individually.
• To help in your planning and irrigation component selection,
we have included component selection information in the
Appendix (pages 14-17) at the end of this manual.
TIP:
Do not mix fixed-spray and rotors within the same zone.
Half Circle
Quarter Circle
Full Circle
Correct head-to-head spacing
Incorrect head-to-head spacing
15’ Radius
DIVIDE YOUR SYSTEM
To determine the number of zones you need in your system,
do the following:
Write down the flow capacity in GPM for each type of
sprinkler in your layout. (see page 17)
Next, divide similar sprinklers into groups.
• Separate lawn and shrub areas.
• Separate shady and sunny areas.
*Different sprinkler types apply water at different rates so don’t
mix sprinkler types within zones. For example, fixed-spray
sprinklers should not be grouped with rotary sprinklers.
Add up the sprinkler GPM for each of the zones you have
created on your plan. If the total flow exceeds the safe design
capacity for your system, split that zone in two, or, if possible,
put some of the sprinklers into another zone. Remember to
move sprinklers to other zones based on slope, sun, shade
or GPM.
COUNT YOUR ZONES
Count up the number of zones you have in your design. That
is the number of irrigation valves you will need. In the example
on page 8, we will need eight valves because we have eight
zones. This will also affect the size timer you will need to buy.
7
A
B
C
MAP OUT THE SYSTEM - STEP 2

•
STEP 2 - MAP OUT THE SYSTEM
KEY:
Zone Valve
Timer
Sprinkler Head
Water Meter
An incorrect piping system
with too many turns in the
pipe results in reduced flow
and pressure to the last
sprinkler on the line.
A correct piping
system with
straight runs.
DRAW IN THE LOCATION OF THE TIMER
Install the timer inside your garage or on an outside wall near
a 120 VAC outlet. Toro offers a weather-resistant timer cabinet
for mounting in exterior locations. Toro also offers an ECXTRA
®
expandable timer with an integrated all-weather enclosure
to make mounting in exterior locations easier. Check local
electrical codes for connection requirement to outside plugs.
Use this symbol
to reflect the timer location.
Place zone or valve wires in the same trenches as the pipe.
Remember that the valves will be wired to the timer, so run
the valve wires where they will be easily accessible. Toro
recommends 18-gauge, multi-strand, direct-burial wire to
connect valves to sprinkler timers if the distance is 1000 feet
or less (refer to Timer to Valve wire sizing chart on page 18).
You will need one wire per zone, plus the common wire. For
instance, this eight-zone system requires nine wires. Be sure to
use Toro’s Waterproof Connection Caps or grease caps for all
your waterproof connections.
TIP:
Always install 2 or more wires than valves
to make it easier to add more valves in the future.
DRAW IN THE PIPES
Use the following symbols to layout your irrigation pipes:
Main line from the water source to the valves
From the valves to the sprinkler heads
(shown only for zones 1 and 4)
Under driveway and walkways
When laying out your irrigation lines
observe the following guidelines:
• Use as many straight runs as possible.
• Try to avoid turns, which result in loss of pressure.
• Avoid runs under sidewalks and driveways whenever possible.
• Make 90 degree connections wherever possible.
NOTE:
You can include more than one pipe in a trench.
Depending on local codes and zone GPM , consider using 1”
Schedule 40 PVC pipe upstream of control valves and at least
3
⁄
4
” Class 200 PVC pipe or
3
⁄
4
” poly pipe downstream.
D E
USING THE GPM RATE TO
CHOOSE THE CORRECT PIPE
To determine the proper pipe size for
your system, refer to the chart below.
FLOW RATES FOR SERVICE
LINES & SPRINKLER LINES
Maximum Flow through
PVC (Plastic) Pipe:
PVC Pipe Size Max. GPM
3
/
4
” Schedule 40 8 GPM
1” Schedule 40 13 GPM
3
/
4
” Class 200 10 GPM
1” Class 200 15 GPM
Maximum Flow through
New Galvanized Pipe:
Galvanized Pipe Size
Max. GPM
3
/
4
” Galvanized Pipe 8 GPM
1” Galvanized Pipe 13 GPM
Maximum Flow through
Type K Copper Pipe:
Copper Pipe Size Max. GPM
3
/
4
” Copper Tube 6 GPM
1” Copper Tube 12 GPM
Maximum Flow through
Polyethylene Pipe:
Poly Pipe Size Max. GPM
3
/
4
” Poly Pipe 8 GPM
1” Poly Pipe 13 GPM
NOTE:
In freezing areas,
poly pipe should be
used downstream of
zone valves.
Side Lawn
Grass Strip
Planter Area
Timer
Zone 2
Zone 1
Zone 2
Zone 7
Zone 8
Zone 6
Zone 3
Zone 5
Zone 4
5
6
7
8
4
3
2
1
Zone 3
Zone 6
8

3
IF THE METER IS IN YOUR BASEMENT:
1. Shut off your water supply at the meter
(check with your water utility).
2. Install an appropriate tee into the service line
for the irrigation connection.
3. Drill a hole through the sill above the foundation, or chisel
a hole in the basement wall for the irrigation line to run
through. Make it no bigger than needed for a 1” pipe.
4. Install the connection fittings, as shown. A ball valve is a
good choice for the irrigation shut-off. For the drain valve,
use a gate-type valve. The drain valve should be as low as
possible to allow complete system drainage.
5. Feed your irrigation system pipe out through
the basement wall, and run it to the backflow
preventer location.
6. Finally, seal the hole in the sill or
foundation with caulking compound.
Typical installation if the meter is in your basement
2
IF THE METER IS IN YOUR YARD:
1. Shut off your water supply at the meter
(check with your water department first).
2. Dig to expose the service line.
3. Tie into the service line, between the water meter
and the house.
4. Remove a section of pipe, leaving a gap large enough
to slide on a compression tee.
5. Slip the tee over each end of the pipe.
6. Tighten the compression nuts. The rubber gasket will
compress against the pipe, creating a seal to prevent leakage.
7. Install a short nipple, using PTFE tape on all threaded
connections to the tee.
8. Attach a shut-off valve, in a small enclosure, to this section
of pipe. The shut-off valve allows you to turn off the system
by hand, if necessary.
9. Keep this connection as clean as possible.
This is your tap water supply.
Typical installation if the meter is in your yard
7ATERMETER
4OVALVEMANIFOLD
3HUTOFF
BALL
VALVE
$RAIN
VALVE
3ERVICELINEFROMSTREET
3EVICELINE
TOHOUSE
"ASEMENT
CEILING
"ASEMENTFLOOR
"ELOWGROUND
06"
4HREADED4EE
WDRAINVALVEUSED
AS7INTERIZATION
BLOWOUTPORT
9
INSTALL IT! - STEP 3
CHECK LOCAL CODES AND PERMITS
Double check to ensure you have secured all permits. In
addition, have the local utilities mark all the buried lines and
pipes before you start digging.
In most areas, dialing 811
®
will get your utilities marked.
Otherwise contact your
local utility provider(s).
A
MARK YOUR SPRINKLERS, RISERS,
VALVES & TRENCHES
Use Toro flags to indicate sprinkler locations according to your
design. Also, mark the location of your drip system risers. Even
if you plan to install the actual drip system at a later date, you
can install your drip risers with the rest of your system.
Use line-marking spray paint to mark where you’ll trench for
pipes and wiring. Check your worksheet to make sure you mark
the lines accurately. You will be digging your trenches along
these lines.
TAP INTO YOUR MAIN WATER LINE
By cutting into your service line and slipping on a compression
tee, you can connect your sprinkler system to the water
supply without soldering. In some instances, you can avoid
cutting the main line by attaching your system to the outside
faucet connection (see diagram and note). PVC pipe may be
substituted for copper in non-freezing areas.
SHUT-OFF VALVES
Whether a Pressure Vacuum Breaker (PVB) is used or not,
we recommend installing a shut-off valve between the zone
valves and the service line. This will allow you to easily turn off
the water to your irrigation system if you need to make repairs
or replace parts. Check local codes for the type of shut-off valve
recommended.
Cold Climates: If you live in an area where it gets below
freezing, it’s best to winterize your system in the fall.
To make it easier to attach the air line to blow out
your system, add a tee in the main supply line (S x S x T)
between the PVB and the valve manifold, screw a cap on
the extra leg.
1
Typical installation from a faucet
B
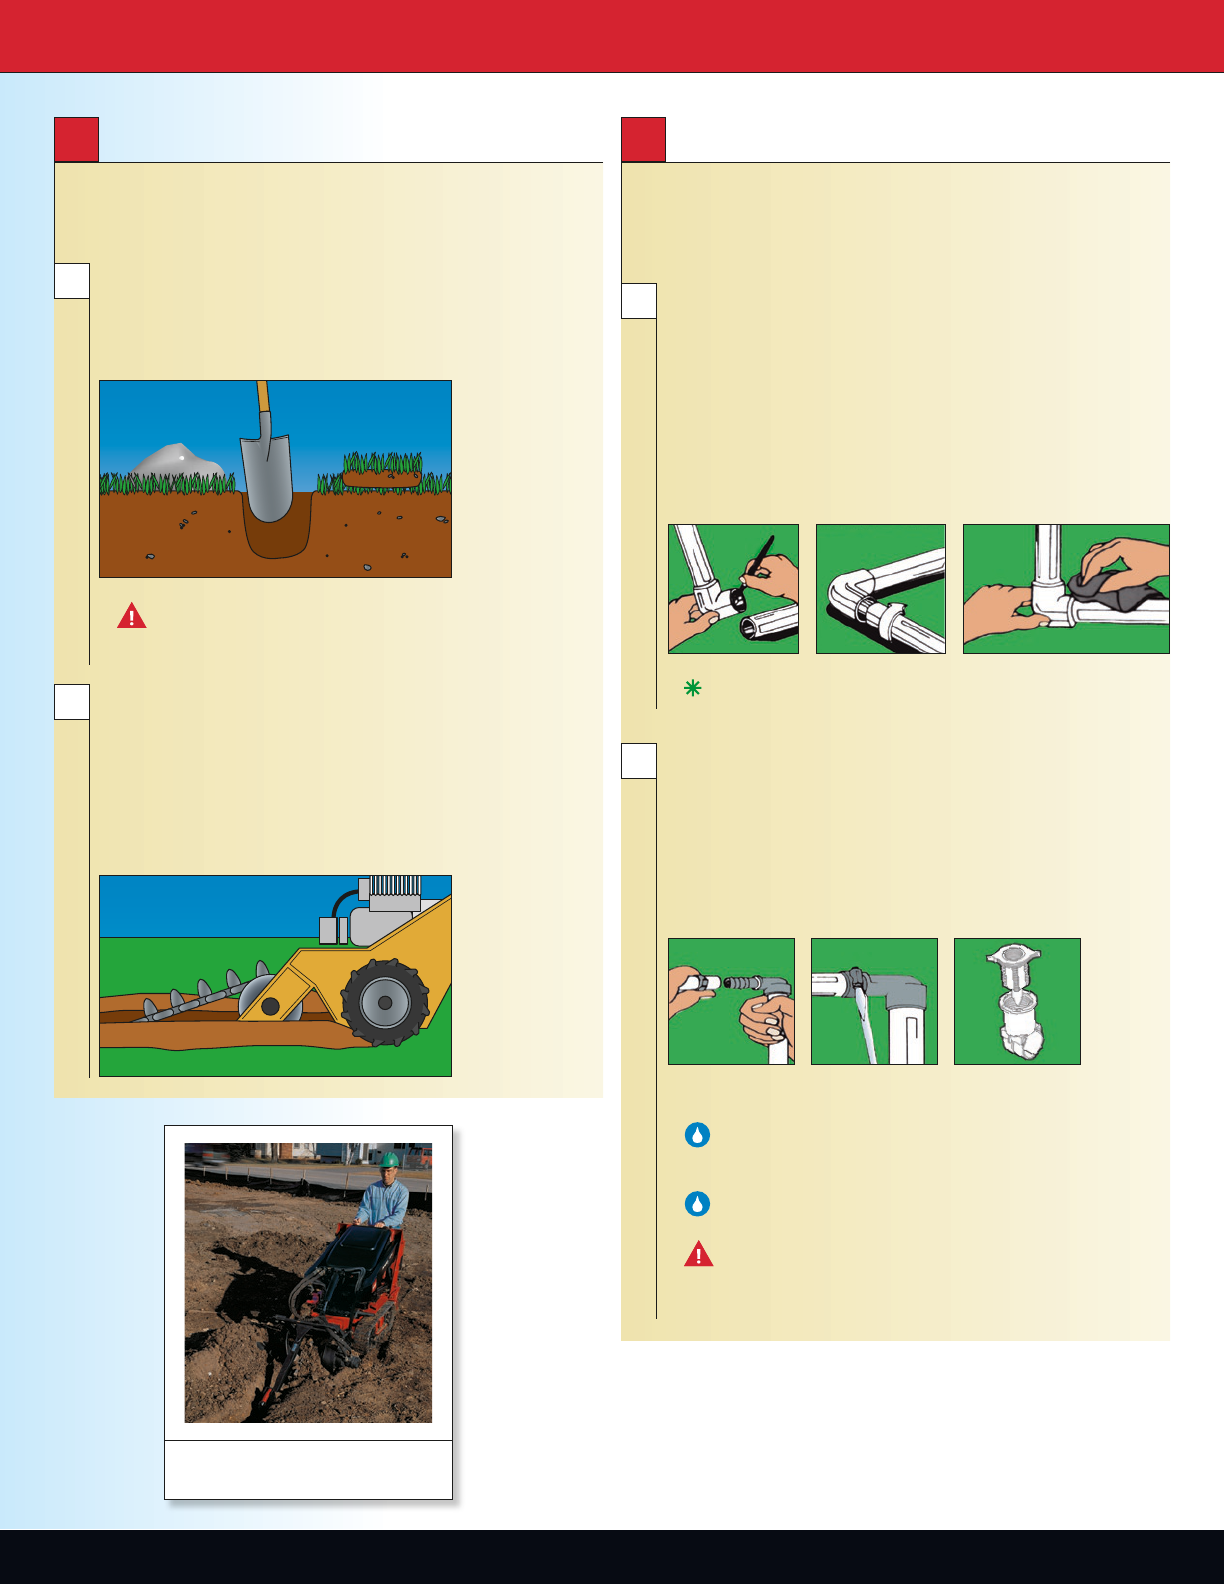
Do it the easy way, use the Toro
Dingo with Trenching Attachment
1
2
1
2
INSTALL THE IRRIGATION
SYSTEM MAIN LINE
Attach the main sprinkler line to the service line. Run it along
the bottom of the trench from the house to the first set of
valves, and if required, to the second set. Place the valve wires
under the pipe in the bottom of the trench whenever possible.
WORKING WITH PVC PIPE
1. Cut pipe with a PVC pipe cutter.
2. Brush on a primer to clean the pipe
surface and the inside of the fitting.
3. Brush glue on the outside end of
the pipe and lightly inside the fitting.
4. Slip the pipe into the fitting and give it a quarter turn.
5. Hold in place for about 15 seconds so the glue can set.
6. Wipe off excess glue with a rag.
NOTE:
Wait at least one hour before running water through
the system. (Check manufacturer’s recommendation.)
WORKING WITH POLY PIPE
1. Cut pipe with a PVC pipe cutter.
2. Slip a stainless-steel clamp over the end of the pipe.
3. Insert the barbed fitting into the end of the
poly pipe, past the barbs.
4. Slide the clamp over the barbs of the fitting.
5. Tighten the clamp.
TIP:
Save time by using the Toro Self-Tapping Saddle for poly
pipe (80-100 PSI). No more sawing, drilling or gluing! Self-
Tapping Saddles are available at your local home center.
TIP:
To relax poly pipe, expose it to sunlight.
Never expose poly pipe to open flame.
WARNING!
Do not use poly pipe as the connecting pipe
between the service line and the control valves. Surge pressure
may rupture the poly pipe. Be sure to check local codes for correct
type of pipe to use.
MAIN AND LATERAL LINE TRENCHING
The main irrigation line is the pipe that runs from your service
line to your valve manifolds. The lateral lines are the lines that
run from the valve manifolds to the sprinkler heads.
TRENCHING BY HAND
To soften the soil, water the ground approximately two days
before you dig. Dig trenches 8” to 12” inches deep. Put sod on
one side of the trench and soil on the other.
WARNING!
Before digging any trenches, you must have
all underground utilities marked to avoid any damage. Call your local
underground locator service, or the city for information, or dial 811.
TRENCHING USING A TRENCHER
Trenching machines are an easier, faster alternative to digging
with a shovel. They can be rented by the hour, day or week,
usually from a lawn supply store or rental equipment dealer.
The person you rent from can show you how to operate the
machine properly and safely. Trenchers should not be used
to dig through ground cover, flower beds, on steep slopes or
near buildings. Be sure to verify all underground utilities before
trenching.
In colder
climates a
vibratory plow
is used for
pulling pipe.
Self-tapping
Saddle (53686)
10
C D
STEP 3 - INSTALL IT!

11
INSTALL IT! - STEP 3
BUILD VALVE MANIFOLDS
A group of valves running off the same supply line is called a
manifold. We recommend grouping your valves into manifolds
based on their use or location. For example, one control valve
manifold to operate front yard zones and one to operate
backyard and/or side yard zones. Use flags to mark the
location of the valves, as indicated on your worksheet.
Refer to the valve inlet size chart on this page
for general valve inlet size rule of thumb.
ANTI-SIPHON VALVE INSTALLATION
Anti-siphon valves are backflow prevention valves designed
to protect your water supply from contamination. Some sort
of backflow prevention is required on every irrigation system,
so you need to check the building codes in your area to find
out if an anti-siphon valve will work for you. These valves are
always installed above ground, so be sure to dig out an area
large enough to accommodate your inlet and outlet pipes.
IN-LINE VALVE INSTALLATION
In-line valves are installed below ground and should always
be installed in a protective valve box. Dig out the area where
in-ground valves are to be installed, and add several inches of
gravel to the bottom of the hole. Place the top of the valve
box so that it is even with the surface of the ground. When
you buy a valve box, be sure to find out how many valves fit
in each box so you know how many to buy. In some cases,
you will need more than one valve box per manifold.
NOTE:
If one of the valves will be used for drip irrigation, leave
enough room between the valve and the sides of the valve box for
the filter and pressure regulator that are part of your drip system.
It may be a good idea to install those parts on the valve, then,
install the valve in the valve box.
TIP:
When putting together your valve manifolds, always
include one or two extra connections in each manifold. This
makes it easier to expand your system at a later date.
TIP:
Look for valves with the flow control feature.
It saves water!
1
2
VALVE INLET SIZE
Size of Inlet Gallons Per Minute (GPM)
3
/
4
”
Under 8 GPM
1”
Above 8 GPM
INSTALL YOUR SPRINKLERS
ZONE-BY-ZONE
Install one sprinkler zone at a time, using Toro Funny Pipe
®
to connect to the lateral lines. Remember to refer to your
planning worksheet.
1. Placing a sprinkler in a trench as a guide, measure from the
connecting pipe fitting to the bottom of the sprinkler and
cut a length of Funny Pipe to fit. Place sprinklers at least 3”
from sidewalks and curbs and 6” from fences and buildings.
2. Install the appropriate Funny Pipe elbow into the
sprinkler and into the PVC or poly pipe fitting.
No glue or clamps needed.
3. Connect the Funny Pipe to the sprinkler
and to the pipe fitting.
NOTE:
Do not use more than 4’ of
Toro Funny Pipe with each sprinkler head.
4. Position the sprinkler in the trench so that the top of the
sprinkler is flush with ground level. Stabilize the sprinkler
with soil without filling the entire trench.
5. Verify that the sprinkler is vertical for optimum performance.
6. Repeat this process for each sprinkler.
FLUSH THE SYSTEM TO CLEAR DEBRIS
After the pipe has been connected and the glue has dried (PVC
pipe only), turn on the water, open valves one zone at a time
and flush until the water runs clear. Seal the fitting with duct
tape to keep dirt out until the sprinklers are installed.
NOTE:
Don’t backfill your trenches until
your final system operation check is complete.
INSTALL LATERAL PIPE
Start from the valves and move outward, laying the connecting
pipe along the bottom of the trench (more than one pipe may
be laid in a trench). At each flag, install a tee or elbow fitting,
and if needed, a riser for sprinkler attachment. We recommend
that you use Toro Funny Pipe
®
for all your sprinkler head
installations. Refer to the Funny Pipe
®
section for more
information.
F
G
H
£¸ÊÝÊ
Î
É{¸Ê`>«ÌiÀ
*«Õ«
-«ÀiÀ
Î
É{¸Ê->``i
-«ÀiÀÊ
>ÌiÀ>Êi
/ÀÊÕÞÊ*«iÊ
>`ÊÌÌ}Ã
/ÊiÝÌÊ>v`
Î
É{¸Ê>ÃÃÊÓääÊ*6
Î
É{¸Ê-«ÊÝÊ-«
ÝÊ-«Ê/ii
£¸Ê-«ÊÝÊ-«ÊÝÊ-«Ê/ii
>ÊiÊvÀÊiÌiÀ
£¸Ê-Vi`ÕiÊ{äÊ*6®
Î
É{¸ÊÝÊ
Î
É{¸Ê`>«ÌiÀ
Ì-«Ê6>ÛiÃÊÃÕ`Ê
LiÊÃÌ>i`ÊȸÊÌÊ£Ó¸Ê>LÛiÊ
ÌiÊ}iÃÌÊëÀiÀÊÀÊ
>VVÀ`}ÊÌÊV`i°
Pressure Vacuum Breaker
should be installed
12” above the highest
sprinkler, or according to
local codes.
1”
Schedule
40 PVC
1” Schedule
40 PVC
from
water
1” Slip x Slip x
Thread Tee
3
⁄4” Class
200 PVC
Valve
Box
1” NPT x
3
⁄
4
” Slip
Female Adapter
source
E

13
TROUBLESHOOTING
Malfunctions aren’t common, but when they occur, they’re often due to one of these causes.
Refer to each product’s specific operating manual for additional information.
TIMERS
PROBLEM CAUSE SOLUTION
Watering cycle
repeats
Multiple start times set Check program and turn
off all but one start time
Season adjust is set at
more than 100%
Reset Season Adjust
Fuses blow
regularly
Faulty valve solenoid Replace solenoid
Damaged or shorted
wiring
Inspect and repair wire
Replace timerFaulty timer
LED display is
blank
No power to timer Check outlet for power
Faulty transformer Replace transformer
See above (fuses)
Blown fuse
Lawn is not
watered
Timer is off Turn timer on
Blown fuse See above (fuses)
Damaged timer/valve
wiring
Repair wire
Faulty transformer, timer
or rain sensor device
Replace timer, sensor or
transformer
Program incorrect Check timer program
One zone does
not function
Damaged wiring at timer
or one manifold
Repair wiring
No water to one
or all zones
Damaged wiring at timer
and zone
Repair wire
ROTORS
PROBLEM CAUSE SOLUTION
Water doesn’t
spray from nozzle
Internal basket screen
plugged with debris
Clean screen
Sprinkler does
not rotate
Not enough water
pressure to rotate
sprinkler
Split zone in two
Debris in sprinkler head Clean debris from
sprinkler
Faulty sprinkler head Replace sprinkler
Sprinkler rotates
in one direction
and stops
Not enough water
pressure to rotate
sprinkler
Split zone in two
Faulty sprinkler head Replace sprinkler
Missing nozzle Replace Nozzle
VALVES
PROBLEM CAUSE SOLUTION
No water at
sprinkler heads
Main water supply valve
is off
Turn supply valve on
Faulty valve solenoid Replace solenoid
Flow control at valve is
closed
Open fully
counterclockwise
Zone valve wires not
connected
Connect wires
Debris in valve, solenoid
or metering orifice
Disassemble valve and
clean with fresh water
One or more
zones won’t stop
watering
Faulty valve diaphragm Replace diaphragm
Faulty valve Replace valve
Replace valveDamaged or cracked
valve body
Damaged or cracked
bonnet
Replace valve
External water
leaks at valve
Damaged or cracked
pipe and fittings
Check and replace as
needed
Damaged diaphragm Replace diaphragm
Water leaks from
lowest sprinkler
in zone
Debris between
diaphragm and
diaphragm seat
Clear debris from valve
Damaged diaphragm Replace diaphragm
Debris in solenoid Clean solenoid
Faulty solenoid Replace solenoid
Valve manual bleed open Tighten by hand
ALL SPRINKLERS
PROBLEM CAUSE SOLUTION
Sprinklers will not
pop up
Not enough water
pressure to run the zone
Split the zone in two
Master or zone valves not
completely open
Open counterclockwise
Flow control on zone
valve not fully open
Open flow control
Debris between sprinkler
riser and riser seal
Clear debris
Sprinklers
“stick up” after
watering
Damaged riser or riser
seal
Replace sprinkler
Damaged retraction
spring
Replace sprinkler
Open counterclockwiseRadius adjustment screw
turned off
Debris in nozzle Remove debris
Water doesn’t
spray from nozzle
Internal filter clogged Clean screen
Water flooding
from sprinkler
Missing nozzle Install nozzle
Faulty or missing
sprinkler head
Replace sprinkler

CHECK YOUR SYSTEM OPERATION
1. Slowly turn on the water, then
manually open an irrigation valve.
2. Adjust the sprinklers to ensure proper coverage.
(See sprinkler installation instructions for details.)
3. If you don’t have complete head-to-head coverage,
follow the steps below:
a. Make sure the control valve and
shut-off valve are fully open.
b. Turn off any water being used in the house
(washers, showers, faucets, etc.).
c. Fine-tune sprinkler spray positions and spray
patterns to match your coverage area.
d.
If coverage is still not complete, go back and
check your system layout against the plans.
e. When you see that the coverage is satisfactory,
fill in the trench.
4. Once you are satisfied with your installation you
can move on to installing your drip irrigation system.
The following chapter gives detailed instructions
for handling this installation.
CONGRATULATIONS!
When properly installed, your Toro automatic
irrigation system will help keep your landscape green
and healthy for years of recreation and enjoyment.
Display
Programming Dial
Valve W ire Connection s
Tr ansformer
Grease Cap/W ire Connectors
Anti-Siphon Valve
Sprinkler
Pump Start Relay
Power
Supply
Min. 5’
spacing
Timer
Pump
12’
I
J
K
OPTIONAL:
CONNECTING A PUMP START RELAY
If your system will get water from a well, water tank, or pond,
a pump start relay lets you automatically activate the pump if
your water supply requires one. For proper function, the timer
must be installed at least 12 feet from the pump and 5 feet
from the pump starter to prevent malfunctions.
INSTALL YOUR TIMER
1. Install the timer in your garage or another convenient
place. If an outdoor location is desired, use an outdoor
cabinet to protect the timer against the effects of weather.
Make sure an adequate power supply is available. Toro
timers require only a standard outlet. (See instructions
included with the timer for details.)
2. If you haven’t already done so, lay the valve wires
in the bottom of the trenches, beneath the pipes.
TIP:
Installing more wire strands than your system currently
requires can be a real time saver. Adding them now is simple,
adding them later after all the dirt is back in place and the grass
is growing is not.
3. Connect the valves to the timer using the valve wires.
a. Take one wire from each valve and connect them to a
common wire. (For ease of identification, use the white
wire as the common.)
b. At the timer, connect the common wire to the
common terminal on the timer.
c. Take the other wire from each valve and connect
them to the timer terminals in sequence.
4. Plug in the timer.
WARNING!
All outdoor electrical connections must be
waterproofed. Use Toro’s Grease Caps/Waterproof Wire Connectors.
12
STEP 3 - INSTALL IT!

APPENDIX
14
Toro 340 MultiStream Sprinklers
are as attractive to watch as they
are effective for watering.
THE RIGHT SPRINKLERS
No matter what your landscape demands,
Toro has the sprinkler family to cover every inch.
TIP:
Select sprinklers with the largest possible radius that is
appropriate and use fewer sprinklers and valves. That means
fewer zones and less trenching.
570
™
SERIES FIXED-SPRAY SPRINKLERS
Radius: 5’-17’
Toro 570™ Series fixed-spray sprinklers
produce a precise, uniform fan of water that’s
ideal for small lawn, shrub and ground cover
areas. Pop-up models disappear when not
in use. Shrub sprays mount above foliage to
water ground cover and shrubs. True matched
precipitation rates and color coding by radius
are just two of the valuable features of
570™ sprinklers and nozzles. Toro has more
than 35 different interchangeable nozzles to
choose from to give you maximum flexibility
and precision.
Perfect for smaller lawn and garden areas.
FLOOD BUBBLER
Radius: 0’-2’
Use the Toro Flood Bubbler for slow, deep
watering around trees, shrubs, vegetable and
flower gardens. Fully adjustable flows from
0 (off) to 2 GPM. Perfect for small groundcover
areas. Toro offers a nozzle model (shown)
and a riser model.
340 MULTISTREAM SPRINKLER
Radius: 15’-33’
Toro’s unique gear-driven 340 MultiStream
sprinklers are recognized by their graceful
“fingers of water.” These slowly rotating
streams are not only attractive; their slower
watering rates minimize run-off. Perfect for
slopes, medium-sized lawns and ground cover.
SINGLESTREAM SPRINKLER
Radius: 34’-48’
Its gear-driven design provides years of smooth,
quiet operation. Perfect for medium-to-large
lawn areas.
A
1
2
3
4
6
7
SELECT YOUR COMPONENTS
Use the information in this section to help you choose the best
sprinklers and components for your system.
PROSTREAM XL
™
SPRINKLER
Radius: 25’ – 46’
With an adjustable radius for full or part
circle watering, the versatile Toro ProStream XL
works with any 4” or 5” rotor on the market.
Perfect for medium-to-large lawn areas.
SIMPLESET
™
SPRINKLER
Radius: 27’-47’
The Toro SimpleSet™ Lawn Sprinkler offers full
and part-circle operation in a single unit. This
closed-case rotary sprinkler is ideal for large lawn
areas and as its name implies, it is simple to set.
UNIVERSAL IMPACT SPRINKLERS
Radius: 25’-45’
Toro Universal Impact Sprinklers are adjustable
from 20°-340° for part-circle operation or 360°
for full circle operation. They are a great choice
for well and dirty water applications and will
supply years of reliable operation.
Perfect for large lawn areas.
5

Toro 1" Jar Top Valves
installed in a valve box.
B
1
2
3
THE RIGHT IRRIGATION VALVES
There are two types of valves: anti-siphon and in-line.
Please check your local codes to determine which is
appropriate in your area.
ANTI-SIPHON VALVES
Anti-siphon valves have backflow prevention devices integrated
into each individual valve to keep the water from the sprinkler
system (and any contaminates) from entering your clean
potable water supply. Anti-siphon valves are always installed
above ground, 6” to 12” above the highest sprinkler or
according to local codes.
IN-LINE VALVES
In-line valves are installed below ground for out-of-sight
operation. When using in-line valves, your system will need to
be protected by an anti-siphon device. Check the local codes.
PRESSURE VACUUM BREAKER (PVB)
A pressure vacuum breaker can be used
with in-line valves to prevent the backflow
of contaminated water into your potable
water supply. Check local codes.
Toro Funny Pipe
®
is high-strength composite poly-tubing that
solves tough sprinkler installation and replacement problems.
Put simply, Funny Pipe
®
acts like a flexible extension cord
between the sprinkler line and sprinkler head, allowing you
to easily position sprinklers wherever you need them.
Whether you are installing a new system or replacing an
old sprinkler head, Funny Pipe
®
can make the job
quick and easy.
C
NOTE:
Do not use more than 4’ of Toro
Funny Pipe
®
with each sprinkler head.
Toro Funny Pipe 50’ Roll
Toro Funny Pipe 100’ Roll
Toro Funny Pipe 24” Stick
Toro Funny Pipe
Flex Assemblies
THE RIGHT ACCESSORIES:
TORO FUNNY PIPE
®
15
APPENDIX

TORO TIMERS
ECXTRA™ TIMER
Toro ECXTRA Timers are unique irrigation
timers that can be programmed using
your PC and include expansion
capability for control and convenience.
Add a zone to any ECXTRA to expand
capacity up to 10 zones for indoor models
or 12 zones for outdoor models.
Toro offers easy to use Scheduling Advisor Software that will
create a watering program based on your specific landscape
characteristics and geographical region. The Toro Time-Pod
conveniently stores your watering program and transfers the
information to your ECXTRA timer.
Other ECXTRA features include...
• Battery-free Backup Protection, using non-volatile memory
protects your schedule and settings in the event of a power
failure.
• Programmable Pump-Start lets the user adjust the delay
between the irrigation pump start up and irrigation system
activation assuring proper water pressure is always available.
• 365-day Calendar manages even the most complicated
municipal water restrictions.
• Seasonal Adjust feature lets the watering schedule be
adjusted for changes in local weather, without the need
for reprogramming
LAWNMASTER™ II TIMER
The LawnMaster II is a feature rich,
simple to install and program timer
that includes:
• 3 Programs for flexible watering according to plant type
• Pump Start relay port for use with well water systems
• 365 day calendar that enables programming based on
municipal water restrictions
• Seasonal adjust to increase watering during hotter months
and decrease watering in cooler months without having to
reprogram
1
2
D
THE RIGHT TIMERS
You are free to use any irrigation timer you choose with your
system, and mount it almost anywhere.
When choosing a new timer, there are just a few
things to keep in mind while you shop:
1. Can it control all the zones I have now and in the future?
Buy a timer that has at least two more zones than you need.
That way you are ready for future expansion without replacing
the timer.
2. How many different programs should the timer run?
A single program timer is not recommended. It is virtually
impossible to create an efficient watering schedule for even the
smallest lawns with just one watering program.
3. How many start times do I need?
As with programs, having multiple start times allows for more
convenience and efficiency while irrigating. Multiple start times
lets you adjust your watering for soil type and plant needs.
4. Should I use an indoor or an outdoor timer?
This is usually a matter of preference, more than need.
Most timers come in both versions, or can be mounted
in after-market housings for outdoor use.
The ECXTRA™
Finally, Timer Programming Made Simple...
and Smart!
*Õ}ÃÊÌ
8/,
Ò
ÊÌiÀ
*Õ}ÃÊÌÊ
V«ÕÌiÀ½ÃÊ
1-Ê«ÀÌ
16
APPENDIX

17
APPENDIX
HOW MANY SPRINKLERS CAN I USE?
When planning an irrigation system, one of the most important
tasks the designer does is figure out just how many sprinkler
heads can be installed on one zone, given the available water
pressure and flow. If too many sprinklers are installed, then
when they are all running, there may not be enough water
available for them to function correctly. This can also adversely
affect the water pressure inside the house. It is better to design
your zones so that you have some “excess” capacity in them.
Then, if needed, you will be able to add a sprinkler or two later
on without needing to change your zones.
An important factor in this “How Many Sprinklers” equation
is the sprinkler pattern you will use. Are they all 90°
Quarter-Circles? Are they Half-Circles? The truth is you will
usually be using a mixture of different patterns with different
flow requirements. This can make things seem a lot more
complicated when you are trying to add the flow up and
figure out your total per zone.
To help you, we have put together a chart that shows you the
maximum number of sprinklers that you can put on one zone,
if that zone has a certain amount of water pressure and flow.
For example, if you are using 570 spray heads and you have 30
PSI at the head of water pressure to work with (called working
or dynamic pressure), you can see that if your system can
deliver 5 GPM at that pressure you can use a maximum of one
15’ Full-Circle on that zone, but up to 5 Quarter-Circles. The
more flow and pressure you have, the more sprinklers you can
install in any zone.
For the exact flow by sprinkler type, refer to the Sprinkler
Performance Chart on the right.
HOW MANY SPRINKLERS CAN I USE?
Gallons Per Minute (GPM)
5 GPM 8 GPM 12 GPM 15 GPM
570 Series Sprayheads (@ 30 PSI)
15’ Quarter Circle (90°) 5 9 14 17
15’ Half Circle (180°) 3 4 7 9
15’ Full Circle (360°) 1 2 3 4
Single Stream & SimpleSet Rotors (@ 45 PSI)
30° to 120° (1.5 Nozzle) 3 5 8 10
121° to 240° (3.0 Nozzle) 1 2 4 5
241° to 360° (6.0 Nozzle) 0 1 2 2
MultiStream Rotors (@ 35 PSI)
90° 3 5 8 10
135° 2 3 5 6
180° 1 2 3 4
270° 1 1 2 3
360° 0 1 1 2
Universal Impact Rotors (@ 30 PSI)
90° (Orange Nozzle) 3 5 8 10
120° (Red Nozzle) 2 4 6 7
180° (Black Nozzle) 1 2 4 5
270° (Blue Nozzle) 1 2 3 3
360° (Green Nozzle) 0 1 2 2
* pressures are based on working pressure at the head
* all measurements based on Class 200 PVC for all lateral pipes
PSI: Pressure Per Square Inch (Working Pressure)
GPM: Gallons Per Minute
Universal Impact
Sprinkler-40
MODEL # PSI SPACING GPM
53720 40 37’ 2.2
Universal Impact Sprinkler
MODEL # PSI SPACING GPM
53722 40 40’ 4.4
SPECIAL PATTERN
(ORANGE)
PATTERN PSI GPM W x L
30 1.20 9’ x 18’
SIDE STRIP 30 0.90 4’ x 30’
CENTER STRIP 30 0.90 4’ x 30’
END STRIP 30 0.45 4’ x 15’
SimpleSet™
Lawn Sprinkler
MODEL # PATTERN PSI SPACING GPM
53674 90° 40 37’ 1.5
180° 40 40’ 2.5
360° 40 37’ 5.0
ADJUSTABLE FLOOD BUBBLER
MODEL # PATTERN FLOW
53692 360° 0-2.0
GPM
570
PC ADJUSTABLE BUBBLER NOZZLE
MODEL # PATTERN FLOW
53786 360° 0-2.0
GPM
MODEL # PSI SPACING GPM NOZZLE PATTERN
53721 40 35’ 1.8 Orange 90°
37’ 2.2 Red 120°
39’ 3.6 Black 180°
41’ 4.2 Blue 270°
43’ 6.5 Green 360°
Universal Impact
Sprinkler-45
SPRINKLER PERFORMANCE CHARTS
570™ Series Nozzles
5’ SERIES WITH 0° TRAJECTORY
(RED)
PATTERN PSI GPM RADIUS
90° 30 0.09 5’
180° 30 0.19 5’
360° 30 0.38 5’
SPACING
MODEL # PRESSURE 18 FT. 26 FT. 33 FT.
53757 (Lawn), 50 PSI 3.7 GPM 5.6 GPM 7.5 GPM
53758 (Shrub),
53759 (High-Pop)
Note: The water flow in GPM (Gallons Per Minute) is based on a
full circle (360°) spray pattern. The flow will vary depending on the
spray pattern used. For example, the flow through a 180° pattern
is about half of a 360° pattern, and a 90° pattern has roughly one
quarter the flow of a 360° pattern.
340 MultiStream Sprinkler
– based on full circle spray Pattern
STD. MODEL- 45 PSI
NOZZLE PATTERN FLOW - SPACING
Orange 53739 - 90° 1.0 GPM - 40’
Black 53738 - 180° 3.0 GPM - 41’
Green 53737 - 360° 6.0 GPM - 43’
Black 53715 - Adj.* 3.0 GPM - 41’
*Orange and green nozzles included 3.0 GPM
installed and set to 180°
SingleStream Sprinkler
8’ SERIES WITH 5° TRAJECTORY
(GREEN)
PATTERN PSI GPM RADIUS
90° 30 0.24 8’
180° 30 0.50 8’
360° 30 1.00 8’
0-360° 30 3.2 9’
10’ SERIES WITH 12° TRAJECTORY
(BLUE)
PATTERN PSI GPM RADIUS
90° 30 0.40 10’
180° 30 0.71 10’
360° 30 1.49 10’
0-360° 30 3.9 11’
12’ SERIES WITH 23° TRAJECTORY
(BROWN)
PATTERN PSI GPM RADIUS
90° 30 0.50 12’
180° 30 1.09 12’
360° 30 2.19 12’
0-360° 30 3.22 12’
15’ SERIES WITH 27° TRAJECTORY
(BLACK)
PATTERN PSI GPM RADIUS
90° 30 0.85 15’
180° 30 1.65 15’
360° 30 3.60 15’
0-360° 30 3.82 13’
E

18
FREQUENTLY ASKED QUESTIONS
1
2
3
4
FREQUENTLY ASKED QUESTIONS
SYSTEM DESIGN
Q: How do I get started?
A: You can design your system yourself or take advantage
of the Toro Design Service. In either case, you will
need some basic information (see pages 1-8).
Q: How long will it take to install my system?
A: After you have your completed design and have parts
in-hand, it will take an average* of 2-3 days (about
1-2 weekends). *(Average home lot size of ¼ acre)
Q: If I have my plans prepared, how
quickly will I get my design?
A: It will take approximately 2 weeks to get your design
back. Or for the cost of shipping, you can have
your plans sent 2 Day Express (call 800-891-0742).
You can check the status of your design, view
and print your plans at www.torodesign.com
Q: How much will it cost for my sprinkler system?
A: If you have a professional contractor install your system, you
can expect to pay at least 2-3 times more than if you do it
yourself. Typical cost for doing it yourself may be between
$800 and $1,600*. Every home is different.
*(Average home lot size of ¼ acre)
INSTALLATION
Q: How far apart do I space the sprinklers?
A: To ensure proper watering of your lawn, water spray
from one sprinkler head must reach the next sprinkler
head (head-to-head coverage). If you space heads too far
apart and do not have head-to-head coverage, you will
end up with brown spots (dying grass) (see page 7).
Q: Can I mix different heads on the
same zone (same valve)?
A: No. You should avoid mixing small and large area sprinklers
on the same zone because they have different watering
amounts and will cause over and under watering.
Q: How many sprinklers can I put on one zone (one valve)?
A: Your water pressure and water flow will determine the
maximum number of heads that can be used. Too many
heads on a zone will create low pressure in your system and
will cause the heads to work improperly (see page 27).
Q: What type of pipe should I use to connect the system?
A: You can use either Polyvinyl Chloride (PVC) or
Polyethylene (Poly) Pipe. In freezing climate areas, you
will generally use Poly Pipe. Consult your local codes to
find out what’s required in your area (see page 11).
Q: How do I install drip or micro-irrigation?
A: You will start by connecting to the water source. In addition
to the valve, Drip or micro-irrigation requires a filter and
pressure regulator to protect the small emitters (drippers).
Then you connect the ½” Drip Tubing. Next you decide on
the best method to water your plants. Refer to Toro’s Blue
Stripe Drip Planning & Installation Guide for more details.
VALVES
Q: How do I hook up my valves?
A: Valves connect to your timer with simple wiring. Each
valve has 2 wires; choose 1 as the zone wire, and the white
wire as the Common wire. Use 18-gauge multi-strand wire
if the distance between the timer and valve is 1000 feet
or less (Refer to the chart below on this page for longer
distances). Always use more strands than you need for
future expansion. (Wire sold separately.) (see page 14)
Q: When I connect my valves to PVC, do I use glue?
A: Most valves will connect to the sprinkler system with a
PVC connector with male threads. Simply screw the male
connector into the valve. Use primer to prepare the pipe
and fitting, then glue the other end of the PVC connector
to the rest of the pipe flowing to your system (see page 11).
Q: How many valves will I need?
A: You need 1 valve for each zone.
Q: How do I determine what type of valve I need?
A: Local water regulations determine the type of valve
you need. Call your local water company to determine
what is required in your area (see page 12).
TIMERS
Q: How do I hook up my timer?
A: Your timer connects your valves with simple wiring
connections. From your timer, you will have 1 common
wire (white) that will link all valves together, and 1
colored wire for each individual valve (see page 14).
Q: How do I determine what type of timer I need?
A: There are four factors to consider:
1: How many zones (valves) you have.
(Hint: always leave room for expanding
your system as your landscape expands).
2: How many programs or watering schedules you need.
Simple timers have one or two programs. For the most
efficient watering, select a timer with 3 programs.
3: How many start times do you need?
Select a timer with 3 or more start times.
4 : Location of the timer: select indoor or outdoor.
Consider the ECXTRA™ with the ability to be
programmed using a home computer (see page 25).
TIMER TO VALVE
WIRE SIZING CHART
Gauge Maximum Distance
18 1000 ft
14 1450 ft
10 1750 ft
6 1930 ft

The tips listed below will help you get the most from your new Toro irrigation system. Please pay
special attention to the water conservation tips. Conserving water is not only the right thing to do
for the planet; it is also the right thing to do for your budget.
1
WATER CONSERVATION
• Always use “head-to-head coverage” in your irrigation
system.
• Keep the soil consistently moist but not wet. This eliminates
runoff, and ensures your plants a steady supply of water.
• Do not water at night - water will sit on the lawn and may
cause disease.
• Water in the early morning - evaporation is minimized and
the lawn utilizes the most water.
• Do not water midday – evaporative loss is at its greatest.
• Create multiple programs for your irrigation system – this
allows you to water most efficiently.
• Install a rain sensor – it will prevent the system from
running during rain.
• Use drip irrigation in flower beds - it saves substantial
amounts of water.
• Reduce run times for zones in the shade.
• Allow grass to grow before mowing -
this reduces
water usage.
• Practice “grass cycling”- this reduces evaporative water loss
from the lawn, while reducing the need for fertilizer.
• Sharpen your mower blade - sharp blades are easier on the
grass and save water.
• De-thatch your lawn - water will get to the roots faster and
evaporate less.
• Aerate your lawn - it prevents soil compaction and allows
water to soak in faster.
• Keep plants with different watering needs on different zones
– trees vs. lawn, etc.
• Plant native species - native plants do better and need less
special care than exotics.
• Mulch flowerbeds and trees - it reduces evaporation and
controls weeds.
• Know your soil type - the three basic types: sand, loam, and
clay require different watering schedules for optimal results.
By implementing these conservation tips,
your water use can be cut dramatically.
2
WATER SCHEDULING
For best results, create a weekly watering schedule. Figure out
your total weekly watering needs (run times). Divide those
runtimes into watering days, and if your timer supports multiple
start times, by that number.
For example, if the weekly watering requirement for one zone is
65 minutes a week, you would water 9-10 minutes every day or
16-17 minutes every other day. It is better to water for shorter
periods, but to do it more often. This allows the moisture level
in the soil to remain constant. Also, consider the type of soil
you are watering. If you have sandy soil, longer runtimes may
be better, whereas with clay soils, you will need to apply water
more slowly and use more start times.
The key is building the most flexibility into your system possible,
and using that flexibility to create the most precise schedule you
can. Precision equals performance and water savings.
3
WINTERIZATION PROCEDURES
FOR COLD CLIMATES
The water supply should be turned off at the main valve and
the irrigation timer should be set to the “Rain” or “Off” setting.
Each valve should be turned on manually to release pressure
and water in the pipes. This is done to protect any components
that could freeze.
Your irrigation system may have manual or automatic drain
valves that need to be opened for proper drainage, make sure
the drain valve is pointing downward to facilitate flow or the
system will have to be blown out using compressed air.
Do not exceed 50 PSI of air pressure.
WARNING!
We recommend hiring a professional when
winterizing with compressed air.
* Follow the recommended winterization instructions included
with your sprinkler timer.
INSTALL A RAIN SENSOR
A rain sensor saves water by shutting
down your irrigation system temporarily
when it rains without erasing your
programs. It is easy to attach to
roof eaves.
INSTALL DRIP-IRRIGATION
Install a Drip-Irrigation system using Toro’s
Blue Stripe
®
Drip Products to save time,
money and water. Refer to pages Toro’s
Blue Stripe Drip Planning & Installation
Guide for more information.
19
TIPS

The Toro Company
8111 Lyndale Avenue South
Bloomington, Minnesota 55420
Toro Helpline: 800-367-8676
Toro Web site: www.toro.com
© 2008 The Toro Company
All Rights Reserved • Printed in the USA
Model # 53655
